First steps with resmio
Table of contents
Once you sign up for free at resmio, you will get access to your account. With the start of your 30-day trial period, you can get to know all the features at your leisure.
To make it easy for you to find your way around, we will first go into the most important controls of resmio’s User Interface.
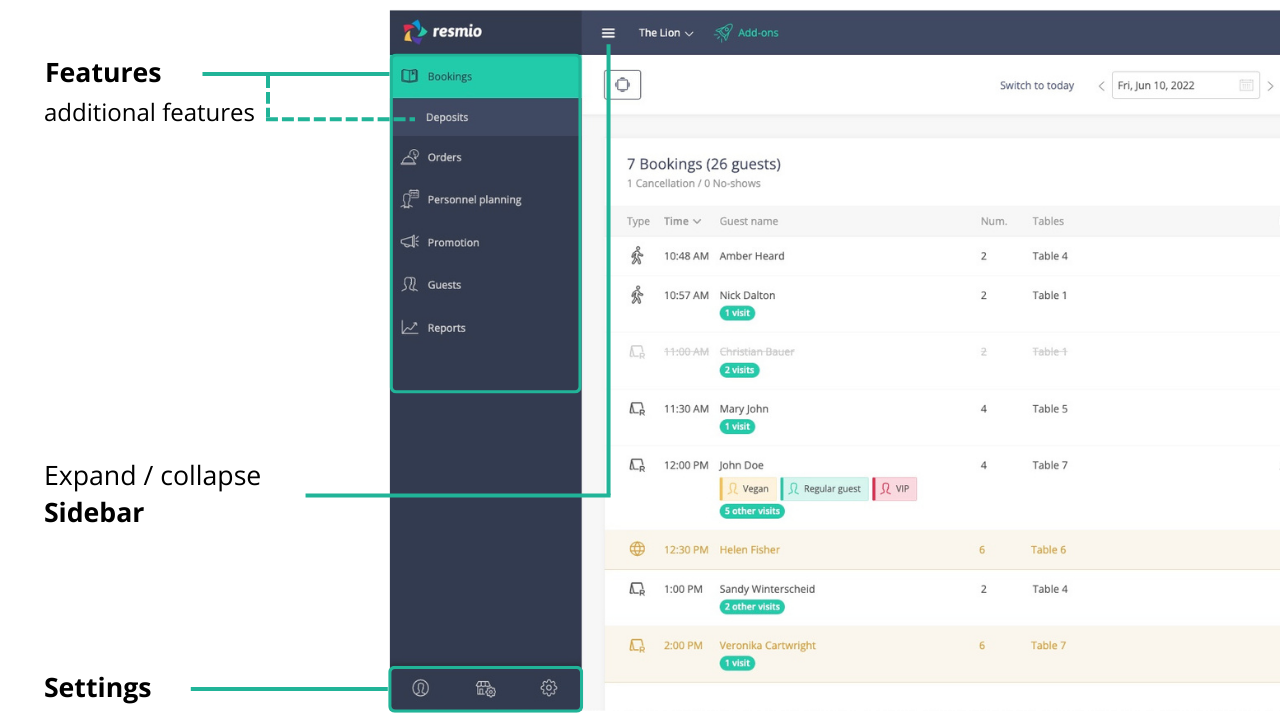
The sidebar gives you quick access to all important features of resmio. The sidebar can be hidden by clicking on the “burger icon” if desired. This will give you a better overview.
Use the bar at the bottom left to access the most important settings for your account. For example, you can set your booking times and capacities, add new users and view potential invoices.

The quick access bar is especially helpful for your daily work with resmio.
- Using the
 “New booking” button, you can add a booking by phone (or bookings by email) to your table reservation system in just a few seconds.
 - The“New walk-in” button is intended for spontaneous visits without a booking.
- If you have activated thewaitlist, you will find registered guests under the menu item.

Your digital reservation book is the heart of your daily work: This is where all your bookings (offline and online) come together in one central place. This way, you and your staff are always informed and can devote yourselves to the daily business in a more organized way.
A significant benefit for you at resmio is the partner network. With resmio, your restaurant is automatically listed in local business directories and portals (including Gelbe Seiten, Golocal, Das Örtliche, speisekarte.de).
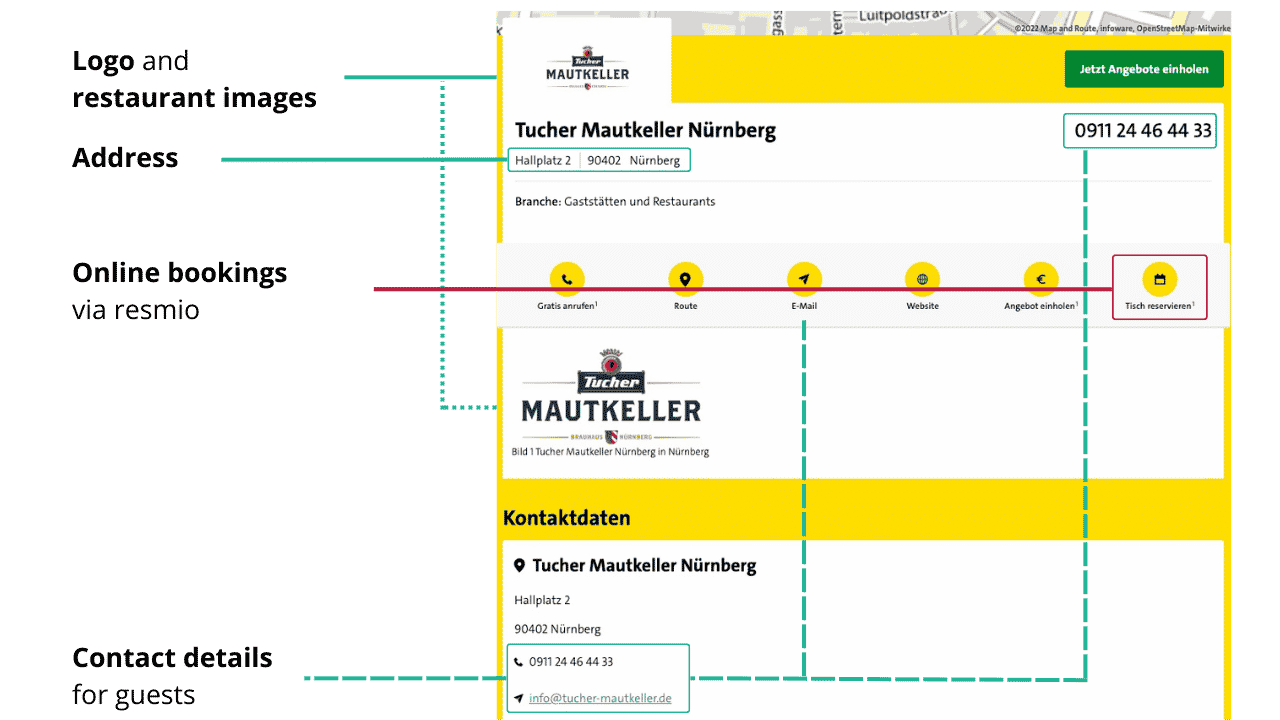
How to complete your restaurant profile:
- In the overview within the sidebar, click on the central “Facility account” icon at the bottom and then switch to “Profile“.
- Next, enter information about your restaurant under “Basic settings”: a short description of your venue, your logo and images of your restaurant (e.g. ambience, food).

- The “opening hours” are particularly important. Since these are shared via our partner network, for one, you should keep them as up to date as possible.
- You can provide more details about your restaurant under “Details” and “Social Media“. Your entries are visible to guests who find your restaurant via the resmio partner network.
We distinguish between ” booking times” (online and manually submitted reservations) and “opening hours“.
- “Booking times” define when your restaurant is available for bookings (online). Our reservation widget, which you can embed on your website, takes the time slots specified there as a reference.
- “Opening hours” are more general and are part of your business profile. Among other things, the opening hours are mapped in our large partner network for your guests and may differ from the booking times.
- Example: Your restaurant is open daily from 14:00 – 22:00, but the kitchen is only open from 16:00 to 20:00.
- Opening hours here are: 14:00 to 22:00, the reservation time could be 16:00 to 20:00.
Before you start taking bookings via resmio, it is important that you provide the booking times and capacities of your restaurant. This is the only way for the system to know if and when seats are available in your restaurant.
You can change the basic settings for this under![]() „Settings” > „Bookings” > „Booking hours & capacities”.
„Settings” > „Bookings” > „Booking hours & capacities”.
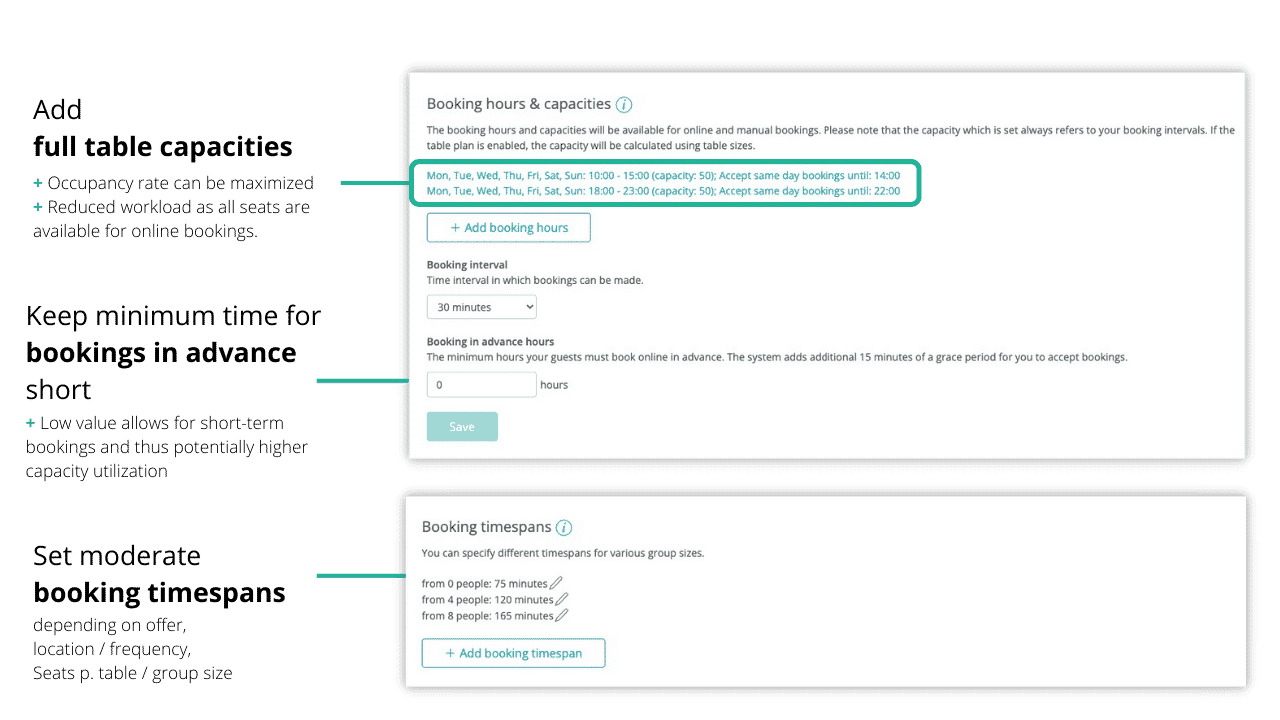
You should also consider the following settings.
- Lead times for bookings
- Period of stay for bookings
- Booking interval, if needed
The ideal settings vary from restaurant to restaurant. As soon as you have gained some experience, you should make adjustments if necessary.
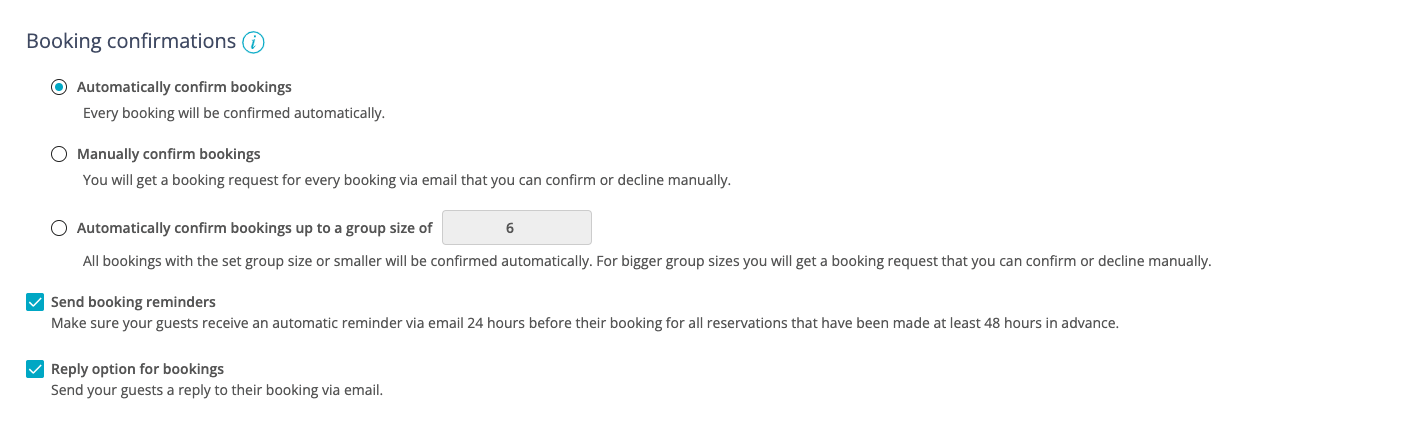
resmio confirms newly received online bookings automatically by default. This leads to shorter response times for booking requests and thus saves time and reduces the workload of your staff!
If you want to customise booking confirmations, you can do so under![]() „Settings” > „Bookings” > „General”.
„Settings” > „Bookings” > „General”.
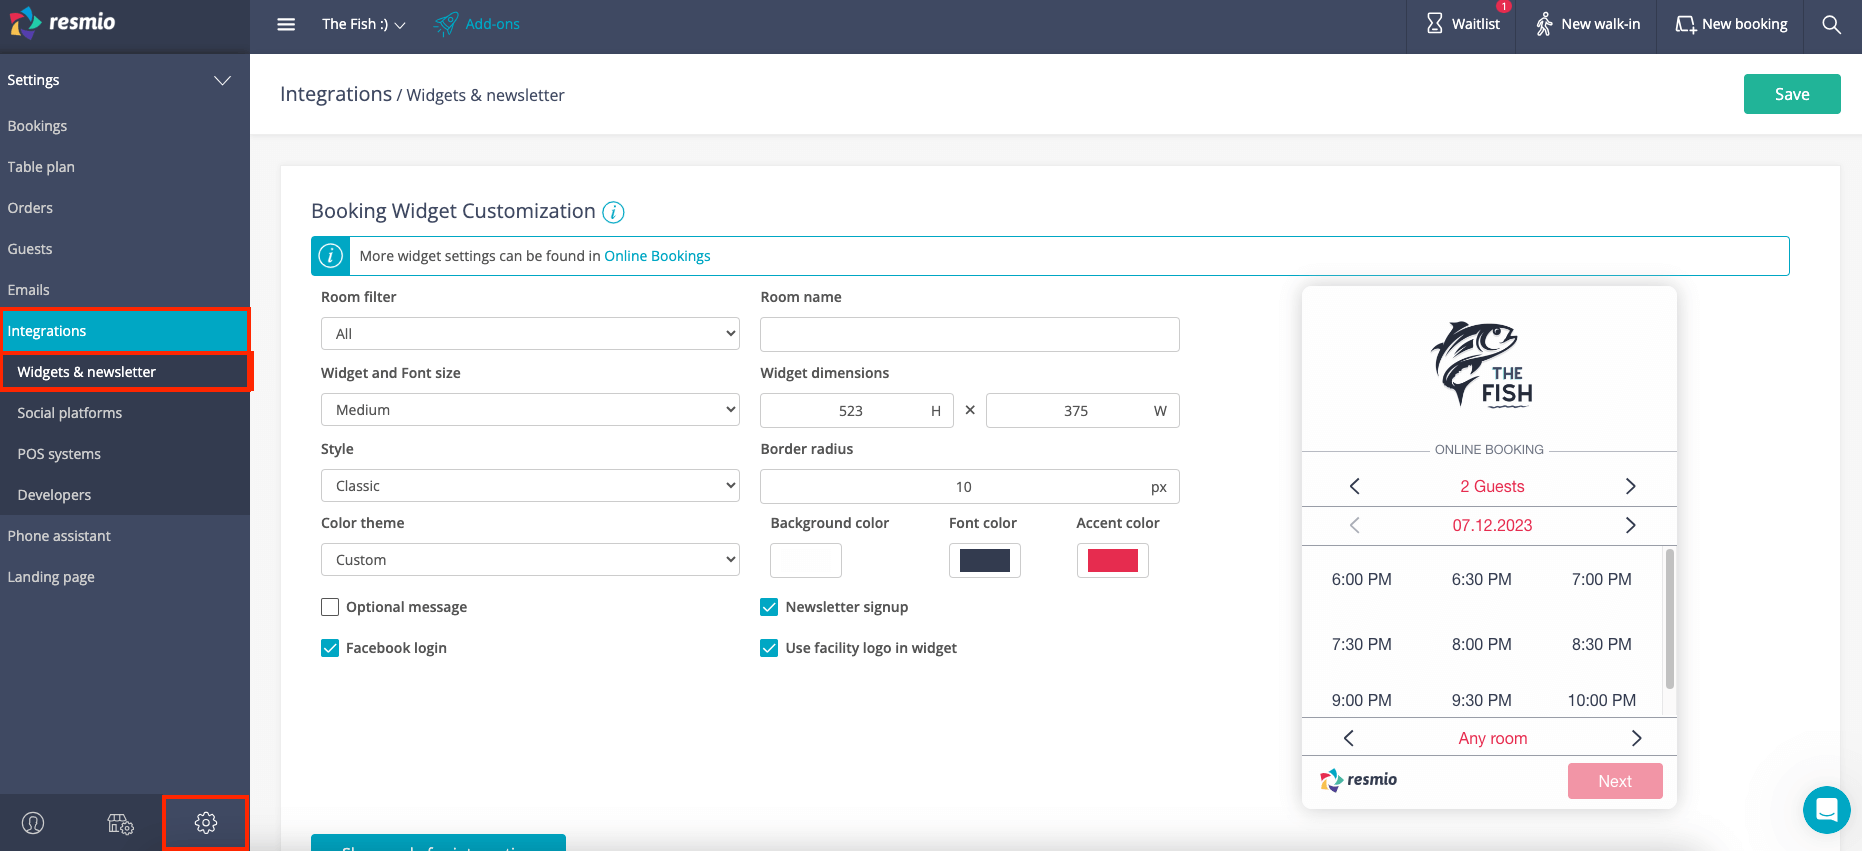
Certainly you want to get online reservations directly through your website, Facebook and Instagram! For this, you need to include your personal booking widget on the respective channel.
- You can find the HTML code / link to the integration under “Settings” > “Integrations” > “Widgets & newsletter“.
- If you are not familiar with HTML, we’ll show you step by step how to integrate resmio. Click on one of the tiles just below this post.
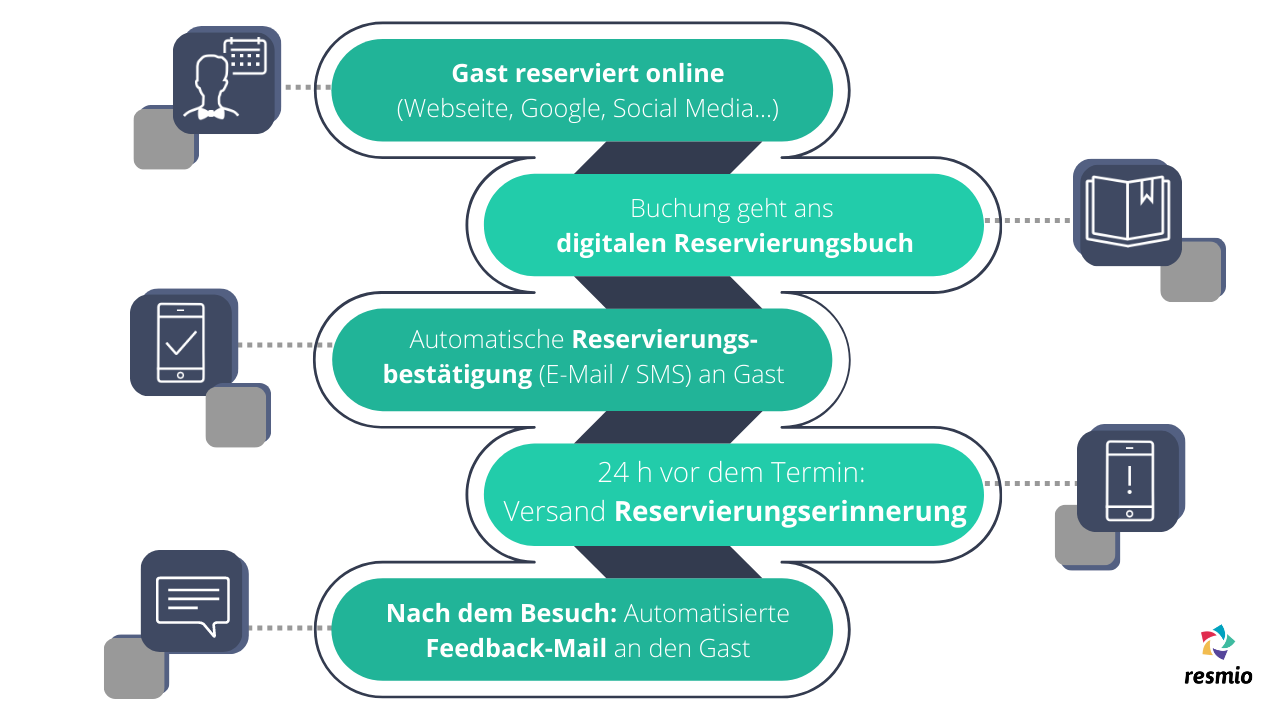
Guests who want to reserve a table at your restaurant can do so with resmio, e.g. right on your website or your Facebook page. For your website, it is best to embed the resmio reservation widget prominent on your website.
- Using the widget, guests can check your capacities themselves and then make a booking at their preferred time – provided your capacity is sufficient – with the previously chosen party size.
- After the guest has completed their online reservation, you will be notified immediately by e-mail and/or SMS.
- At the same time, your guests will automatically receive confirmation of their reservation by e-mail and/or text message.
- New bookings are then shown in your online reservation book in a clearly organised manner. If the option “Send booking reminders” is active, guests will also receive a reminder e-mail and/or SMS one day before their visit.
- Once the feedback feature is enabled, guests will be sent an email asking for feedback on the food and service after their visit. You can view the results of all feedback in your account under “Guests” > “Feedback“.


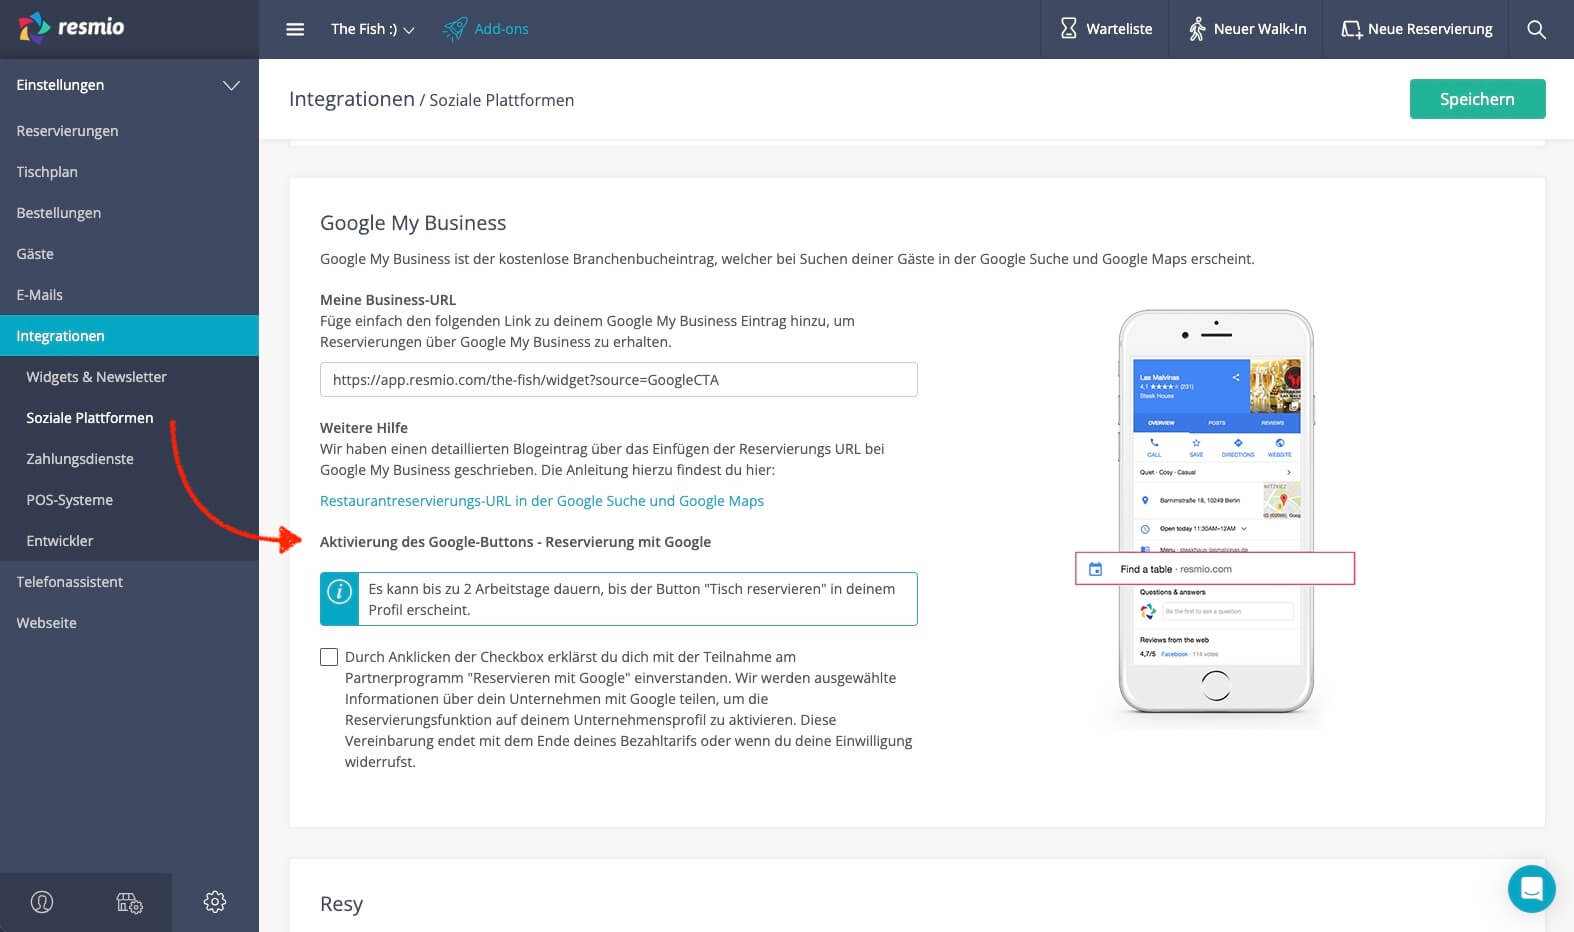
To enable the “Reserve a table” button in your Google business profile, your restaurant must fulfill the following requirements:
- Your restaurant has an active business profile on Google with a gastronomic business category such as restaurant, café or equivalent.
- You agree to participate in the “Google Reserve” program and the associated data processing via your resmio account.
You can give your consent for Google Reservations via ![]() „Settings” > „Integrations” > „Social platforms“. To do so, click on the appropriate checkbox.
„Settings” > „Integrations” > „Social platforms“. To do so, click on the appropriate checkbox.
In addition to the button, we recommend adding a direct booking link to your reservation widget in your Google Business profile. We show you how to do this in the instructions.
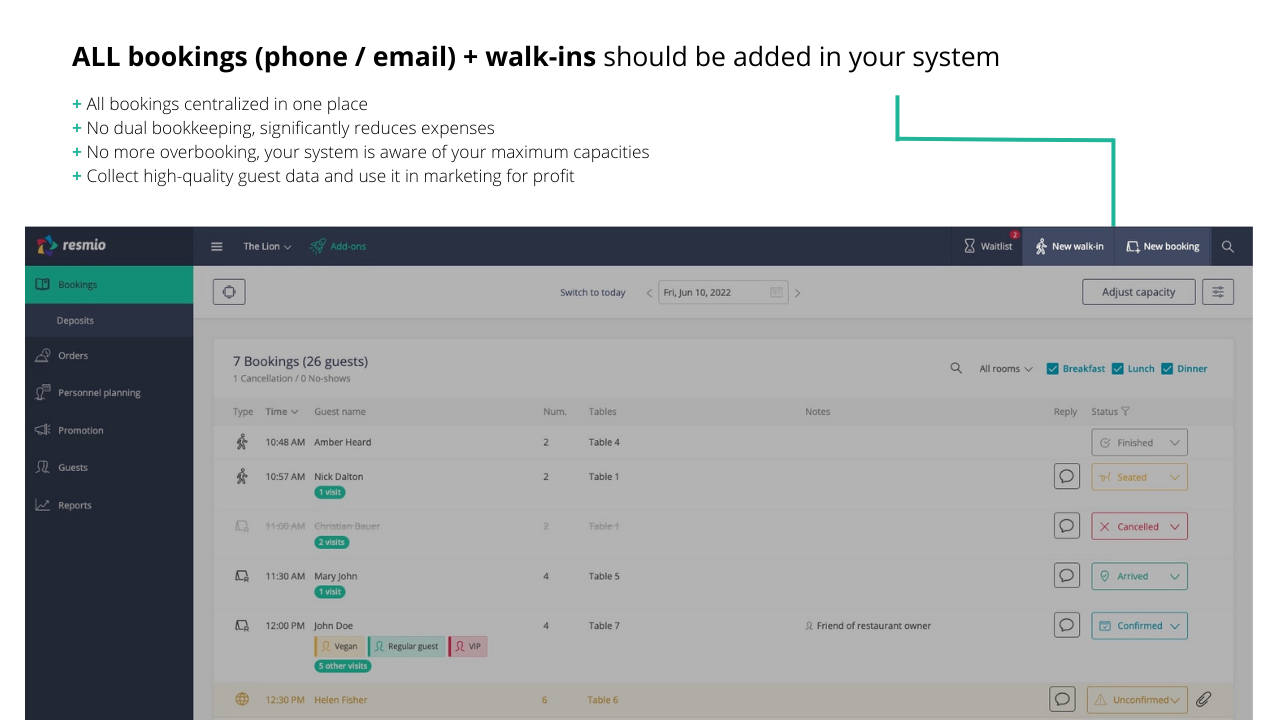
Now you’re ready to start accepting online bookings. But…
Only by adding phone and email reservations and walk-ins to your digital reservation book will you be able to maximise your table occupancy and drive more revenue.