Digital Menu and Ordering
Table of contents
Set up ordering system
- What types of ordering options can I offer my guests?
- How do I make settings for orders for pickup?
- How do I make settings for delivery orders? / How do I set the delivery area?
- How do I make settings for orders at the table?
- How can I use the QR code (table orders)?
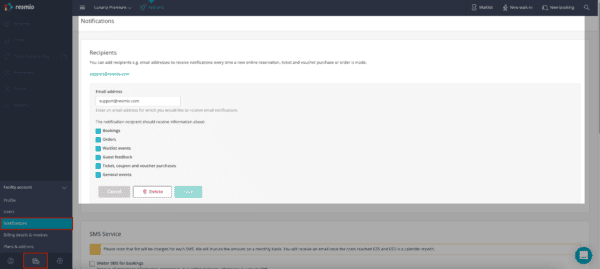
- How will I be notified about the arrival of a new order?
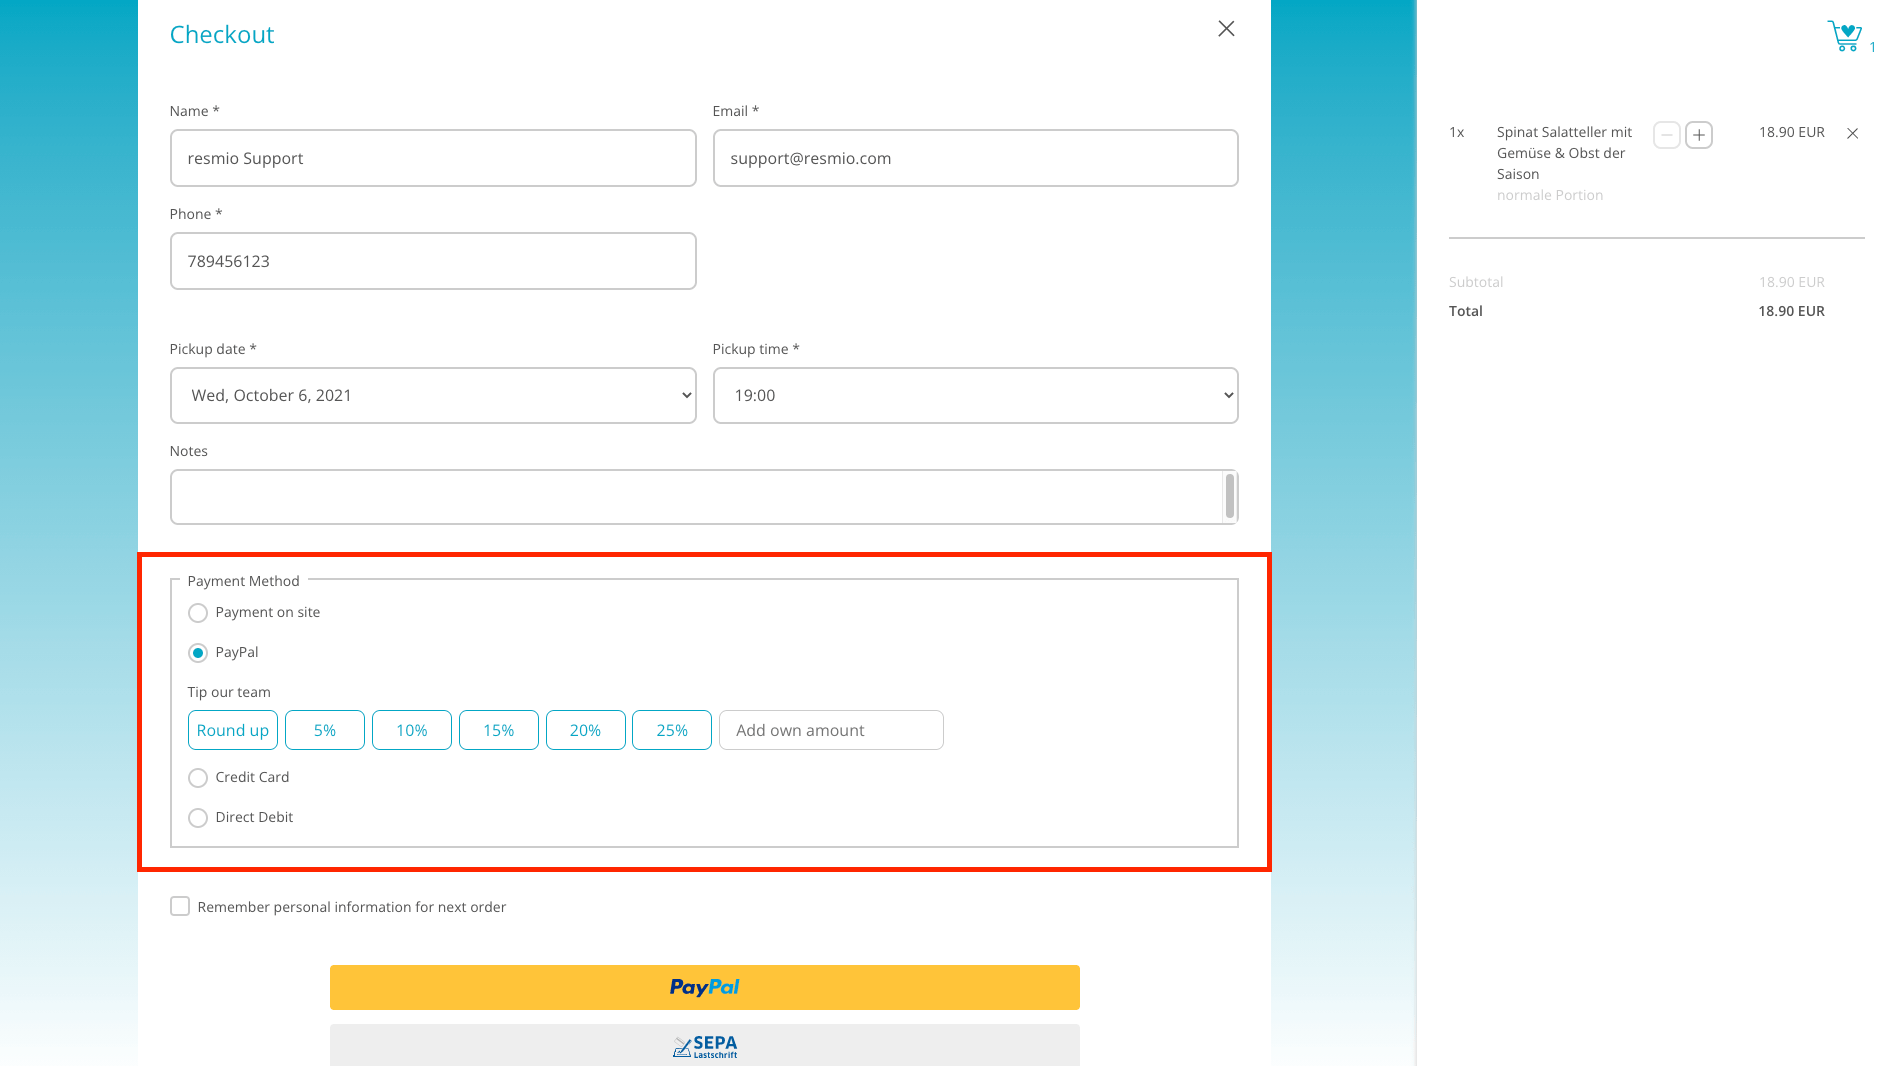
- Can my guests tip me directly during the order process?
- Where can I see the orders of my guests?
- Is there a possibility to get an overview of the products?
The digital menu is the shop window to your restaurant. And what is the purpose of a shop window? To arouse interest and entice people to buy. Without a doubt, you’ll want to make sure your venue has a welcoming feel for guests. From the bright, friendly entryway to the meticulously arranged, set tables to the service reception, everything should literally scream, “Step inside, make yourself at home!”
Why shouldn’t you make the same demands on your shop window on the Internet? And thereby increase your potential to attract new guests to your restaurant and thus increase your sales! That’s why it’s important to give the digital menu at least the same care as the paper menu at the table.
Categories & Products
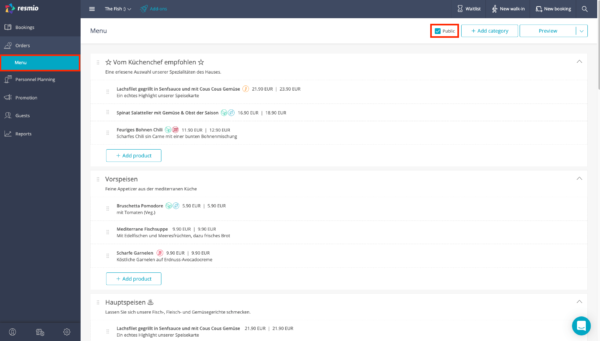
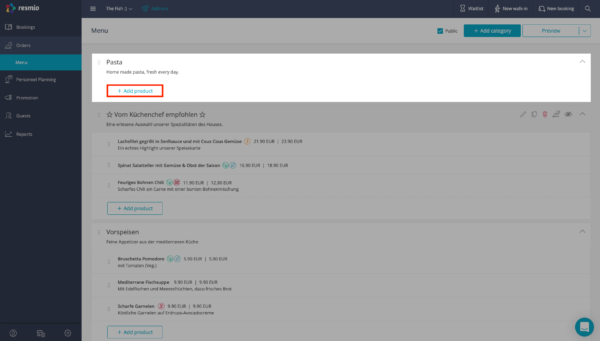
The digital menu is generally composed of categories (e.g. Pasta) and assigned products / dishes (e.g. Spaghetti Napoli).
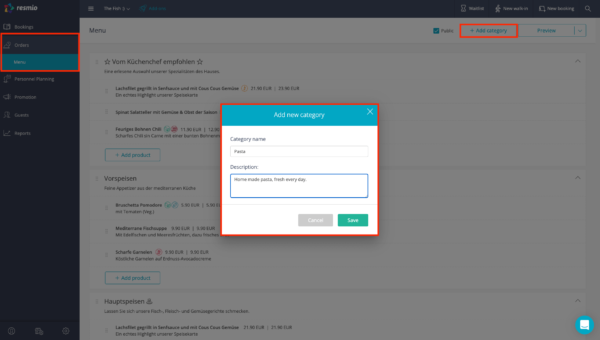
- To create your menu select
 “Orders” in the menu on the left hand side and then click on “Menu“. Select “+ Add Category” in the upper right corner and a new window will open where you can add a name and (optionally) a description.
 - Below the category you can now create your individual dishes. In order to do that click on “+ Add product”.
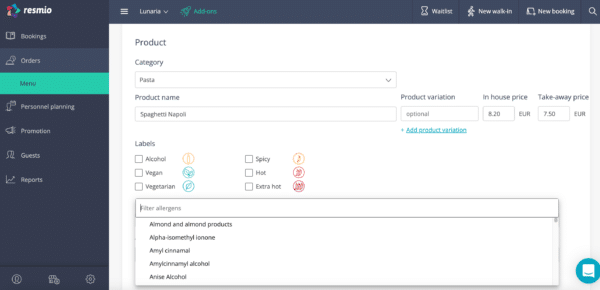
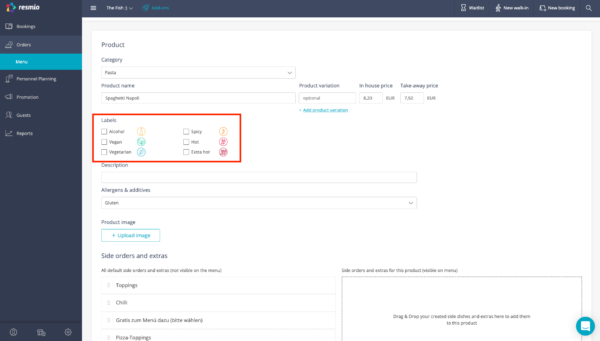
- In the new window you can now add the name, price and a description (e.g. ingredients).
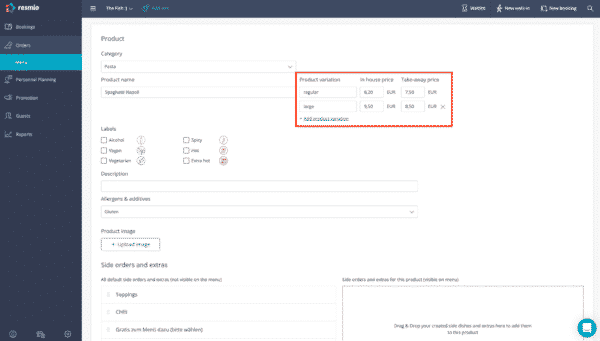
- You also have the possibility to add product variations. To do so, click on “Add product variation” and add product variations (e.g. different portion sizes) as well as the respective price.
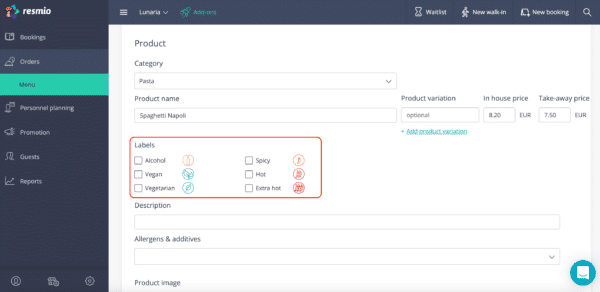
Label additives
- Below “Allergens & additives” you will find a pre-selection of substances that require labeling.
- By clicking on the respective additive, you can select or deselect it.
- Below “Labels’‘ you can add tags to your dishes and beverages. Place a checkmark next to the respective label.
- You can choose between: alcohol, vegan, vegetarian, spicy, hot, extra hot.
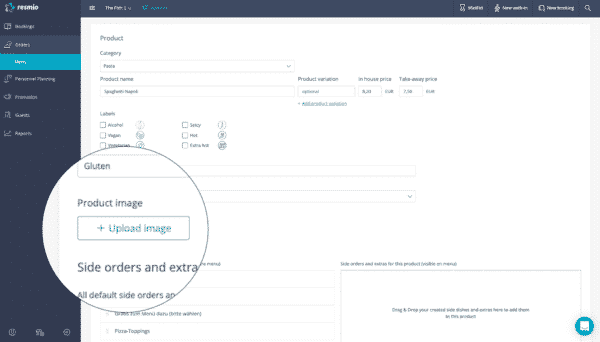
Product photo
It’s no secret: high-quality photos of your dishes will awaken appetite and tempt customers to buy.
- Below “Product image” > “+ Upload image” you can upload a file that has at least a dimension of 2400 x 1600 px and is not larger than 10 MB.
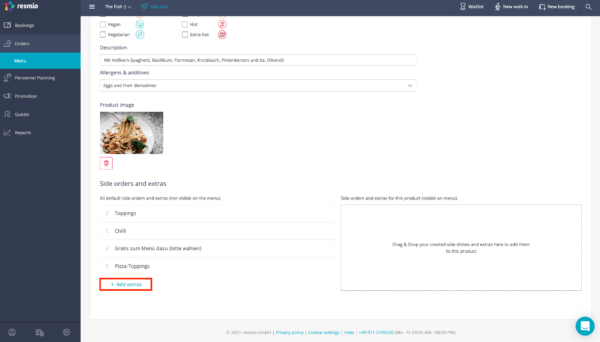
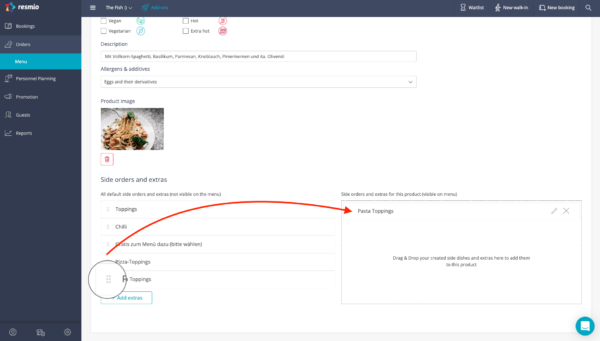
Side orders and extras
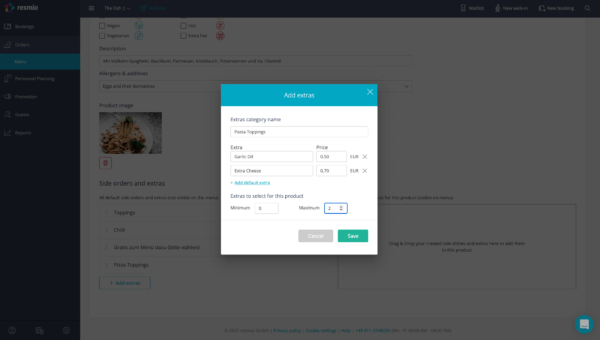
- You can also create “Side orders and extras” and set individual prices for them.
- To do this, click on “+Add extras” at the very bottom of a product. Then you can give the extras a name (e.g. Pizza Toppings) and add the different items with their respective prices.
- You can also set a minimum and maximum to determine how many extras your customers can add.
- After you have saved the side orders and extras, you can add them to the individual products. To do this, drag the extra category from the left side to the right box called “Side orders and extras for this product”.
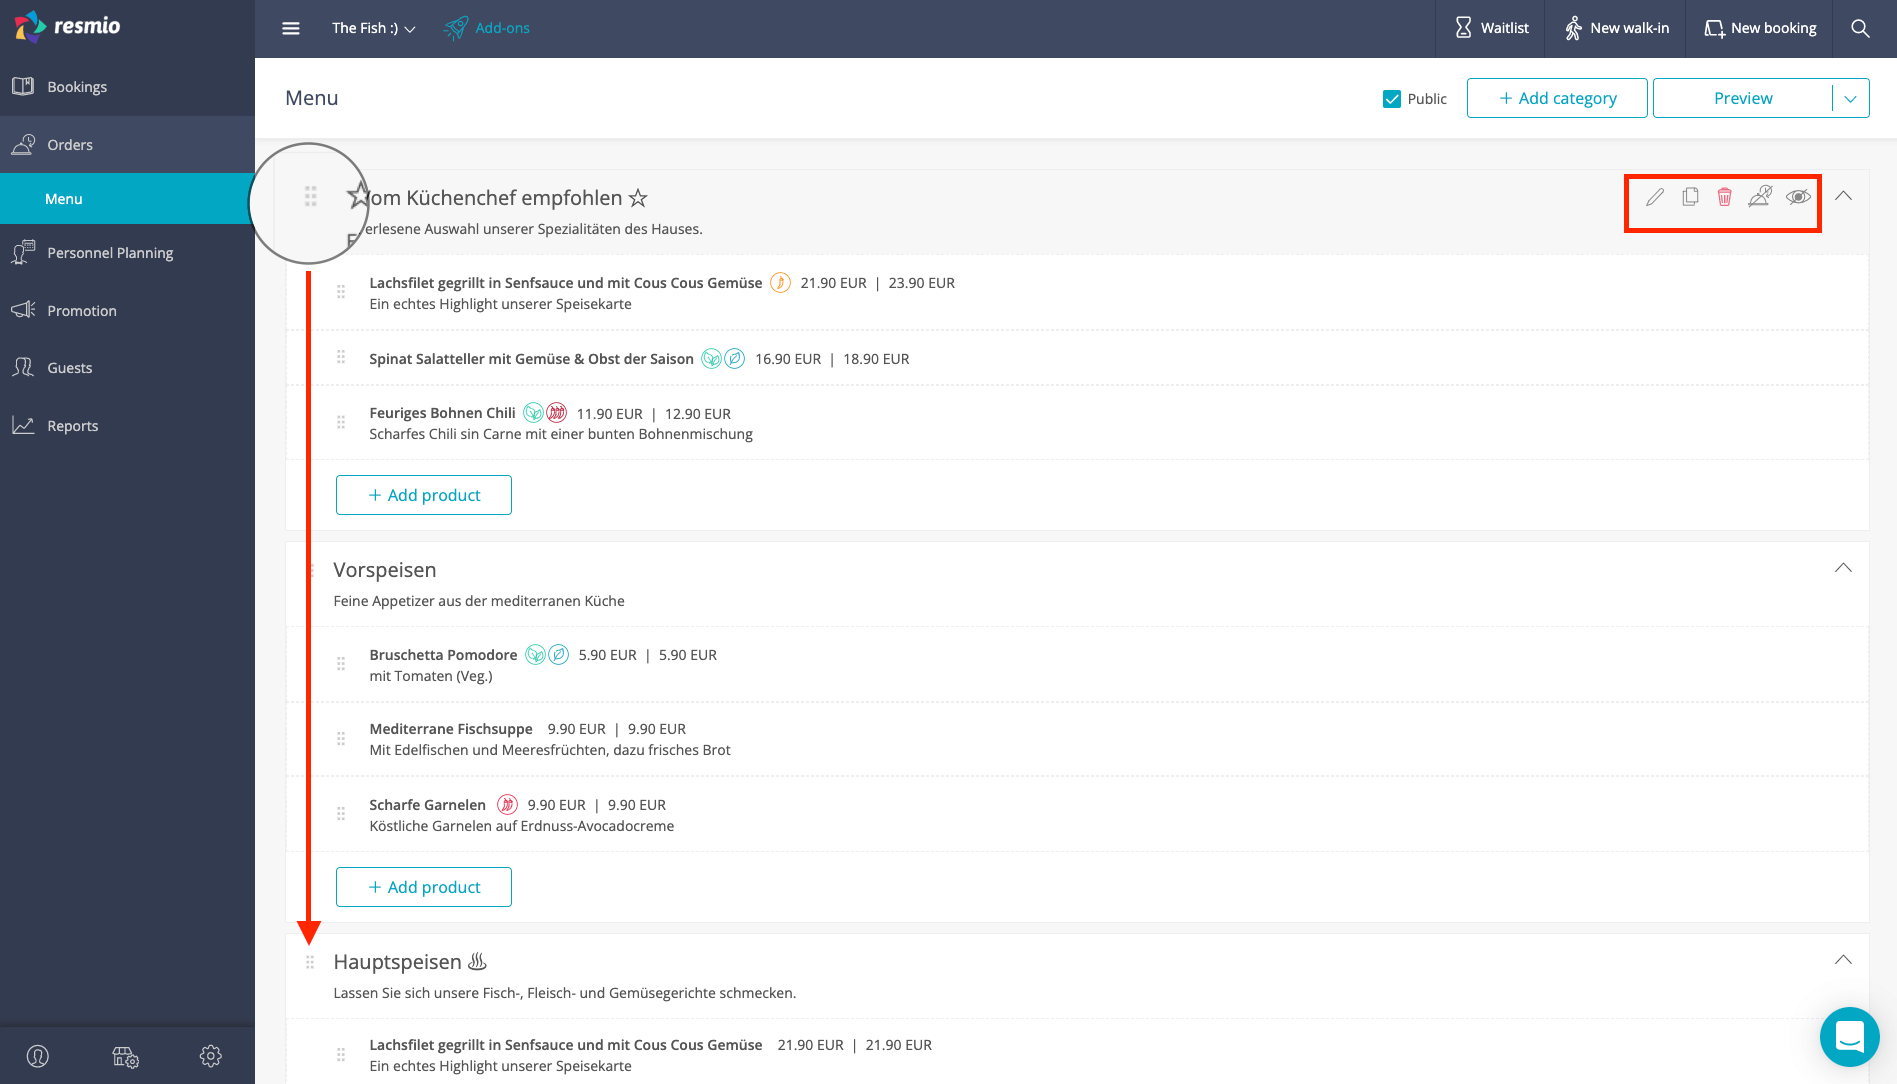
You want to change the position of a category/product? Click on the corresponding dot icon next to the category name/product name and move the category together with all products or the single product to the new preferred position.
When you hover your mouse over the categories and products, an edit bar will appear on the right hand side. There you have the option to duplicate, delete, exclude for orders or hide the items completely.
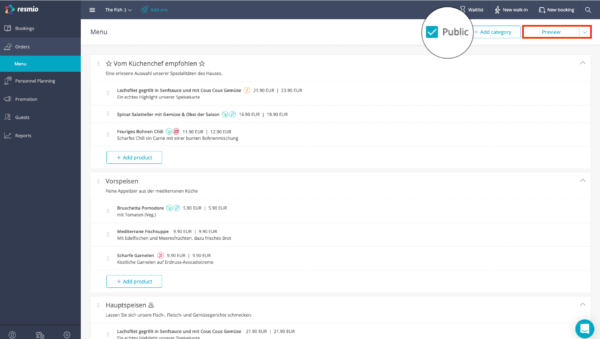
- In the first step, you have to check the “Public” box in the top right corner of the menu.
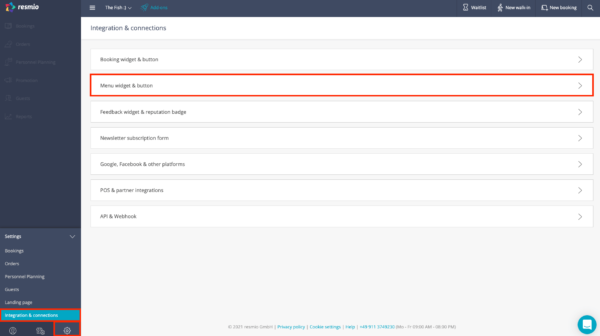
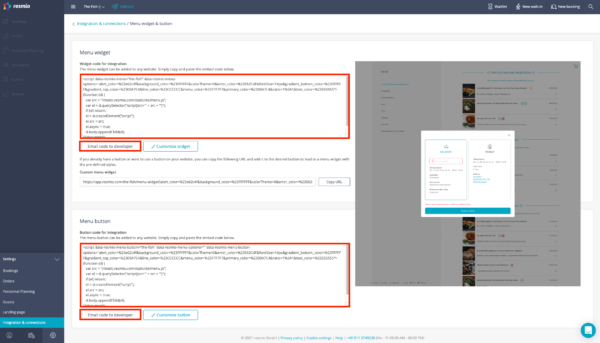
- Then go to “Settings” > “Integrations” > “Widgets & newsletter” > “Menu widget”. Here you can choose between the integration as widget, link and button. Which method is suitable differs from channel to channel.
Here you can find the respective instructions:
https://www.resmio.com/help/first-steps-faq/#widget

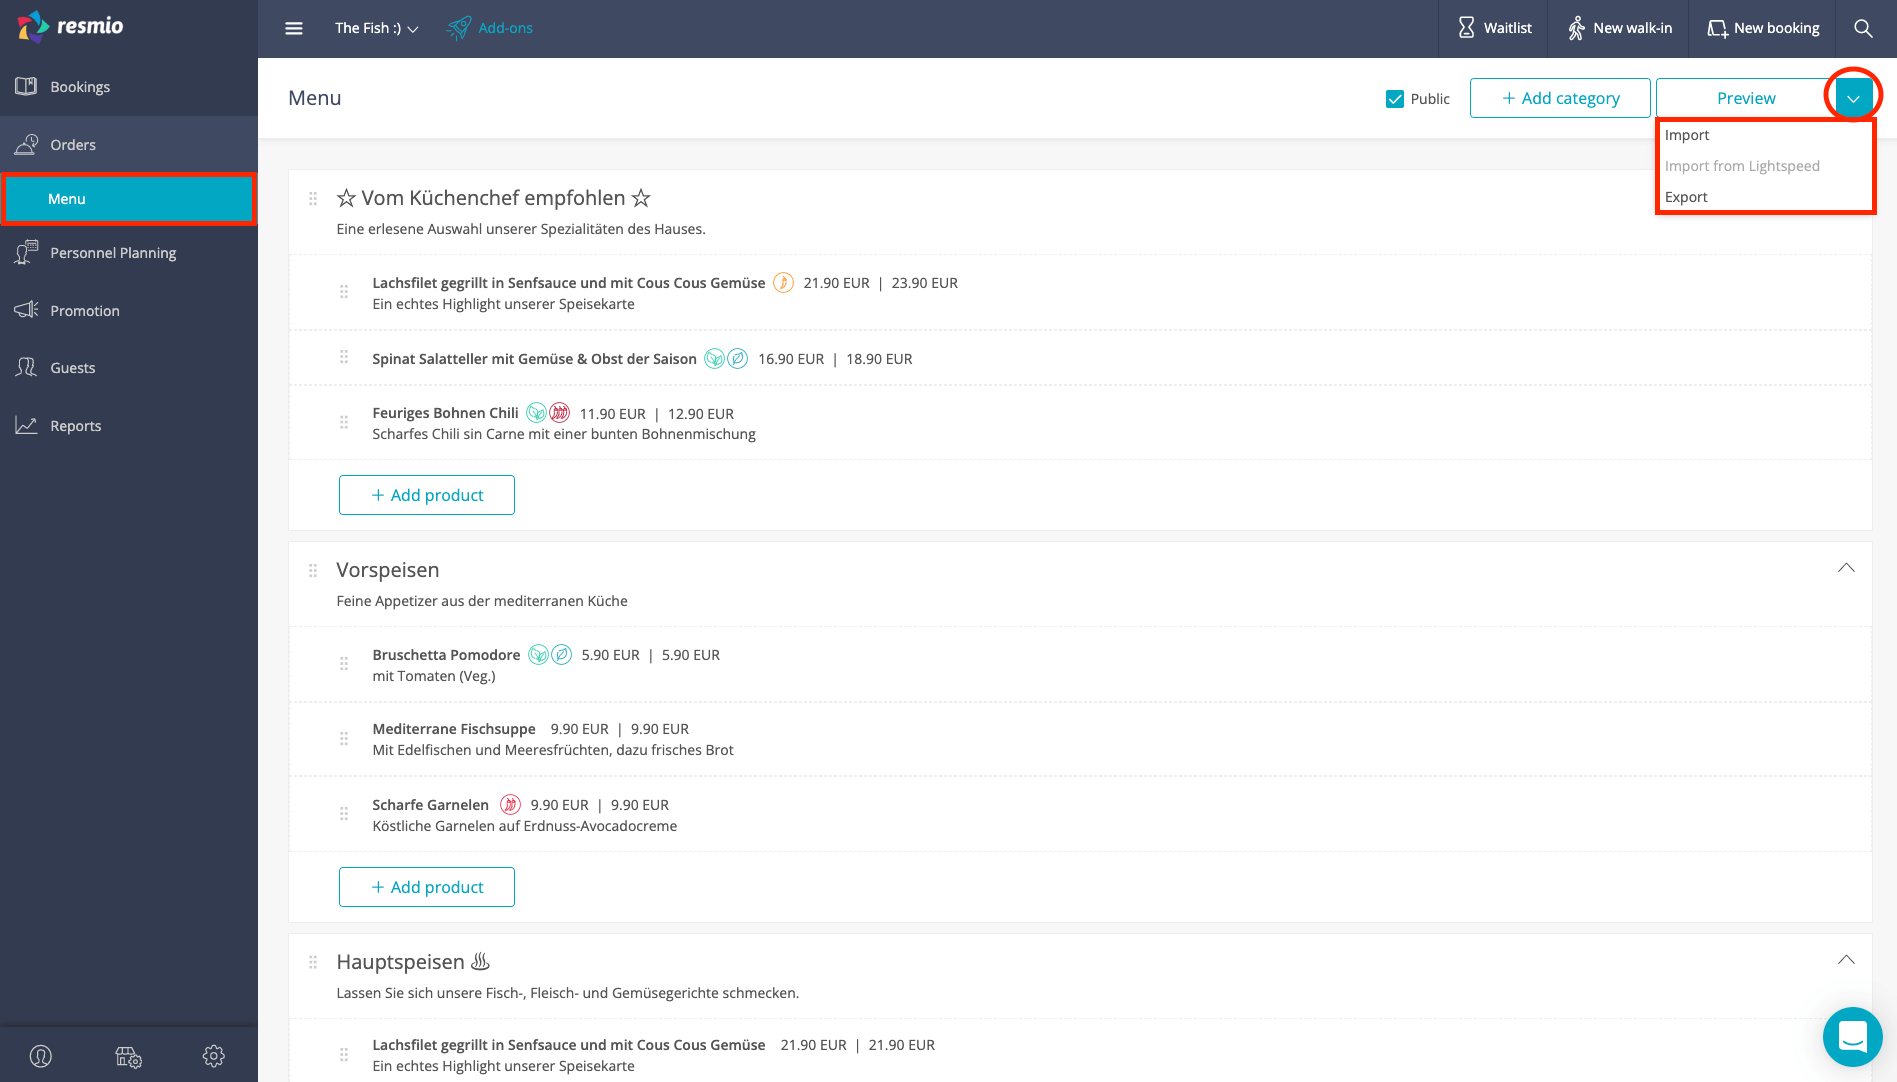
Yes, you can import or export your menu under certain conditions.
You need an exportable digital menu in a resmio account in the first step.
- The categories and products must be created under “Orders” > “Menu”.
- However, if you have the same or similar menu for multiple restaurants / resmio accounts, it is enough to store the menu in one account.
- Afterwards you can export the menu via the small arrow symbol in the upper right corner using the “Export” button and insert it again in a second resmio account via “Import”.
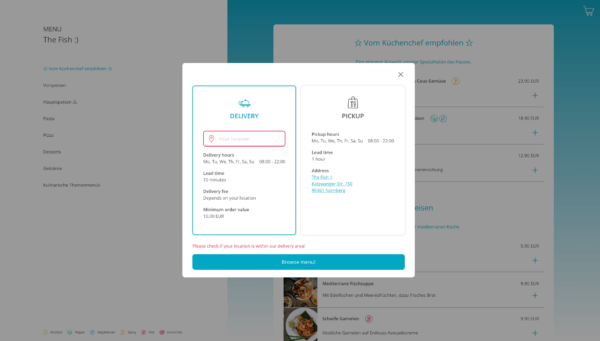
Basically you have the possibility to offer your guests three different types of orders.
- With the option “Enable pickup orders” you enable your guests to order products from your menu online and then pick them up at the restaurant themselves.
- “Enable delivery orders” means that you deliver the products provided on the menu to the guests’ homes.
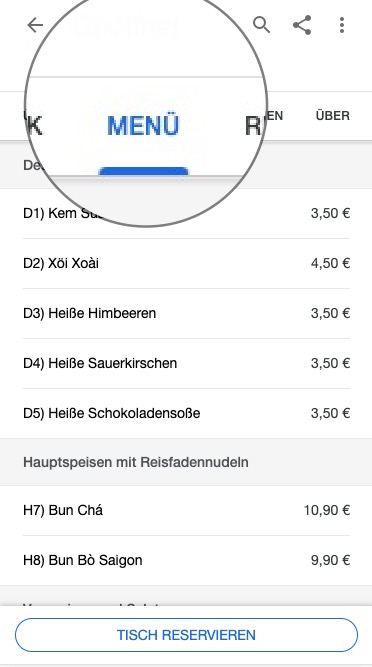
- “Enable ordering via QR code” allows your guests to order from their seat from your online menu via a QR code, so no waiter has to take the order first.
- You can make all settings for this under “Settings” > “Orders“. Just tick the respective check boxes for the type of order you would like to offer.
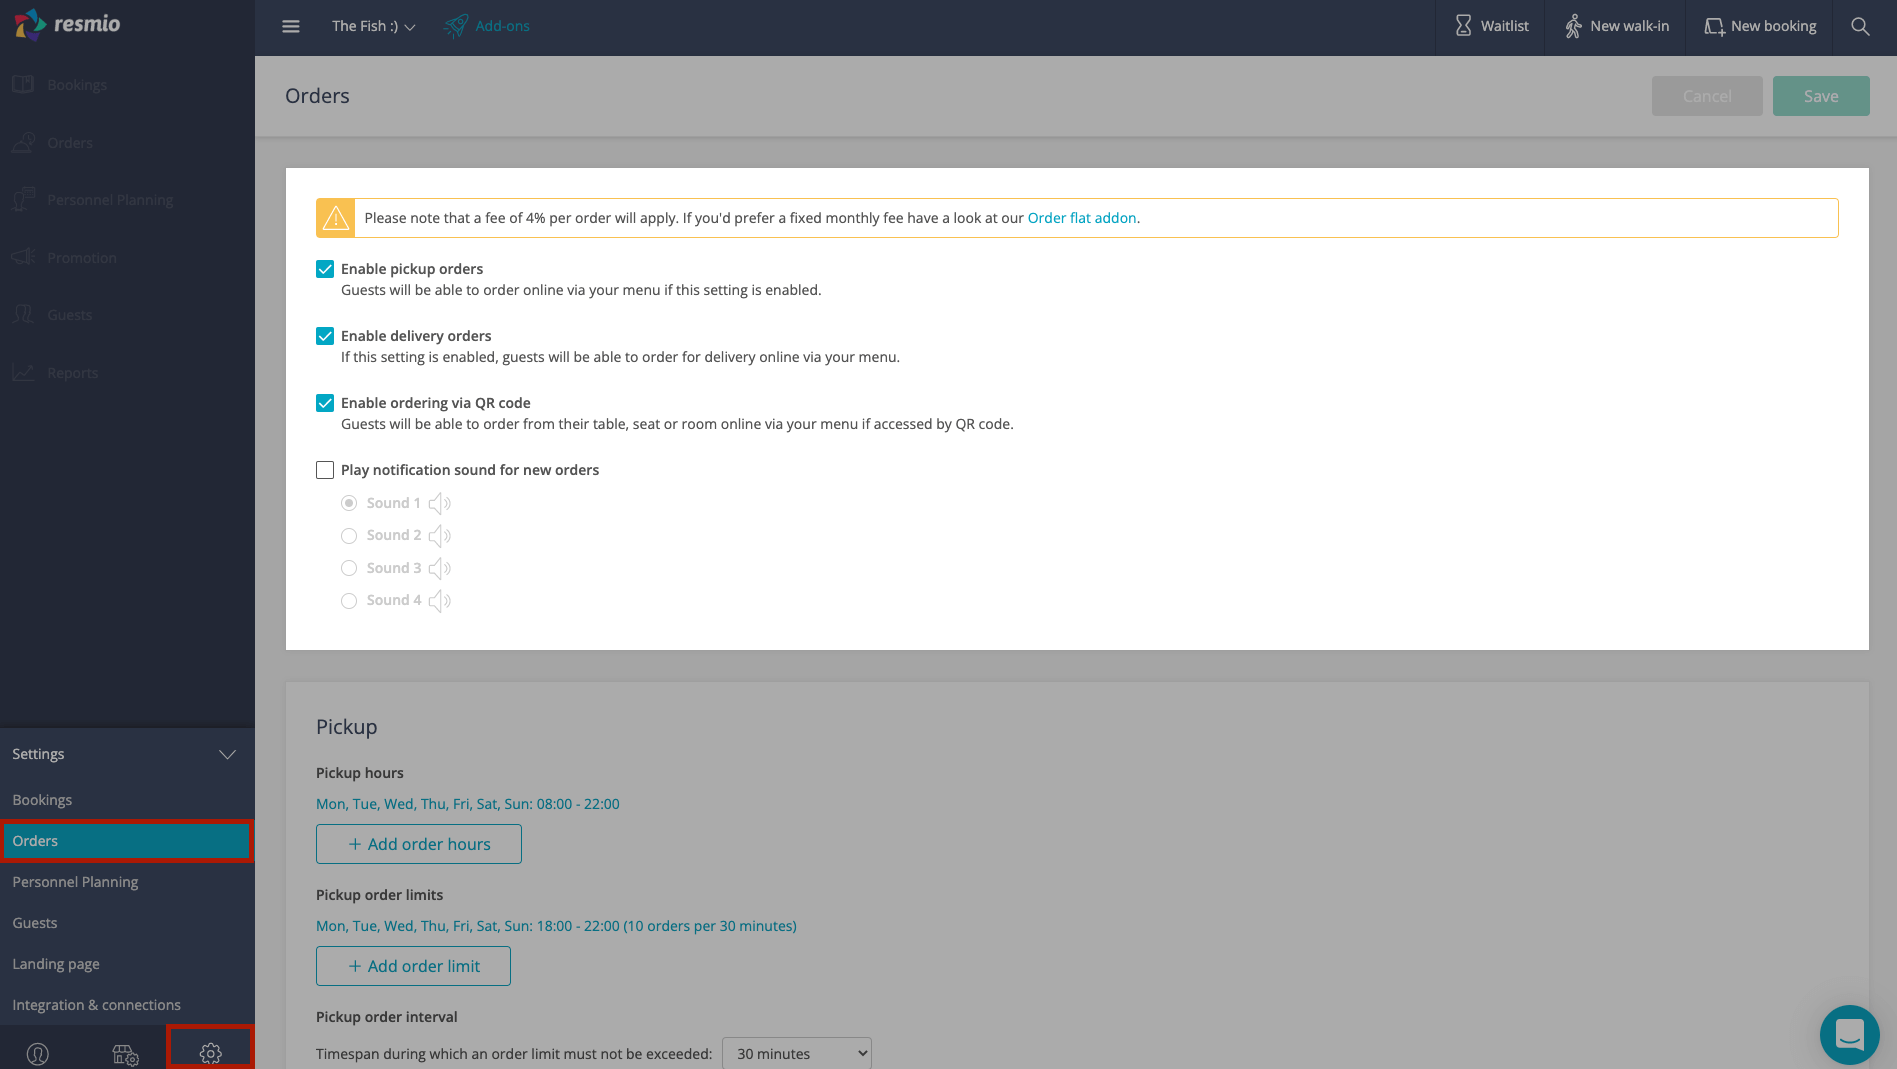
Under “Settings” > “Orders” > “Pickup” > “Pickup hours” you can set for which times your guests can pick up products from your restaurant. Below “Pickup lead time” you can set how much time you need to prepare everything till your guest can pick up their order. You also have the option to allow pre-orders up to six days.
Under “Accepted payment methods for pickup and delivery orders” you can define which payment methods you allow. The following are available: Payment on site or upon delivery, Credit Card, PayPal and SEPA Direct Debit. In addition, you can set a limit to payment on site so that amounts over this limit have to be paid with one of the other payment methods.

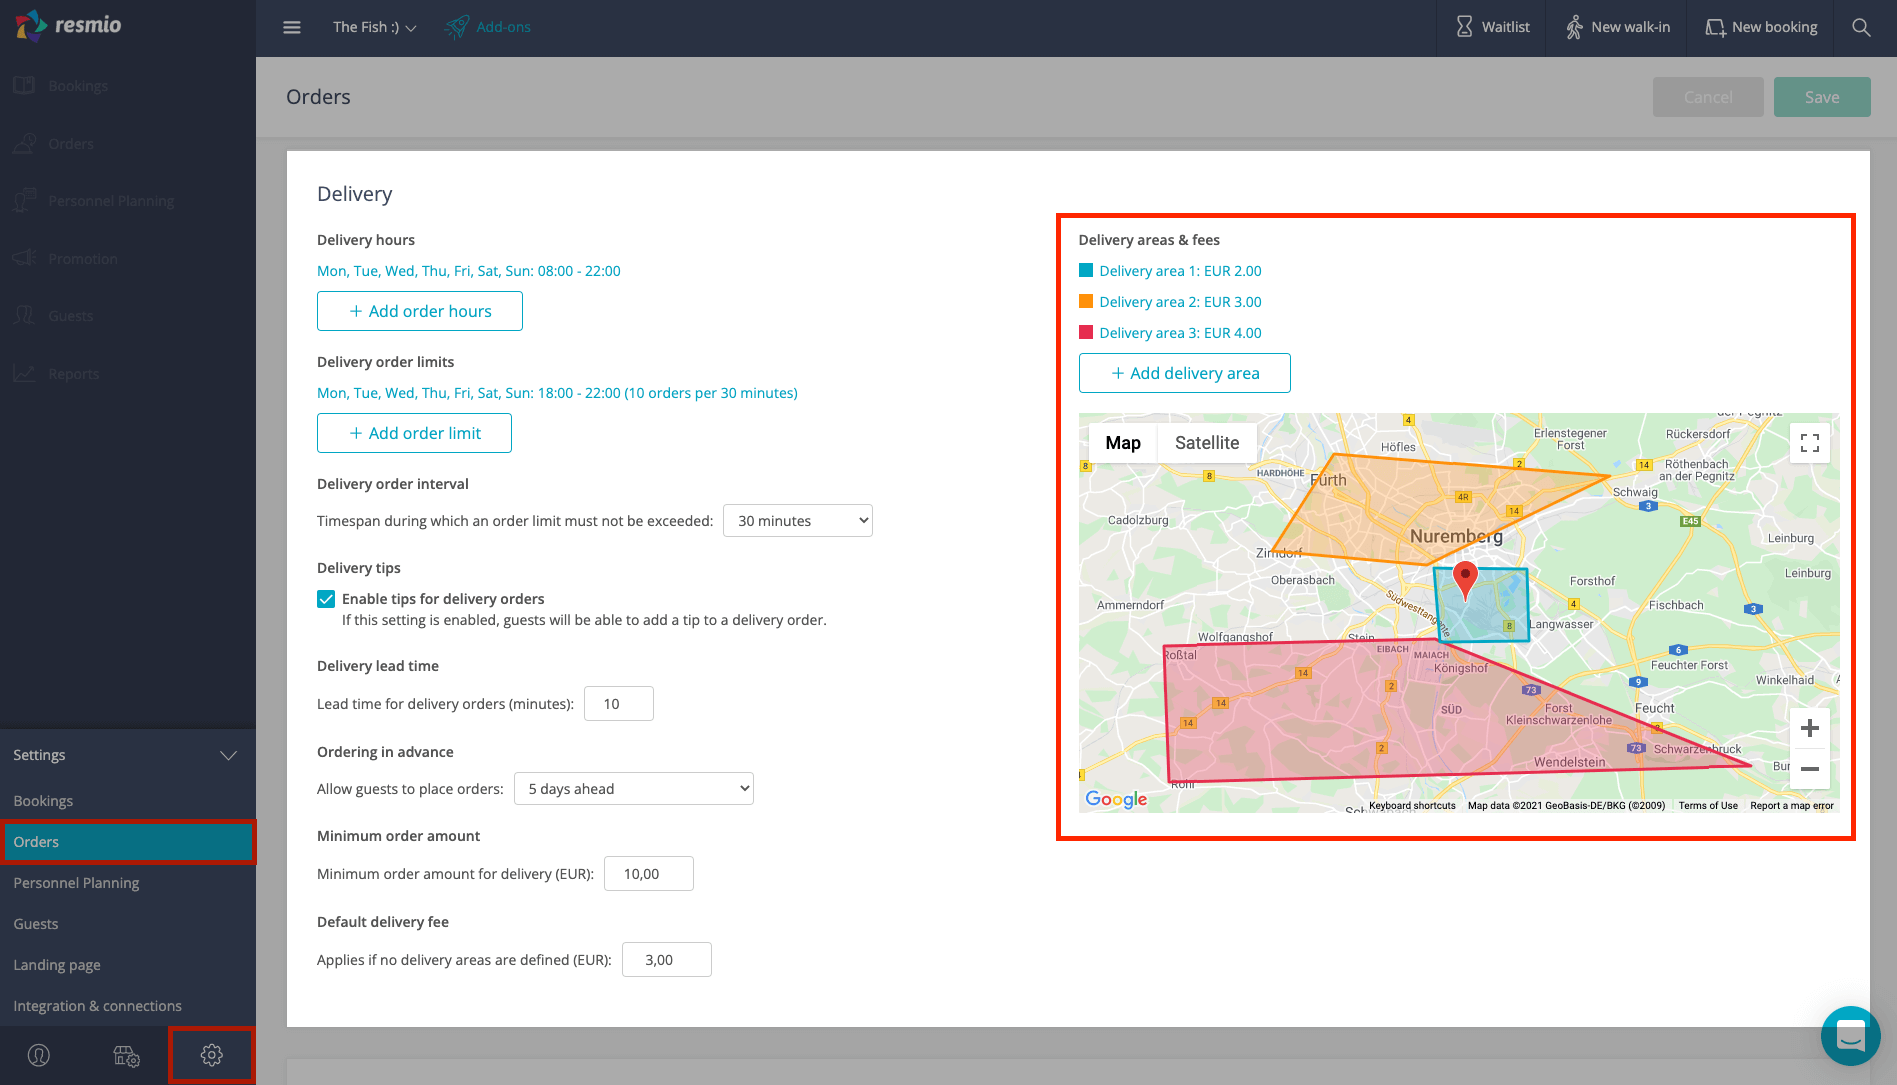
Under “Settings” > “Orders” > “Delivery” > “Delivery hours” you can set at which times you deliver products to your guests. Also below “Delivery lead time” you can set how much time you need to deliver the food to your guest. You also have the option to allow pre-orders up to six days.
In addition you can set your delivery area via the map on the right hand side. First you can set the Map section using the plus and minus symbols. Then click on “+ Add delivery area” and make a double click on the map. Then you can drag the mouse to narrow down an area and save it.
When you are done with the first delivery area, you can also create more delivery areas with different delivery fees. To do this, click on “+ Add delivery area” again and define a new area in the map.
Additionally, under “Minimum order amount” you set the minimal amount your guests have to pay so that you deliver the desired products. Finally below “Default delivery fee” add a value that you would like to charge for the delivery service. Of course, you can also set both values to zero if you don’t want to set a minimum order value or a delivery fee.
If you have specified more than one delivery area, you can enter the different delivery fees directly above the map.
Under “Accepted payment methods for pickup and delivery orders” you can define which payment methods you allow. The following are available: Payment on site or upon delivery, Credit Card, PayPal and SEPA Direct Debit. In addition, you can set a limit to payment on site so that amounts over this limit have to be paid with one of the other payment methods.
-
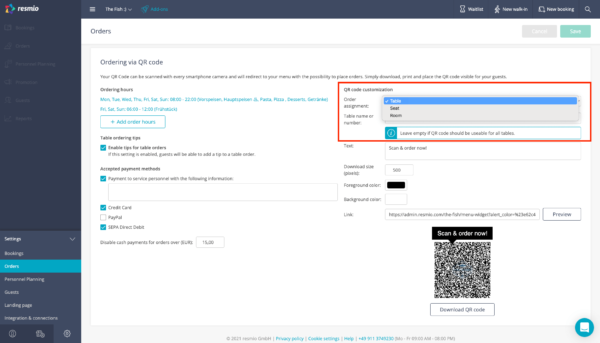
- Under “Settings” > “Orders” > “QR code ordering” > “Ordering Hours” you can set the times your guests can order from you digital menu directly from the restaurant table via QR code.
- Below “Accepted payment methods” you can define what payment methods you allow. The following are available, Payment to service personnel, Credit Card, PayPal and SEPA Direct Debit.
- In the option “Payment to service personnel” you can also add information for the guest if necessary (e.g. “Only cash payment possible”), the guest will see this when selecting the payment method. In addition you can set a limit to cash payment so that amounts over this limit have to be paid with one of the other payment methods. You can also individualise the QR code. That means you can set the text that is displayed over your QR code and define the download size and the fore- and background color).
- It is also possible to create and print an individual QR code per table/seat/room. Then the table/seat/room number is automatically deposited directly with the order. If you do not fill out this field the QR code will be created in general for the whole restaurant. Your guests will be asked to fill the table/seat/room number themselves.
Please note that on the menu which is displayed when scnanning the QR-code only “In house” prices are shown.

After you have activated and configured the function “Enable ordering via QR code” in your system you can download the QR code as a graphic file. You can glue the QR code directly to the tables or include it into your menu. In addition we have created a print template (in A5 format) for a table display which you can use for free.
-
- Download the file and open it in a corresponding program (e.g. Word / Open Office / Google Docs).
- To replace the QR code in the print template, press the right mouse button on the QR code and then select “Replace image”.
- If you want to, you can also individualise the text in the document.

- Email
Just as with the bookings, you will receive a notification for every order.
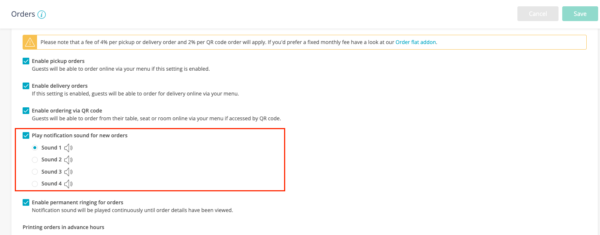
- Notification sound
Under “Settings” > “Orders” you can set a notification sound for the orders. You can choose between 4 different tones. It is also possible to set the ringtone to keep playing until someone looks at the order. - Voucher
You also have the option to print a receipt for each new order. This can be done via the iPad app.
You have the option to enable the tip function under “Settings” > “Orders“ in the respective option (pickup, delivery, order via QR code). Then your guests can directly give the desired percentage/amount of tip when paying for the order. The perspective of the guest is displayed on the picture on the right.
On the top left you can see which orders are available in the “Orders“ section. The different symbols show you if the order is for pick up, delivery or was made from a table.
- In the overview you can see directly if an order has been paid or if the payment is still open. In addition you can see the status of the order and change it.
- All received orders have the status “New”, as soon as you edit them you can change the status to “In progress” or “Finished” or if necessary you can also set the order to “Cancelled”.
- If you select the order you can see all the details (Pick-up time, the products ordered with prices and total price of the order, any notes and contact details of the guest and pick-up/delivery time or table number.)

Yes, you can also view a product overview. Just select the order overview (left hand side “Orders”) on the three dots on the top right and select “Product view”. Then you see an overview of the ordered products. Optionally you can also choose to show or hide the product variations.

This feature is only available for our PREMIUM or ULTIMATE customers with access to our great partner network.
You can link your digital menu at resmio with Google. That will display your digital menu in your Google Business Profile (on mobile devices only) below “Menu“.
The following requirements must be fulfilled for the menu to be visible on Google:
- Your digital menu at resmio must at least have 15 items.
- Your Google my business account for your restaurant must be linked to our partner network.
- This currently has to be done manually by our sales team, please get in touch with your contact person.
- Our partner account must be stored in your business account with the user role “Administrator”. After that an activation is possible.
- A menu with at least 12 products must be stored in your resmio account. This menu must be published: “Orders” > “Menu“ > checkmark in the upper right corner at “Public”.
- You also need to check “Payment on site or upon delivery” below “Settings” > “Orders“ > “Accepted payment methods for orders for pickup and delivery”.
- Other payment methods can still be selected, but Google itself currently only accepts cash payments. It is important that nothing is entered in the field “Disable payment on site or upon delivery for orders over:”, otherwise Google Food Ordering will not work.
If you had previously linked another provider on Google for accepting online orders and/or pickup of your food and would now like to have only resmio’s button, you have two options:
- You directly contact your current provider and ask them to remove the button.
- You use the following link to request the removal of the button from Google: https://support.google.com/business/contact/business_food
Please note: We can only add or remove the resmio button and cannot remove the buttons of other providers.

