Managing reservations
Table of contents
Booking Mananagement
- Adding Table Bookings – How to add phone and email reservations
- Adding Walk-Ins – Why guests with no reservation belong in your system
- Setting up serial reservations (e.g. regulars’ table)
- Bookings with recurring guests
- Booking and Guest Tags for good customer relations
- The booking overviews
- Printing of the Agenda / Reservation Overview
- Import of Table Reservations
- E-Mail and SMS Notifications for Table Bookings
- Enable history for changes to the reservation
In case of emergency / absence
Manage capacity and utilization
Inform guests
- Leave a note on closed days
- Request more booking related details from guests
- Customize booking notifications (e-mails) for guests
- Promoting special deals in the booking widget
- Important notes for guests before booking (e.g. maximum length of stay)
- Set mandatory fields for staff in case of manual bookings
- Change widget text for unavailable / fully booked times
- Respond to questions from guests
To fully utilize the potential of your digital reservation system (time savings and reduced staff workload), you should migrate phone bookings as well as incoming reservations via email into your system.
Nice to know: Online reservations via the widget on your website and table reservations via Google automatically appear in your reservation system.
This is how it goes
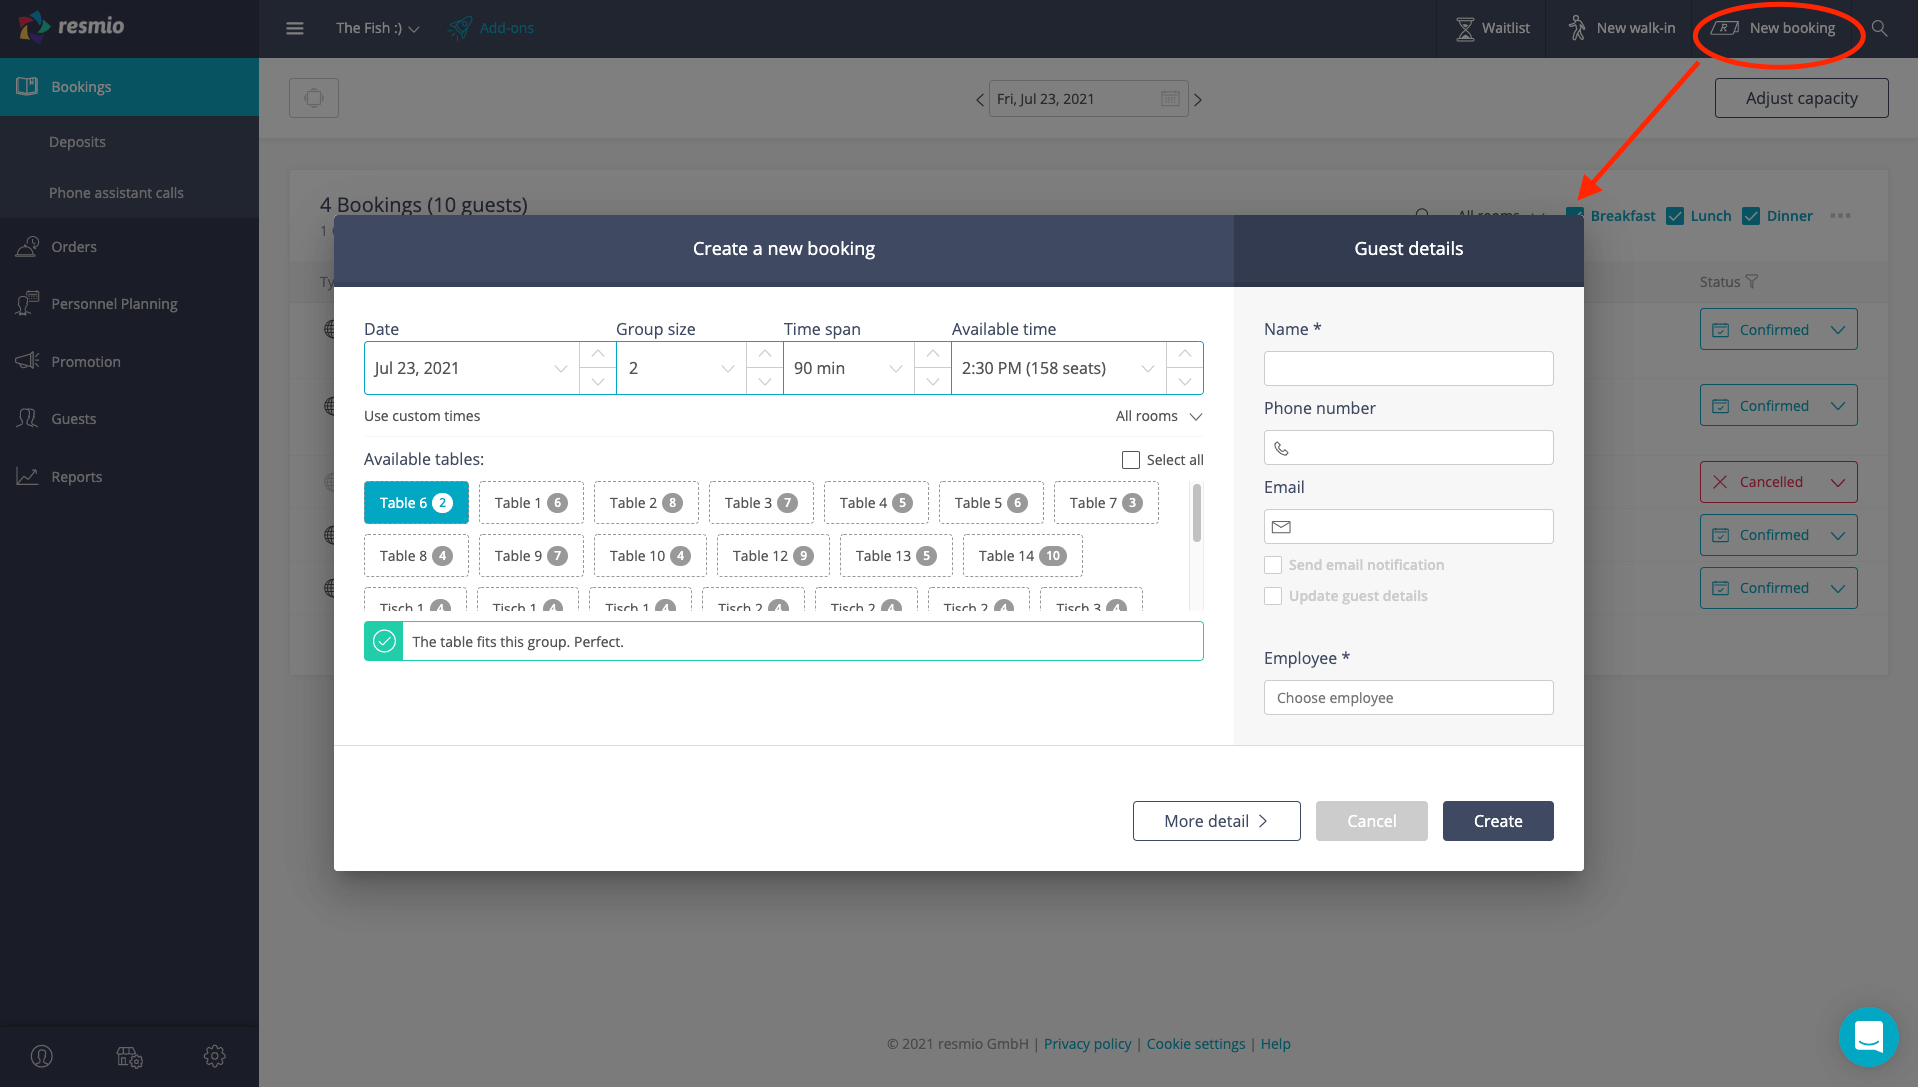
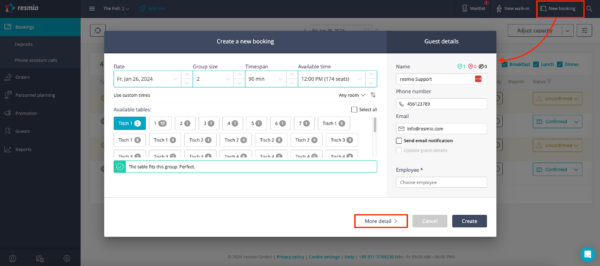
- Click on
 “New booking” in the upper right corner.
 - This opens a new dialog box in which you can add a booking for the requested time and date (if there is available capacity). Using the more detail > button, you can also add attachments, notes and tags to the booking.
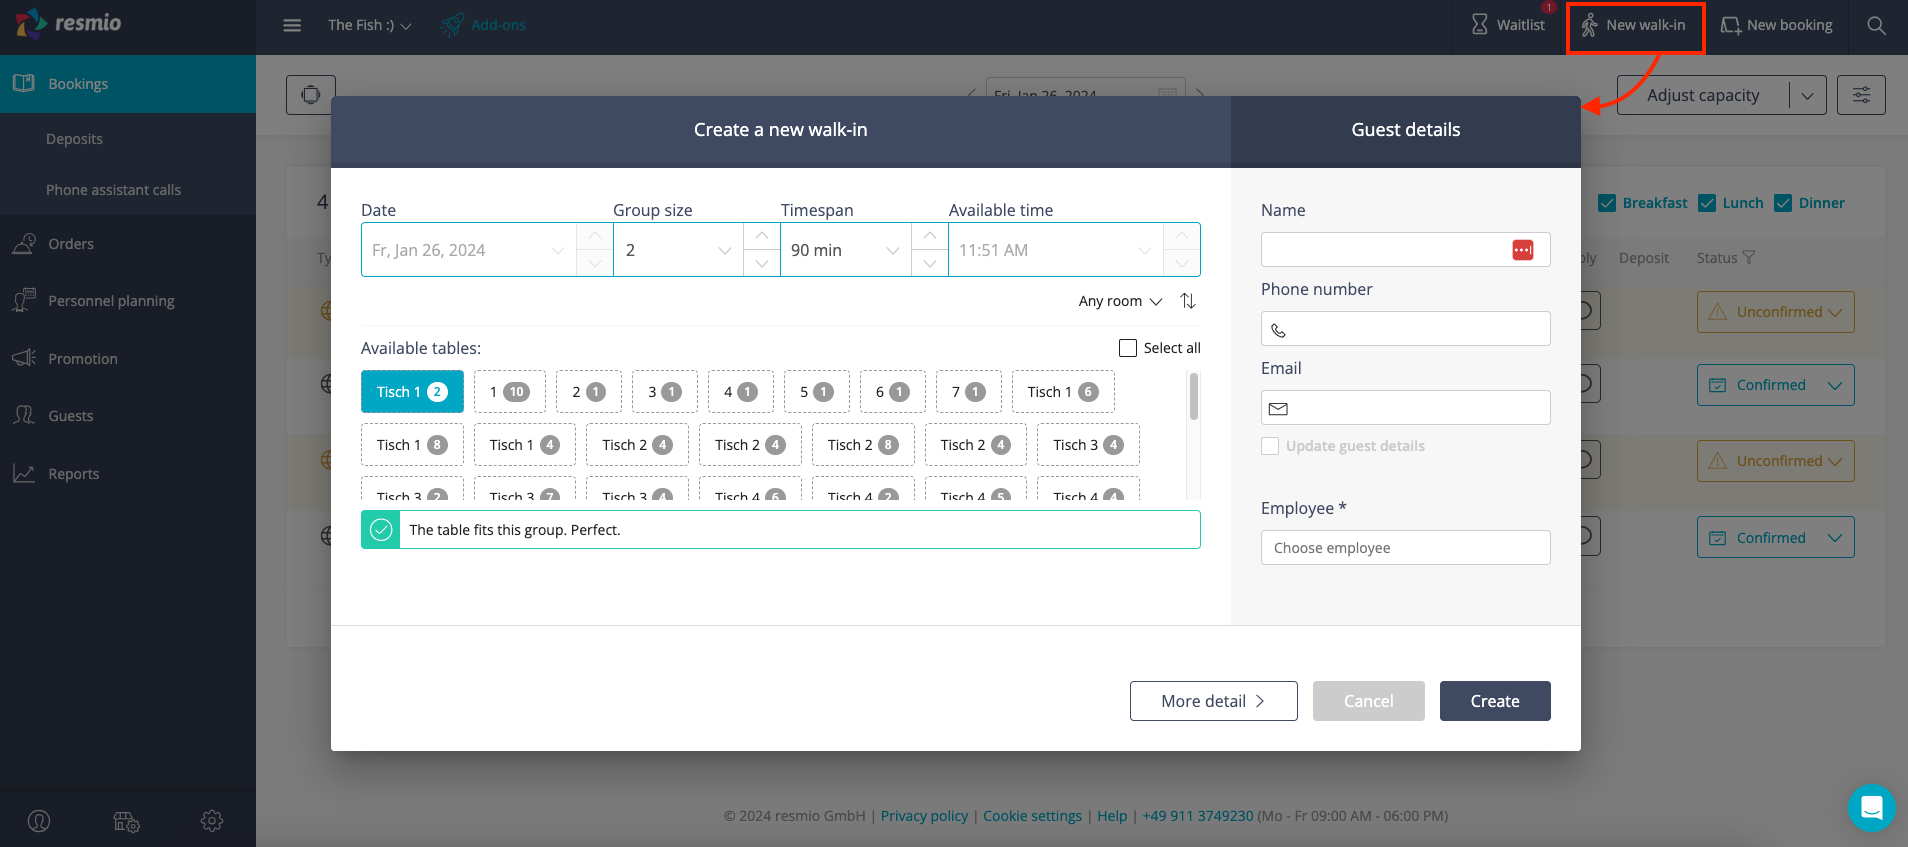
In case guests come to your restaurant spontaneously with no prior phone/online booking (“walk-ins”), make sure to add them to your digital reservation book by following the steps below.
This is how it goes
- Click the„New walk-in” button the upper right corner.
- In the following dialog box, set the size of the group and the duration of the stay, if necessary. Add guest contact information, if known, and additional notes and tags via the more detail > button.
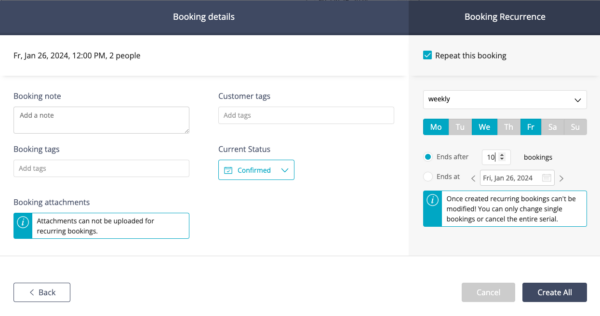
Regulars’ tables, events… there are many occasions for recurring bookings. Using resmio you can easily and fast set up recurring reservations. In general, you handle it the same way as if you would add a regular reservation:
- Click on „New booking” in the upper right corner.
- In the following dialog box, please add all relevant information for the booking, such as the group size, duration of stay and contact details.
- Then click on the more detail > button. In the right column, check the “Repeat this booking” box.
- Then select the appropriate settings (period, days of the week, end of series).
- Finish by clicking Create all at the bottom right and the serial booking dates will automatically be added to your digital reservation book.
The icon in the reservation overview also shows you that it is a recurring booking.
Once a guest has made a booking at your restaurant and is listed in your guest database, he/she will be suggested to you automatically by entering his/her name, phone number or e-mail address.
If you click on the suggested guest entry, the contact fields are filled in immediately – this saves a lot of time in day-to-day operations.
Your system also tells you the number of previous visits to the contact, as well as any cancellations and no-shows.

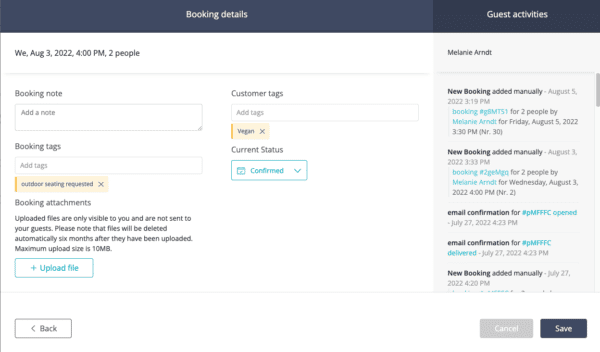
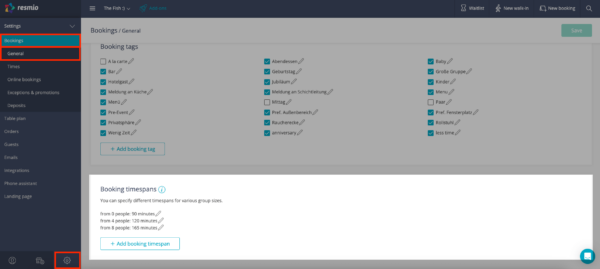
You can click Details > when creating a new booking to add booking tags and guest tags. This way, you and your colleagues can immediately see in the reservation overview which needs your customers have and can respond to them individually.
- The reservation tags are attached to the individual booking and therefore contain information that is only important for this specific booking. For example, that this time the guest would like to sit on the terrace.
You can edit the booking tags under “Settings” > ” Bookings” > “General“ and add new ones if necessary. - The guest tags always appear when the guest makes a booking. General information is stored here, for example allergies.
You can edit the guest tags under “Settings” > “Guests” > “Automation“ and add new ones if necessary.
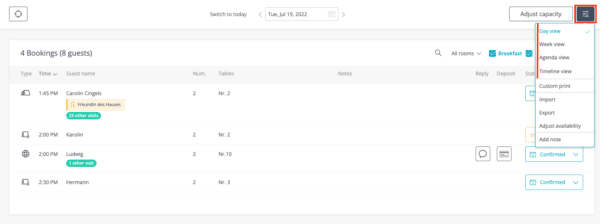
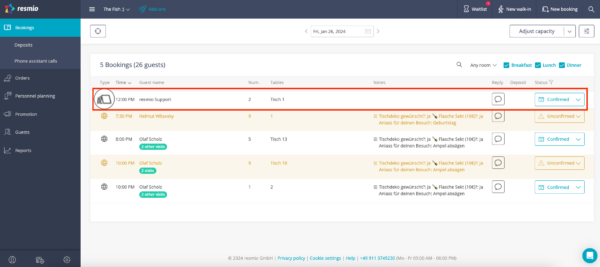
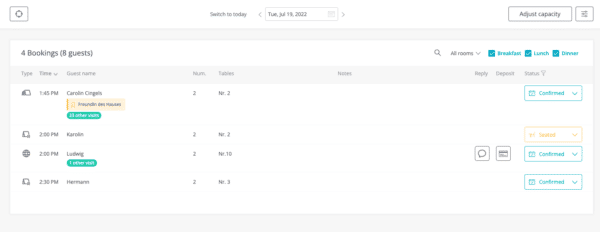
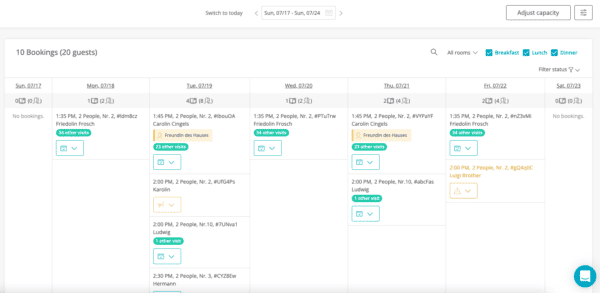
In your reservation book you can change the view using the filter icon ![]() in the upper right corner. There is the day view, the week view, the agenda and the timeline.
in the upper right corner. There is the day view, the week view, the agenda and the timeline.
Day View:
This view is preset. There you can see all pending bookings for the current day.
Week view:
You can view all bookings of a certain week at once. This view is especially helpful for the shift schedule and menu planning.
Agenda view:
In the agenda, all future bookings are displayed one below the other, sorted by date. This will give you an overview over several weeks.
Timeline:
In the Timeline, the bookings of a day are arranged on a timeline. You can drag and drop the bookings to adjust the time or the table. This helps you maximize your capacity utilization quickly and easily.
You can switch to full screen mode by clicking this icon ![]() in the upper left corner to get an even better overview of your table bookings!
in the upper left corner to get an even better overview of your table bookings!
resmio allows you to download and print an overview of your reservations of the day or week as .PDF and .CSV files.
- After signing in, navigate to the menu on the left and click on the first menu item
 “Bookings“.
 - In the upper right corner, next to the “Adjust capacities” button, you can access advanced settings by clicking the
 icon.
icon. - In the following menu, select “Custom Print” and in the following dialog box, adjust the print view according to your individual needs.

Already got bookings before joining resmio? In that case you can easily transfer them into your system. The datasets have to be in a formatted spreadsheet (.csv) to be imported. You can also use our template below.
- Open your list of reservations in Microsoft Excel, Google Spreadsheets or any other spreadsheet software.
- Make sure that your table is formatted correctly! Please pay attention to lower case letters and spaces. In addition, only csv files can be imported.

- day (day of the booking)
- time (time of the booking)
- number (group size)
- name
- walkin (true / false)
- booking number
- phone
- notes
- comment
- status
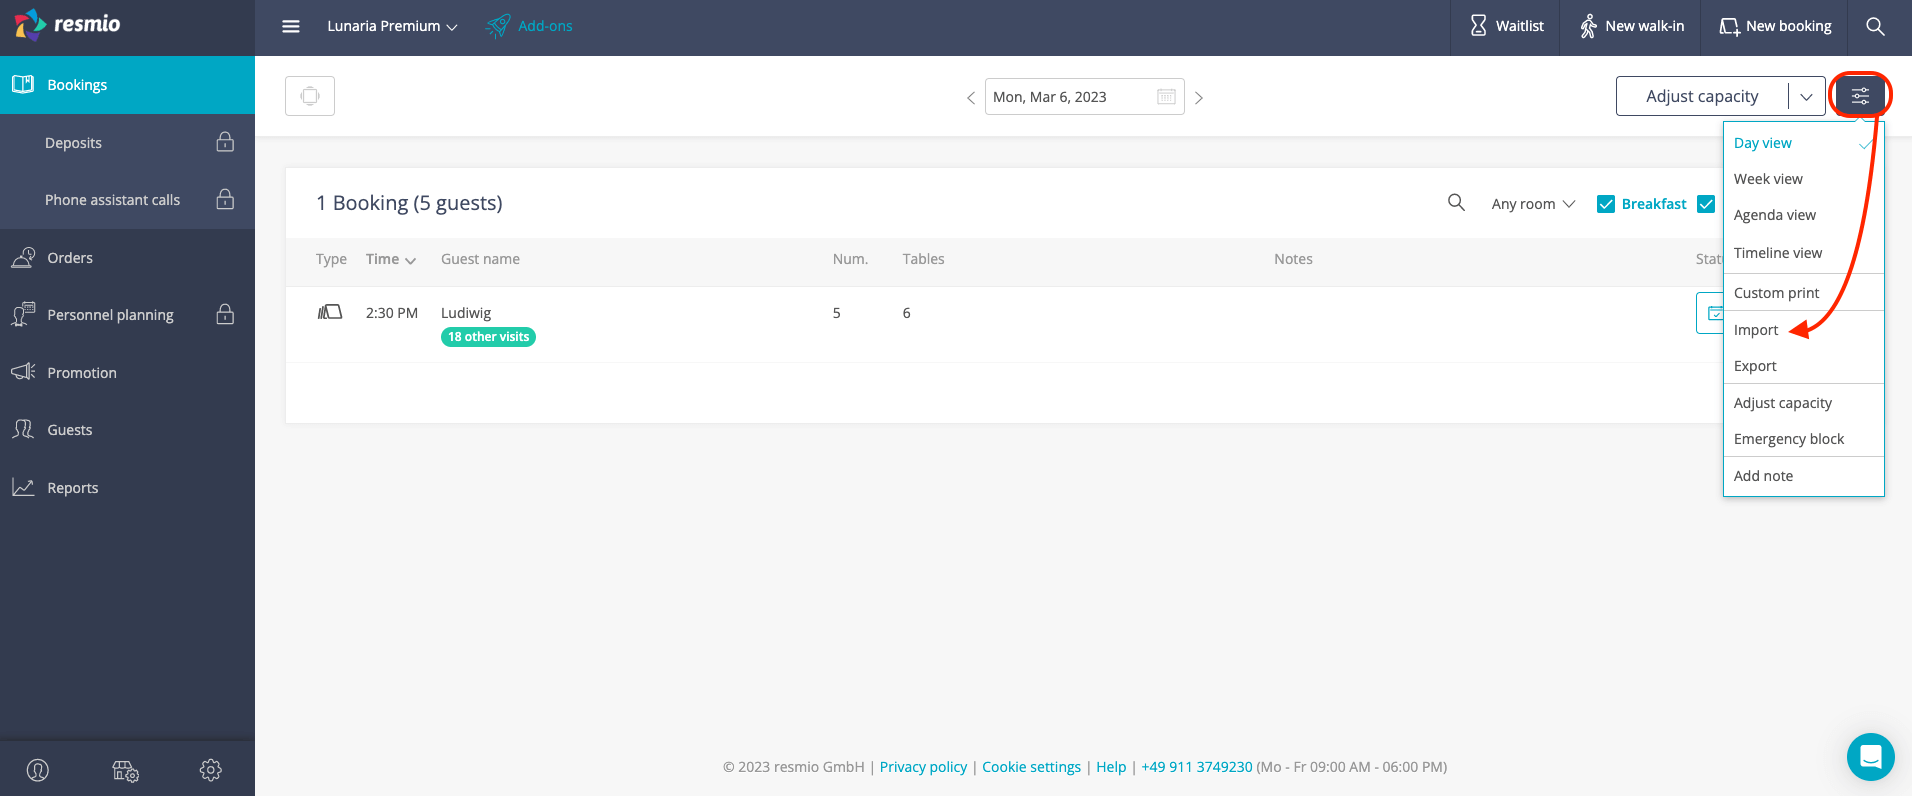
The date of the booking has to be in the following format:: YYYY-MM-DD (Example: 2022-06-25).
If the file to be imported does not have a “status” column, the bookings are added as “confirmed”. If a column “status” exists, the cells must contain the following values: “unconfirmed”, “confirmed”, “arrived”, “seated”, “noshow”, “finished” or “cancelled”.
3. Next, click on the filter icon ![]() in your resmio account in the reservation overview and then on “Import“.
in your resmio account in the reservation overview and then on “Import“.
4. You can now upload your existing reservations. Depending on the size of your data set, this process may take some time. Once completed, you will get an e-mail notification including further import details.
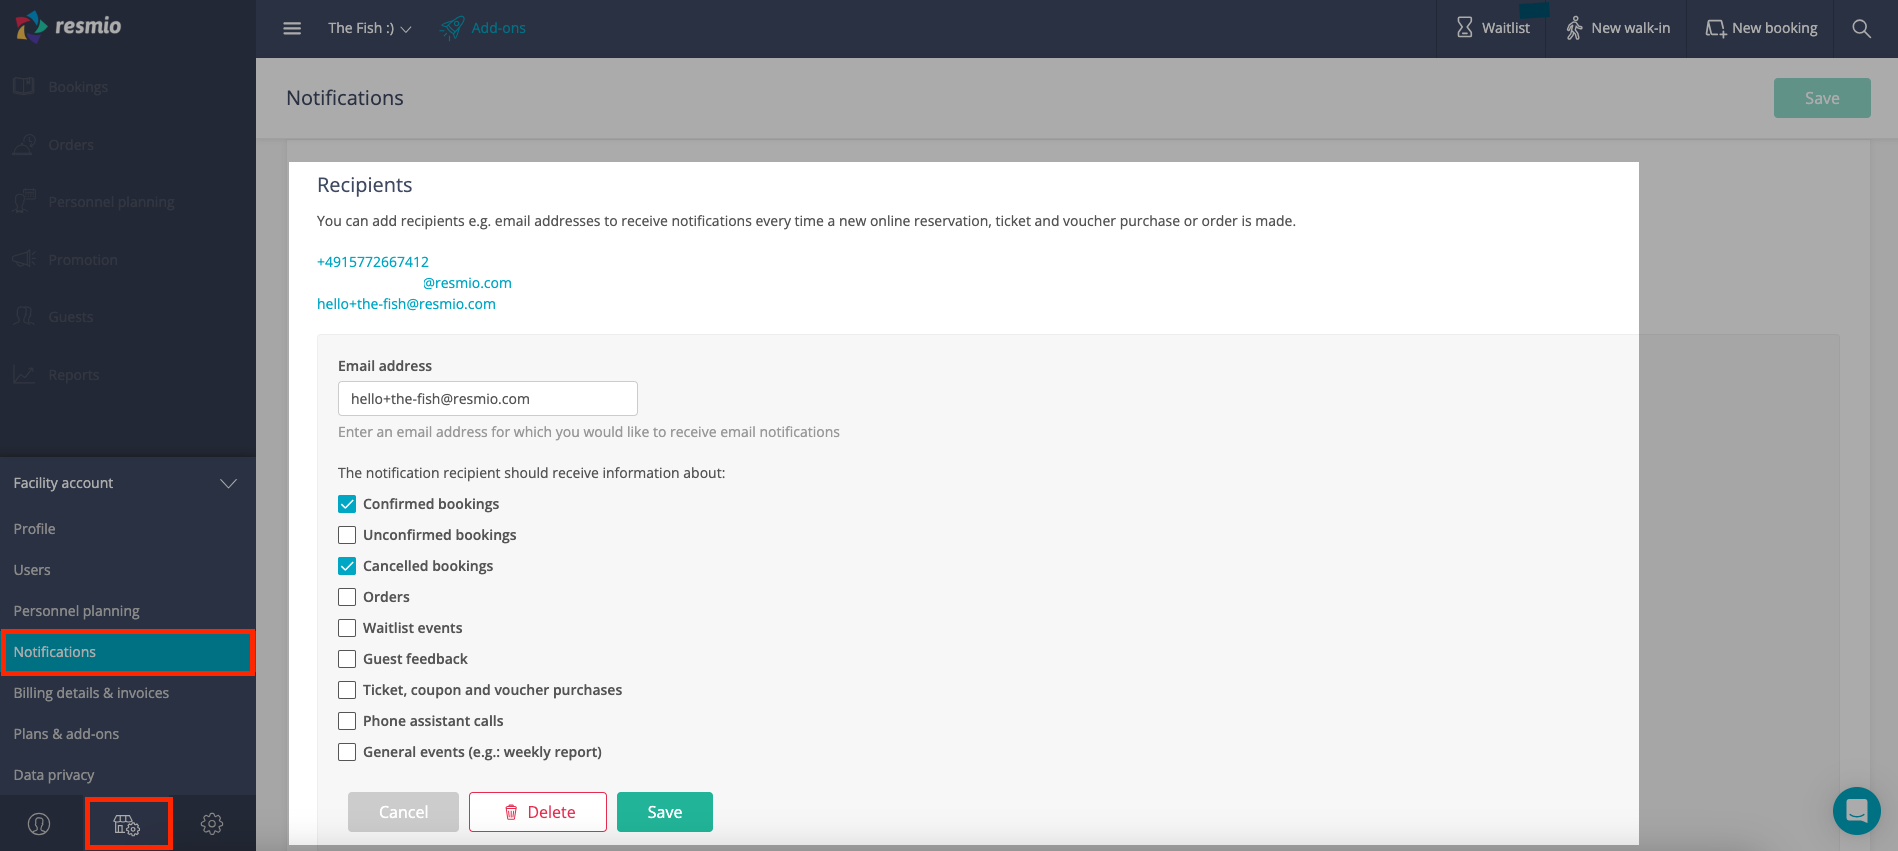
Click on ![]() “Facility account” > “Notifications” and select “+ Add recipient”. You can define individually for each deposited e-mail, for what it gets a notification.
“Facility account” > “Notifications” and select “+ Add recipient”. You can define individually for each deposited e-mail, for what it gets a notification.
SMS: You will be charged 0,09 € for each SMS sent. But you can also set a maximum budget to not exceed a specific value. Once the limit is reached, no more SMS notifications will be sent for that month. We will keep you up to date about the spendings via email, so you have full control.
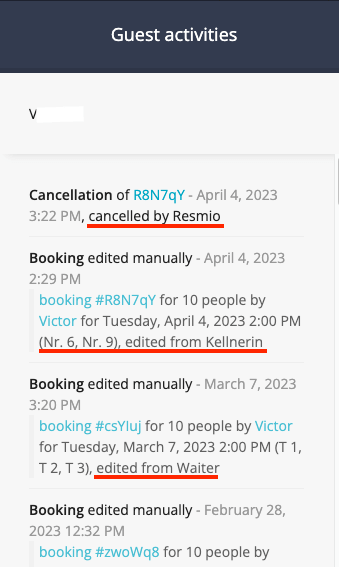
With the alias you can see who processed the booking and when. Several employees can log in through one user and then select their name in the alias list.
In the guest activities one can then see which employee has made a change. You can see who,
- created,
- edited,
- and canceled the booking,
- and who processed deposits.
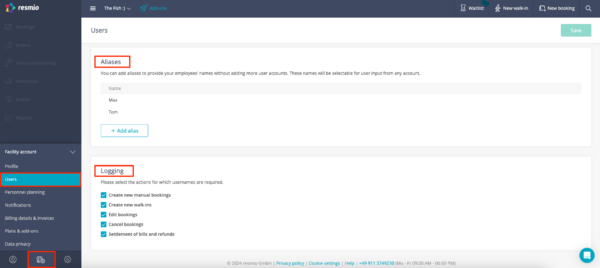
The alias names are created at ![]() “Facility Account” > “Users“ > “Aliases”. Beneath that at “Facility Account” > “Users“ > “Logging” you select for what an entry is created in the guest activities.
“Facility Account” > “Users“ > “Aliases”. Beneath that at “Facility Account” > “Users“ > “Logging” you select for what an entry is created in the guest activities.
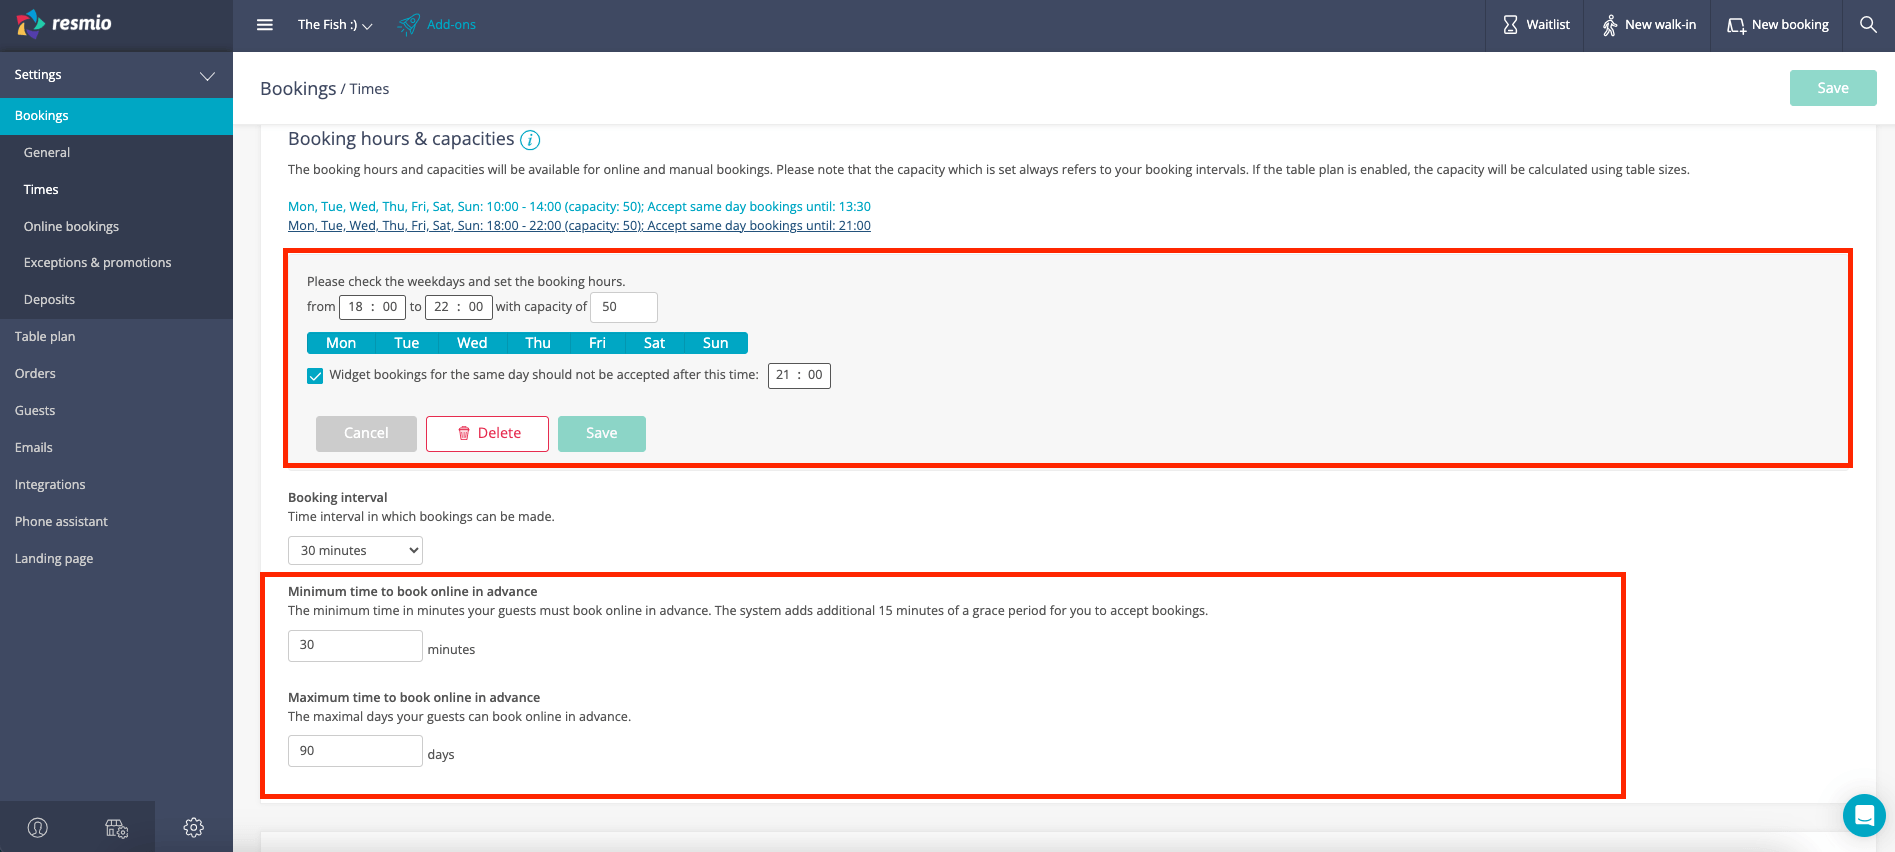
- Sign in to resmio.
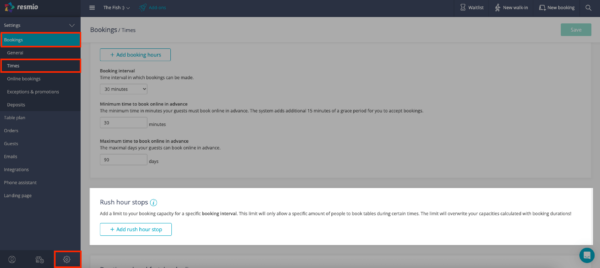
- Click on „Settings” > „Bookings” > „Booking hours and capacities”.
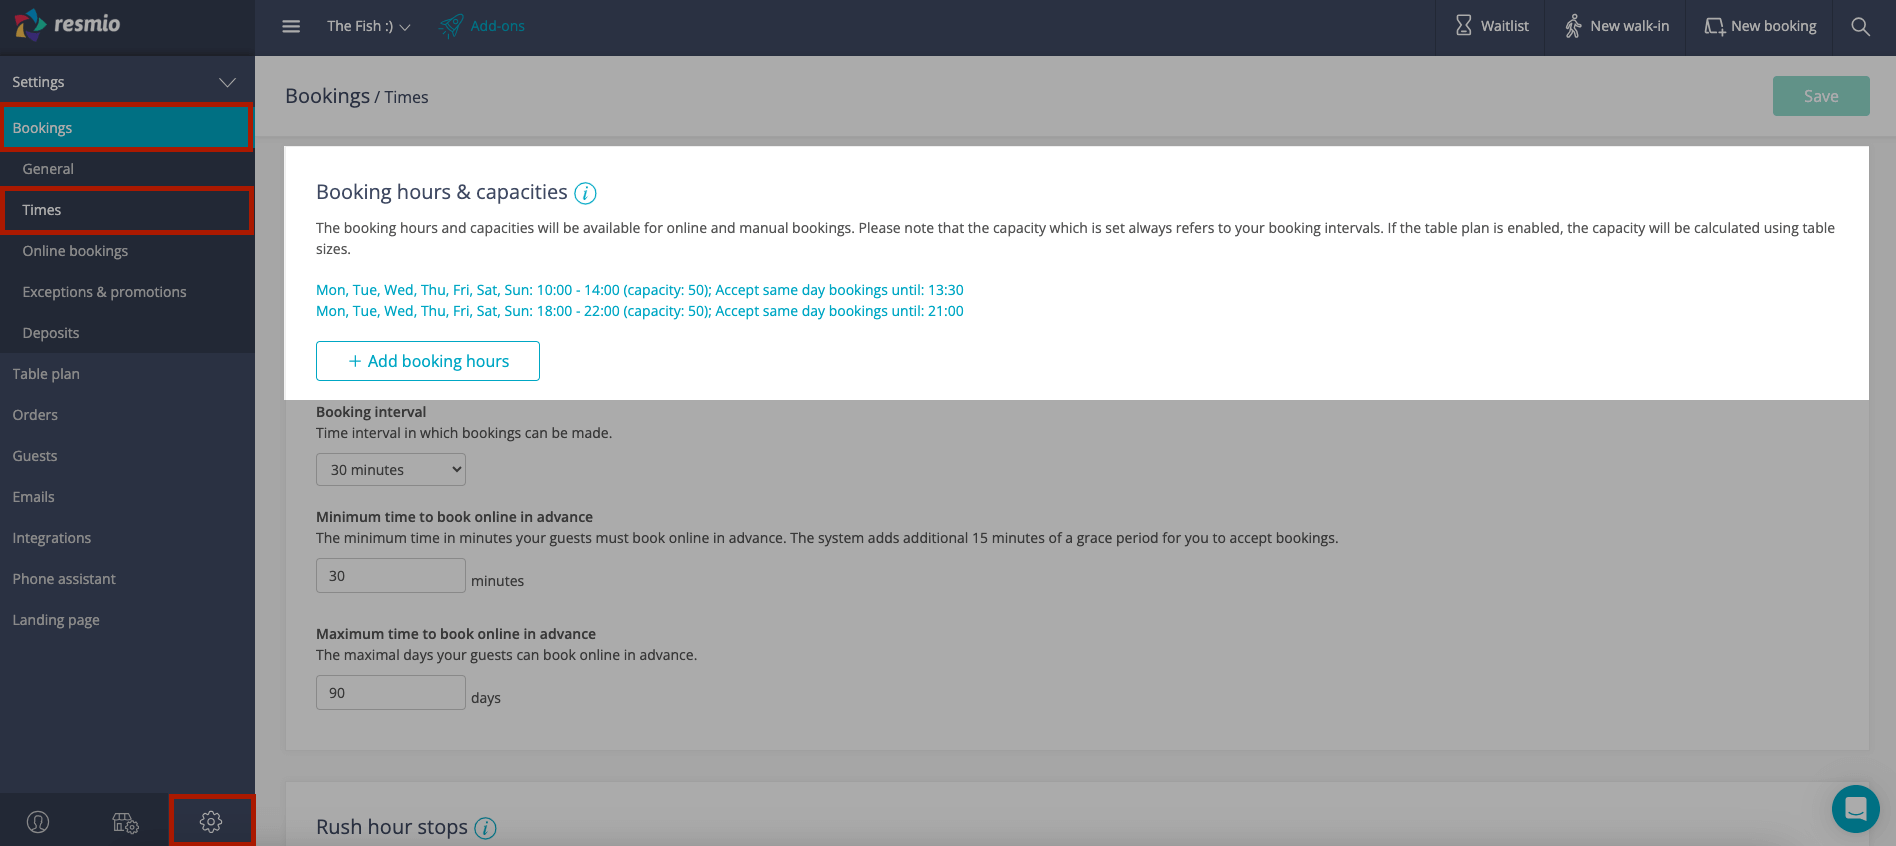
Here you can set your booking times and capacities for each day of the week. Please note that the capacity you set always refers to the booking interval (*) you have specified.
Example:
- Booking interval of 30 minutes
- Booking hours and capacity: Mon. – Sun. 12:00 to 20:00 (capacity 10)
- Result:Guests are able to reserve in 30 minute periods (12:00, 12:30, 13:00, 13:30 etc.), each half hour a total of 10 seats (capacity = 10) are available for booking.
Are you using the table plan? Then the seating capacity will be calculated based on the table sizes and your capacity set within “booking times” will be overwritten!
Please check under ![]() “Settings” > “Table plan” > “Basics“ if your table plan is active (“Online booking are automatically assigned to a table”).
“Settings” > “Table plan” > “Basics“ if your table plan is active (“Online booking are automatically assigned to a table”).
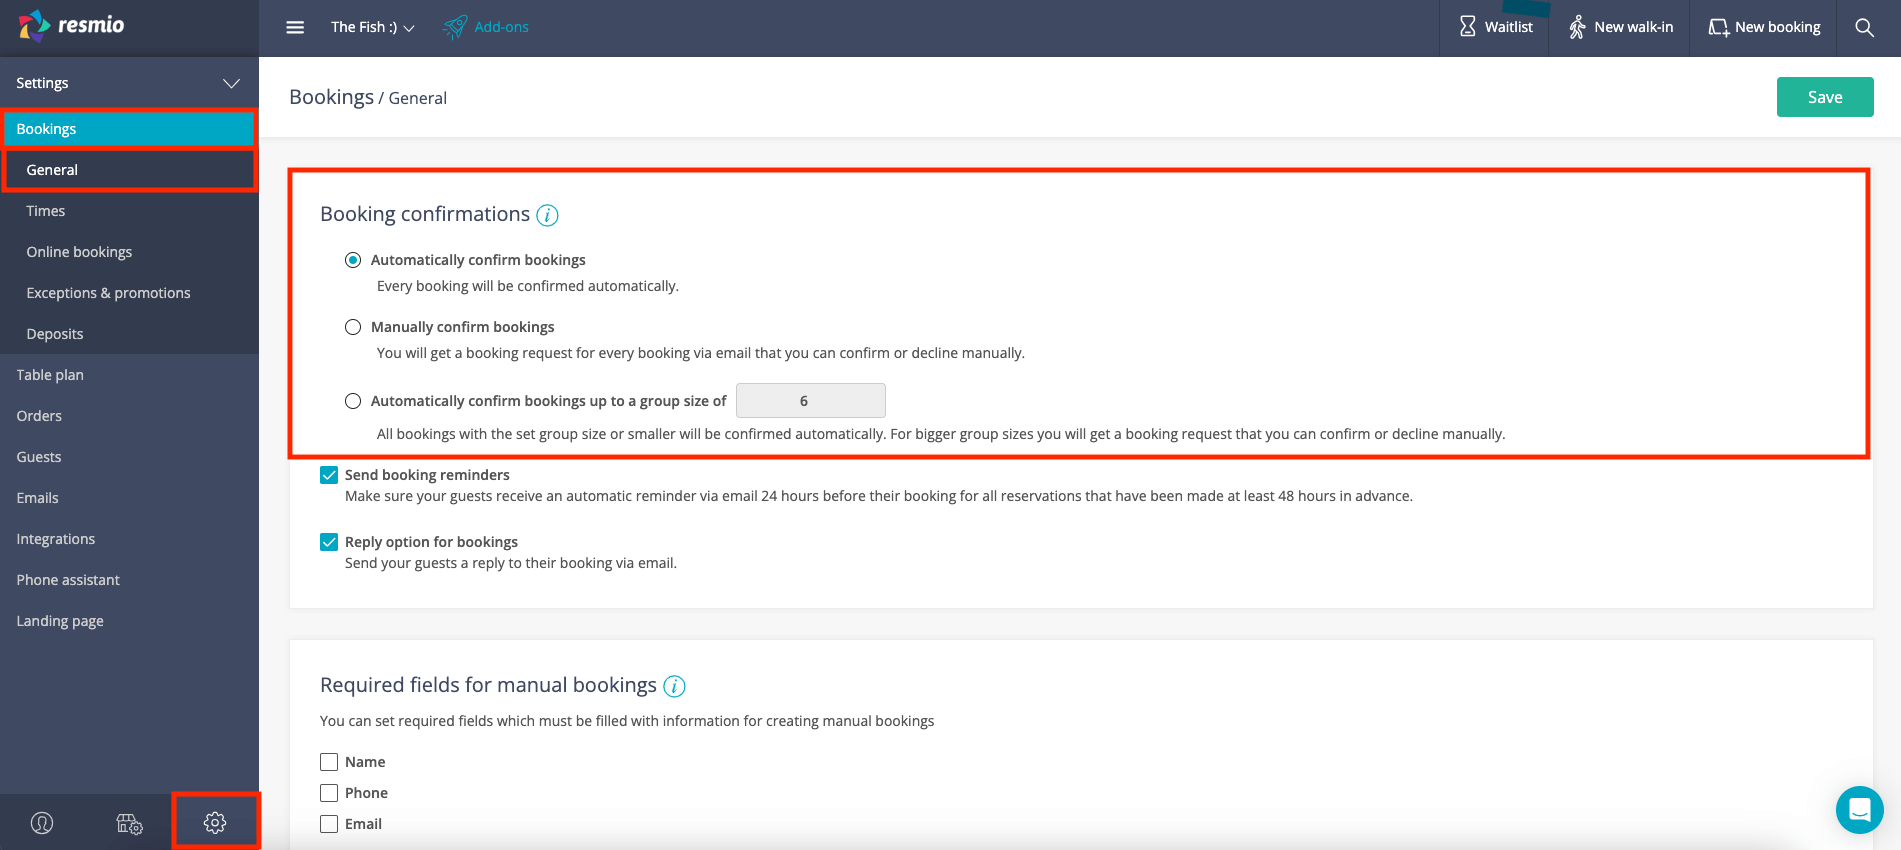
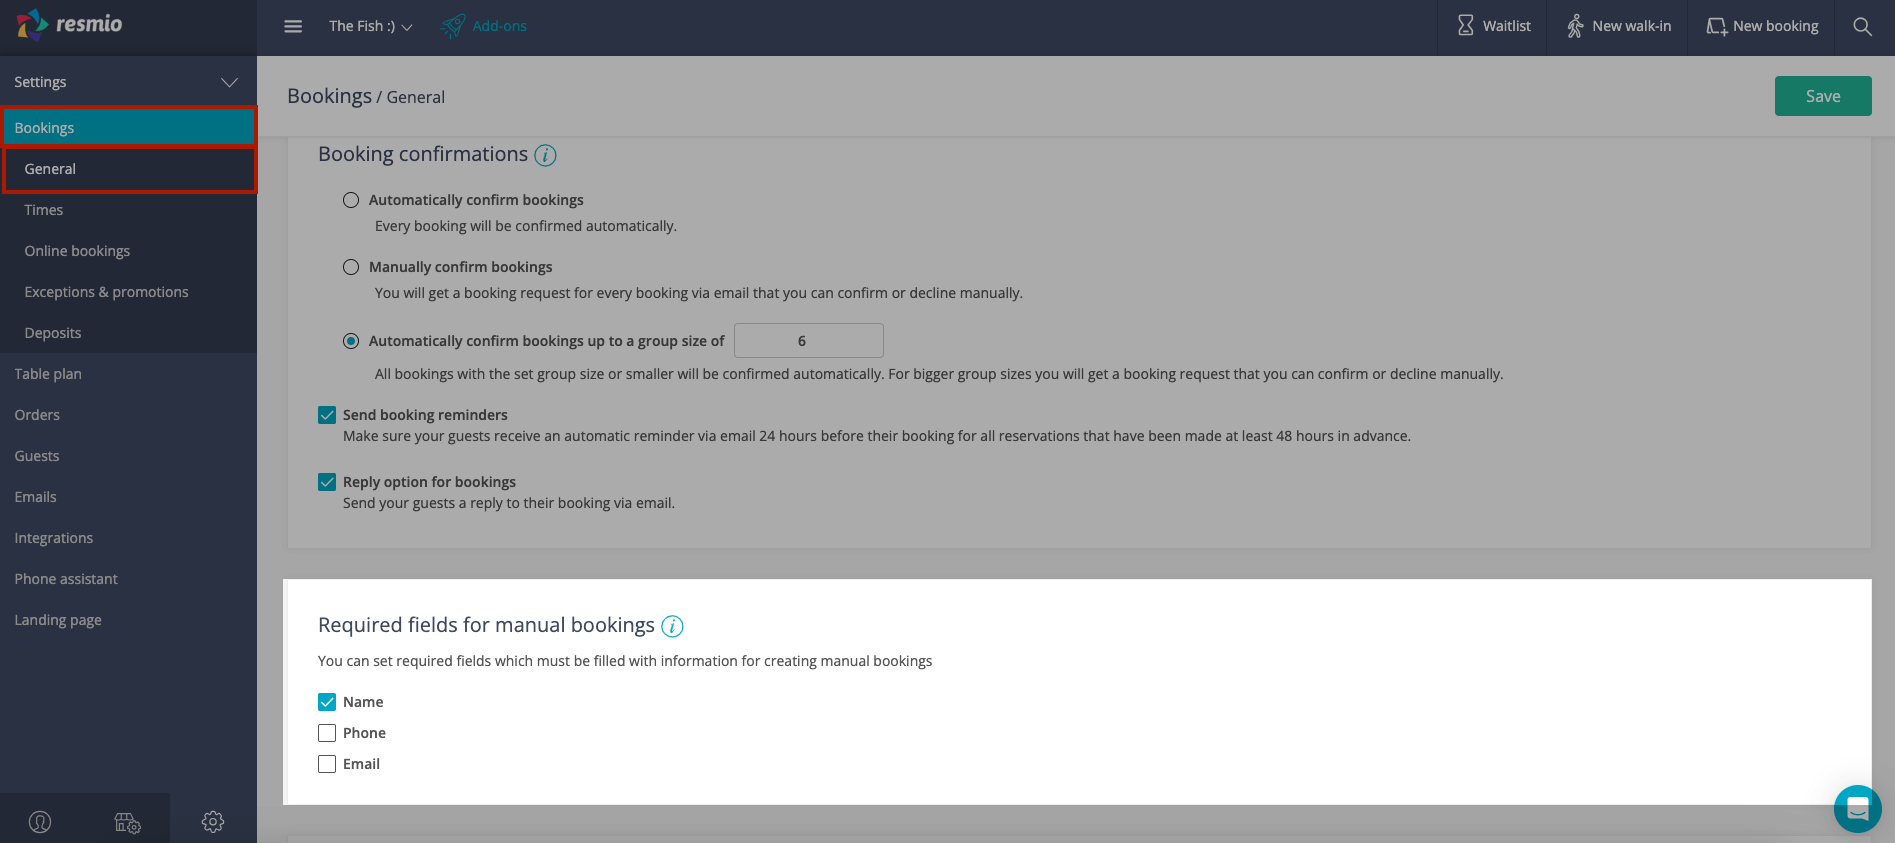
In case of online booking, resmio automatically accepts your online reservations by default. In some circumstances, it may be useful to approve or reject booking requests after individual review by the staff.
- If you have selected „Settings” > „Bookings” > “General” > „Automatically confirm bookings” , your guest will automatically receive a booking confirmation. You will be notified by e-mail or SMS, without having to do anything else.
- If you turn off the automatic confirmation, you have to confirm or cancel incoming table reservations first.This is done via…
- … a link in the email or SMS notification sent with the reservation.
- … in your booking overview via the status bar. It is only then that your guest will receive a reservation confirmation or cancellation.
You also have the option to automatically confirm bookings only up to a certain group size.
To do this, select “Automatically confirm bookings up to a group size of” and and specify the maximum number of guests for which automatic confirmation is allowed.
To avoid overbooking, it helps to choose the right settings.
- First, set your booking times and capacities under “Settings” > “Bookings” > “Booking hours and capacities“. Here you can specify exactly how many seats you want to make available online.
- With“Rush hour stop” you add a limit per reservation interval. This overwrites the capacities of the reservation times.
Furthermore, you can make the following settings under the same menu item:
- Specify the duration of the guest’s stay, so that your system can predict how long the reserved seats will be occupied.
- Also, you can set a lead time for bookings, so that you can get yourself ready for your guests.
This feature is basically optional.
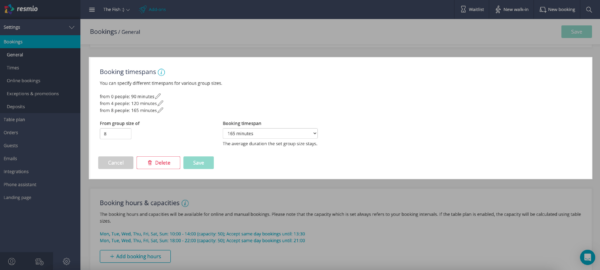
The booking time span from a certain group size can be predefined as follows:
- Switch to„Settings” > „Bookings” > „Booking hours and capacities “
- With “Booking timespans” you can set the duration of stay according to the size of the group (e.g. from 6 persons, duration of stay 90 minutes).
- When defining booking timespans, it is important to bear in mind that the duration of the stay, based on the reservation time, has an effect on the time period before and after the booking. As a result, a very long length of stay, in particular for larger groups, may block potential bookings.
- For larger groups, e.g., 15 people, a higher booking timespan may be reasonable. However, it should be noted that booking for a large group with a very long duration of stay per se may prove difficult, as sufficient seating capacities must be available for the required period.
Here is an example with the following initial situation:
- Restaurant has a total capacity of 25. A group of 15 or more for 14:00, configured length of stay: 240 minutes.
- The capacity of 15 is blocked in the reservation widget for a total of four hours between 14:00 and 18:00, reducing your total capacity by 15 seats.
- Case 1: A new group of 15 or more for 13:00, with the duration of stay configured as 240 minutes. This means that between 13:00-17:00 this group needs a capacity of 15. Between 14:00-17:00 there are 5 seats missing because of the first group, so at 13:00 this booking cannot be accepted.
- Case 2: Another group of 10 people for 13:00, configured duration of stay: 60 minutes and a further group of 5 people for 13:00, configured length of stay: 60 minutes. Required capacity for both groups is 15, between 13:00-14:00. Both reservations can be accepted as there is capacity for 15 people at 14:00.
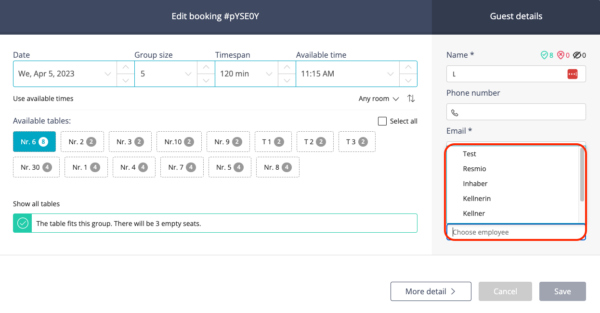
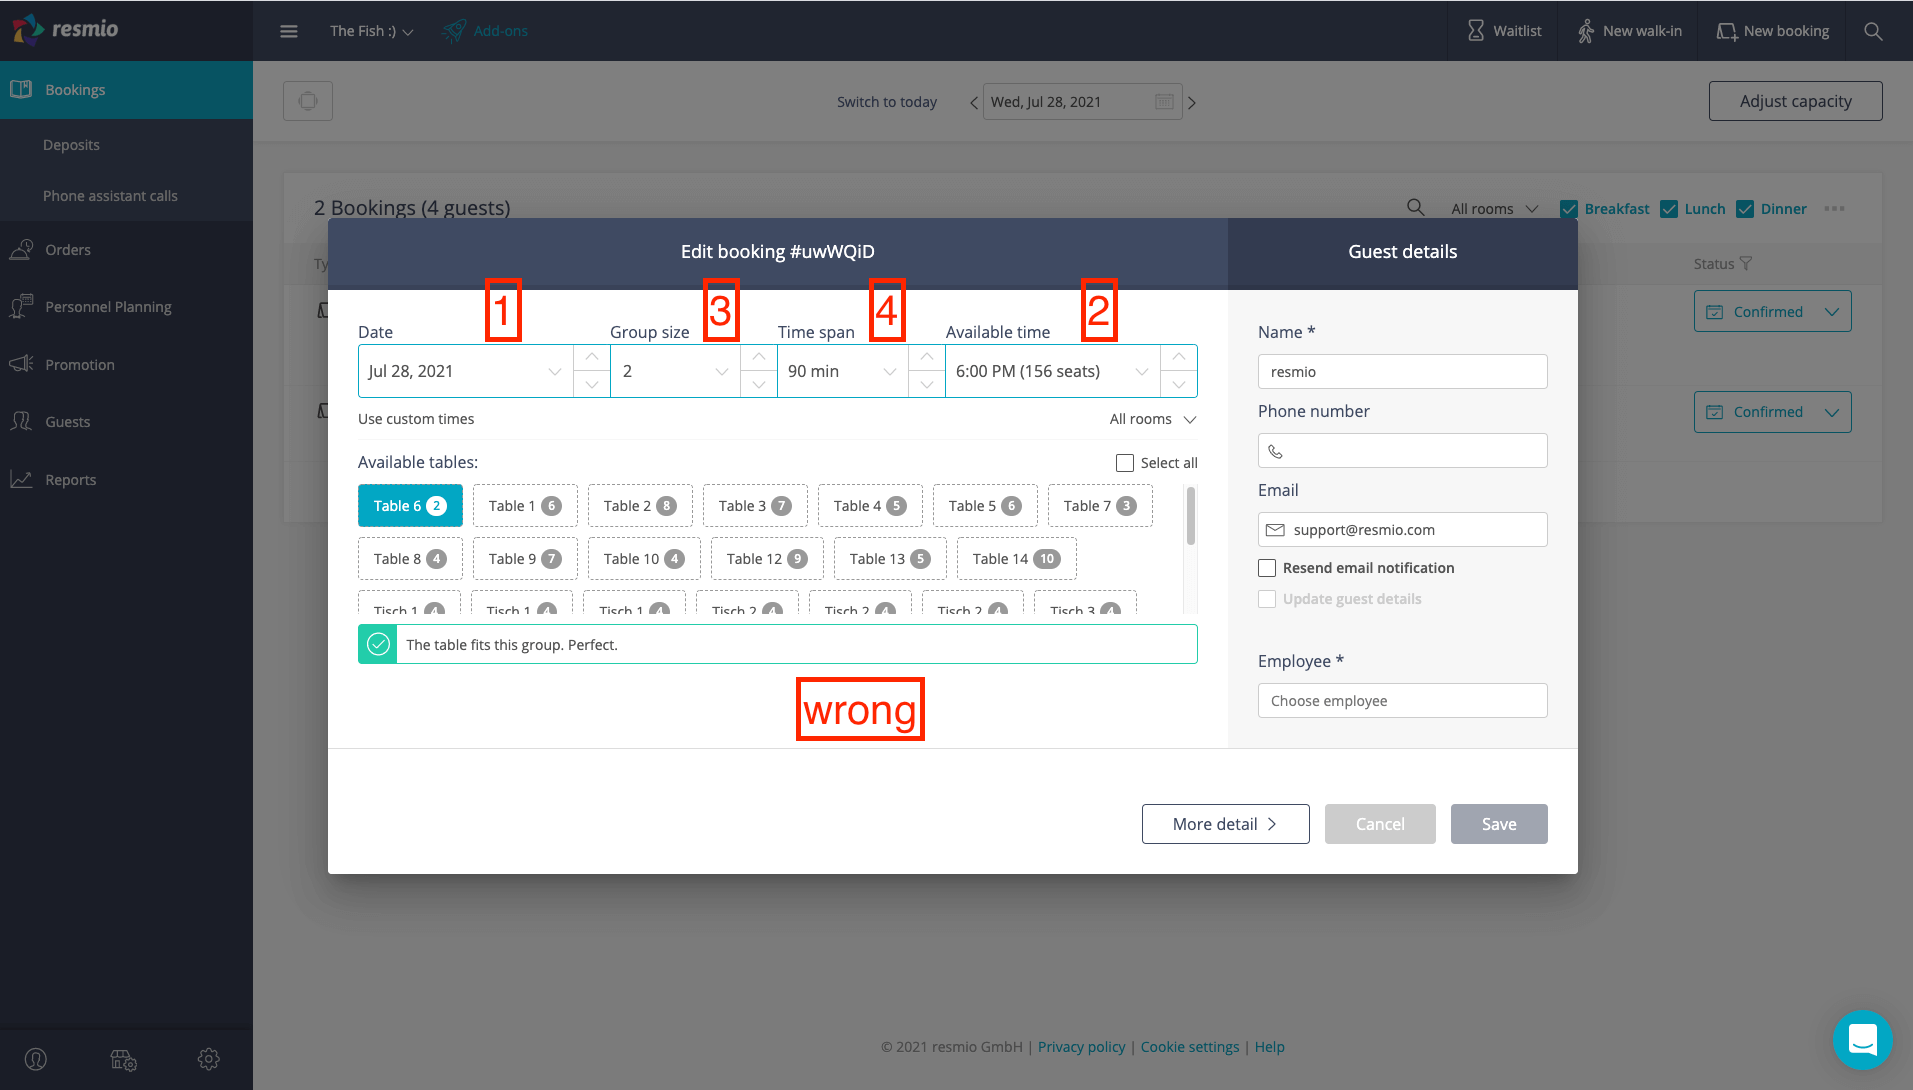
In case of manual addition of a new booking, you should always set 1.) the date, then 2.) the group size, then 3.) the time span and 4.) finally the available time, because depending on the size of the group, the duration of stay applies and available capacities are recalculated and can change in the process.
Keep in mind that in case of a manual booking, you can still modify the duration of stay as you wish.
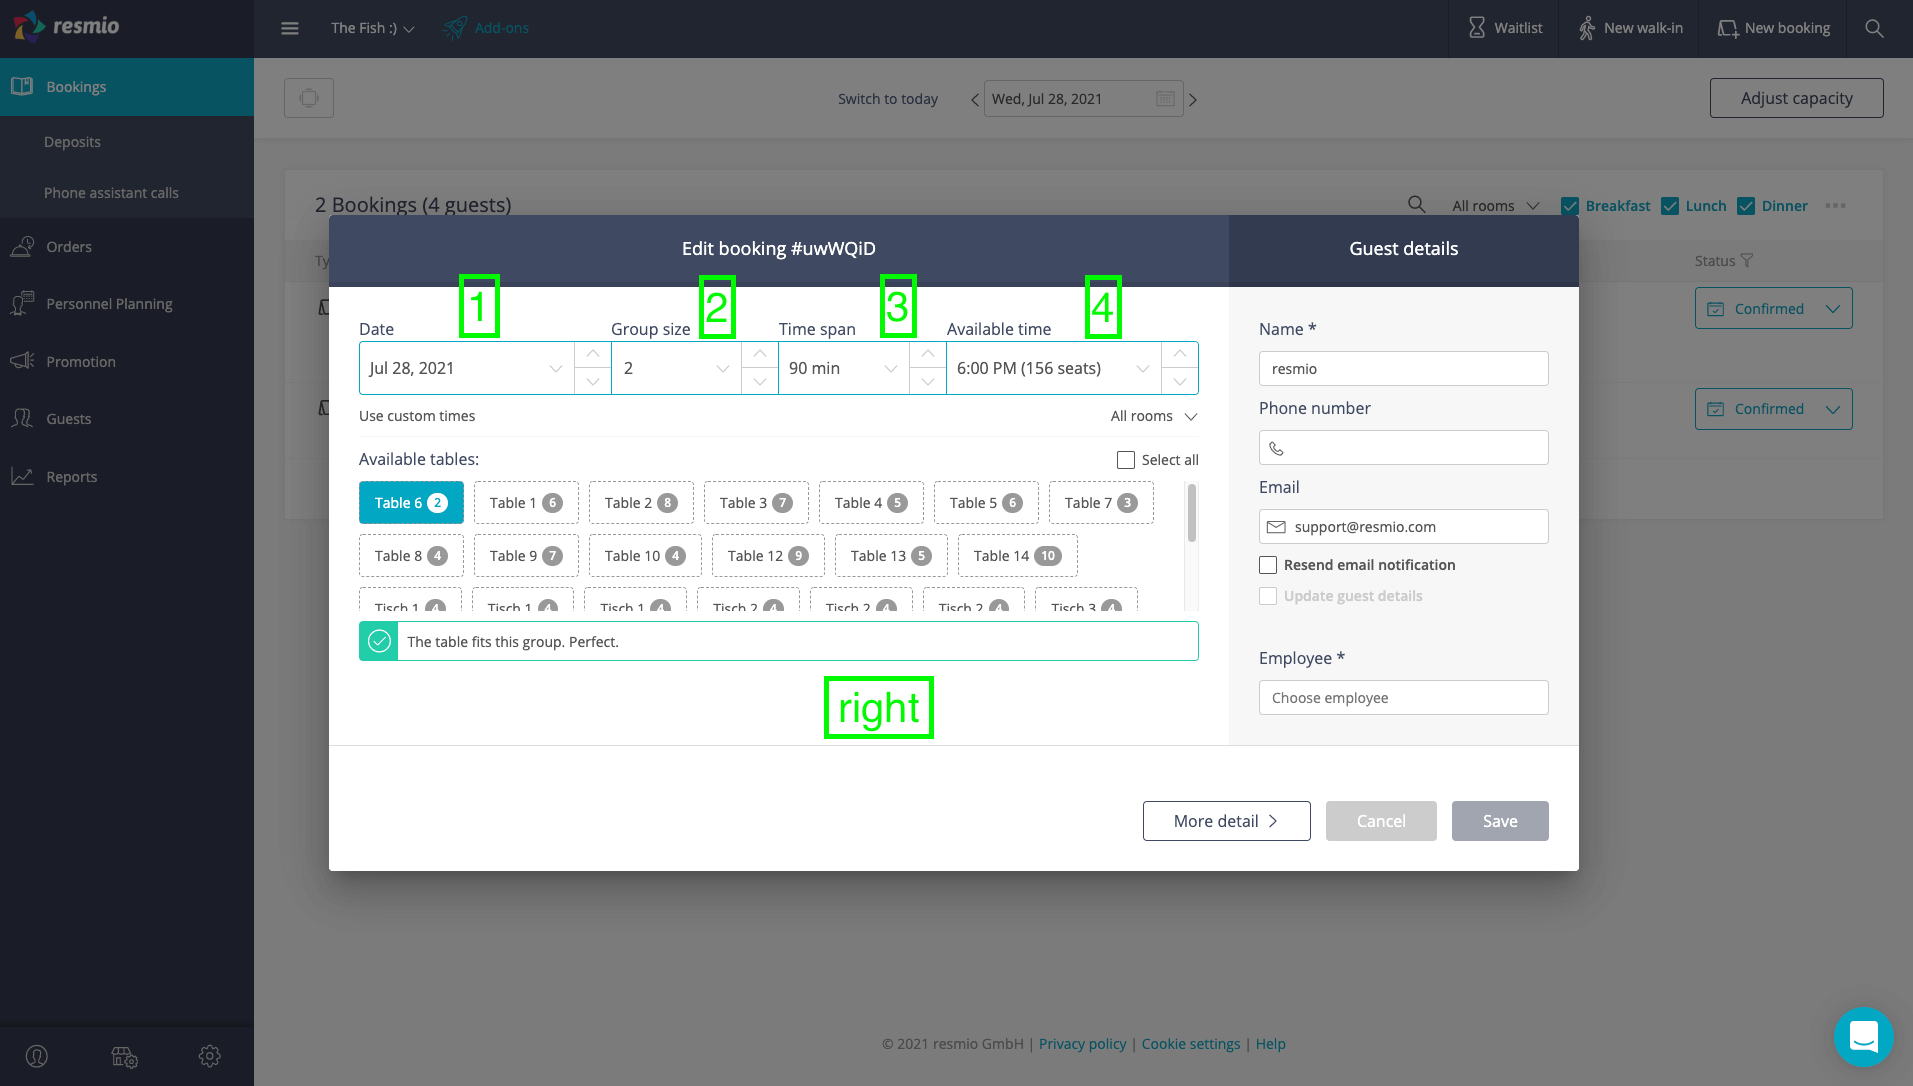
Example:
- Right: Choose first the date e.g. 03/23/2020, the amount of guests who would like to book a table e.g. 10 people and finally the time (e.g. 6:00 p.m.). The time span will be automatically adjusted. You can see immediately whether you have enough capacities available (e.g. 6:00 p.m., 0 seats).
- Wrong: First you select the time (e.g. 6:00 p.m.) and see available seats (e.g. 10). If you change afterwards the date and the group size, the capacities will be also recalculated. Thus, instead of 10 free seats (that were shown previously), 0 available seats might appear, in case there is no more capacity for 10 at selected time.
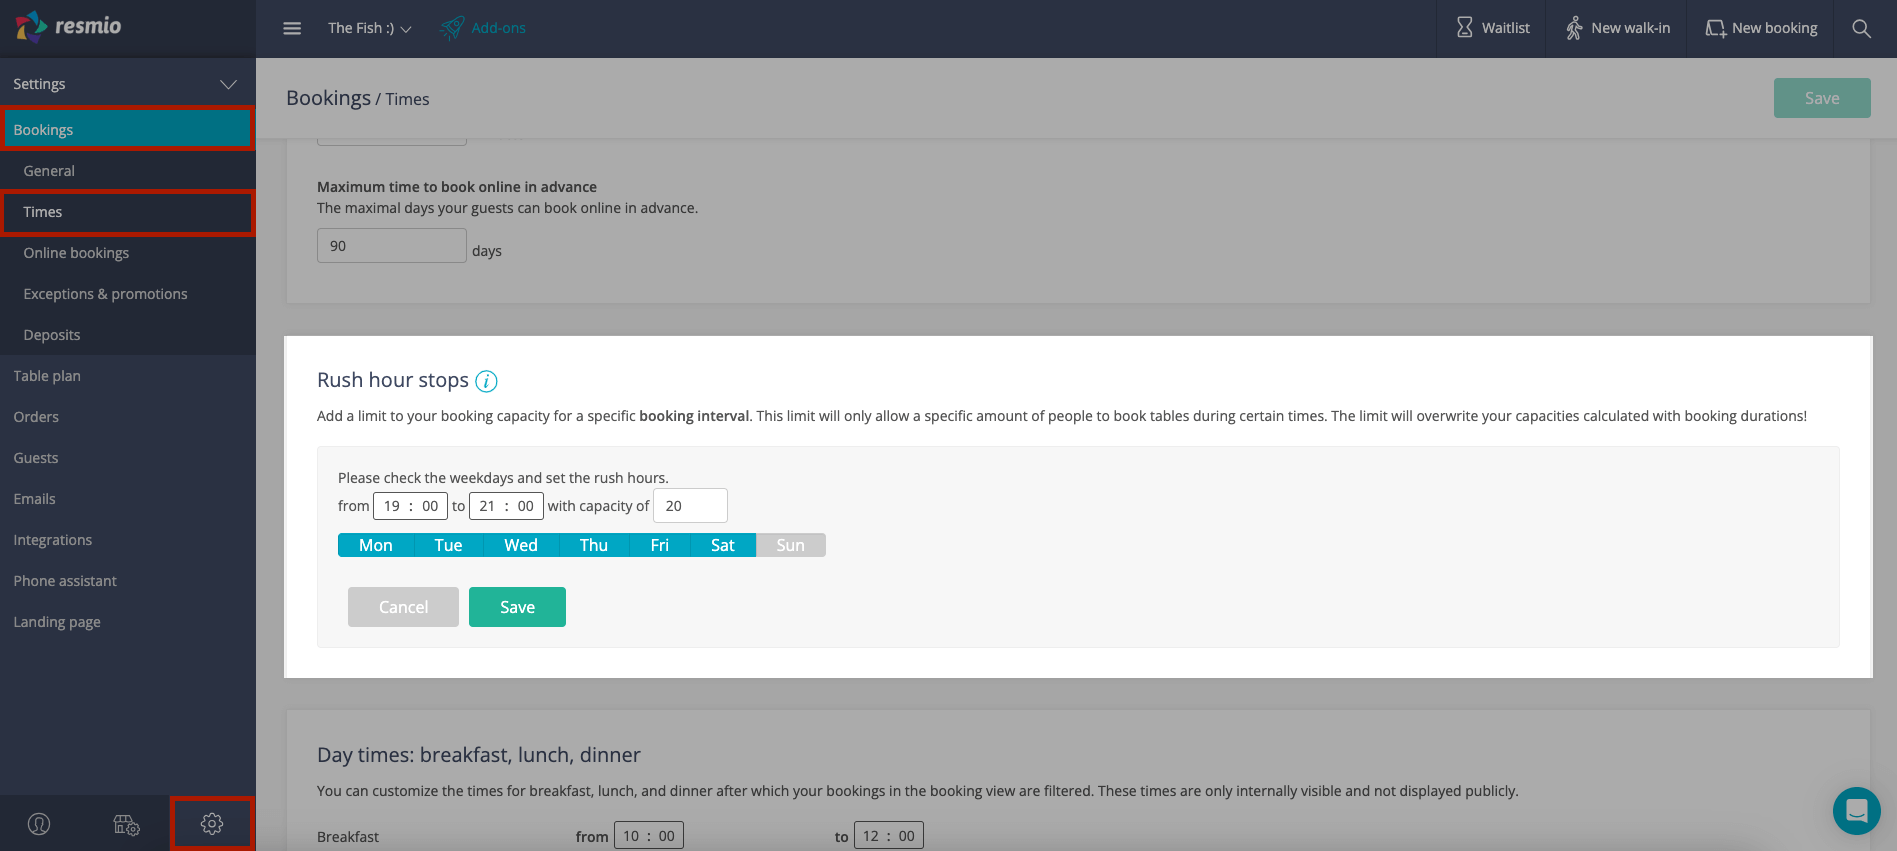
In order to keep tables open for certain groups of guests (e.g. walk-ins) and / or to relieve the kitchen and the service during peak periods, it is advisable to set a “rush hour limit“.
That’s how it works:
- Under “Settings” > “Bookings” > “Times” > “Rush hour stop” you can set up a different capacity for a certain time slot than your usual capacity.
Example:
- Booking interval of 30 minutes, booking times and capacity: Mon. – Sun. 12:00 to 20:00 (capacity 50).
- Rush hour limit for Sat. and Sun. 6-8 p.m. (capacity: 25)
- Result: On Sat. and Sun. between 6 p.m. and 8 p.m. a maximum of 25 seats per booking interval (30 minutes) is available, although the restaurant capacity is higher at other times (50).
Click on![]() “Settings” > “Bookings” > “Booking hours & capacities“ and you will find the option to define a booking lead time (“booking in advance hours”) in the next position.
“Settings” > “Bookings” > “Booking hours & capacities“ and you will find the option to define a booking lead time (“booking in advance hours”) in the next position.
This option sets the minimum time that determines how many minutes before the actual booking your guests have to reserve.
And there is the maximum lead time, which determines how many days in advance guests can reserve.
You can also specify directly in your preset booking times that you do not accept reservations for the same day after a certain time.
- Just click on your already set times and check the box “Widget bookings for the same day should not be accepted after this time“.
Your booking system offers a variety of options to take preventive action against no-shows:
- Guests who have previously been no-shows will be tagged in your reservation overview. This requires that you or your staff have marked any no-shows as such in the past using the booking status.
- You can block unwelcome guests from making online reservations.
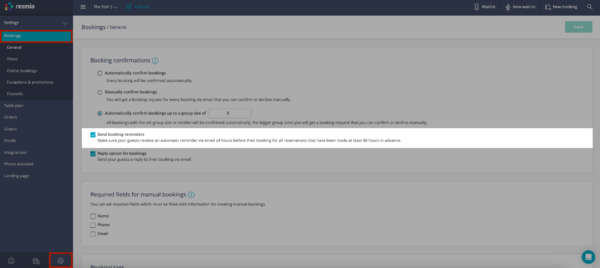
- Firstly, you can enable booking reminders under “Settings” > “Bookings” > “General“ “Send booking reminders”.
- This way your guests will receive an email 24 hours before their reservation reminding them of their table booking….
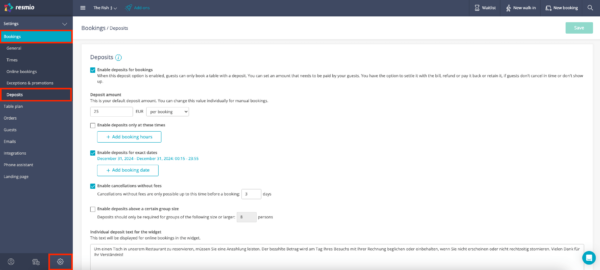
- Furthermore, you can specify under “Settings” > “Bookings” > “Deposits“ that your guests have to pay a sum determined by you before they can make a binding reservation for a table.
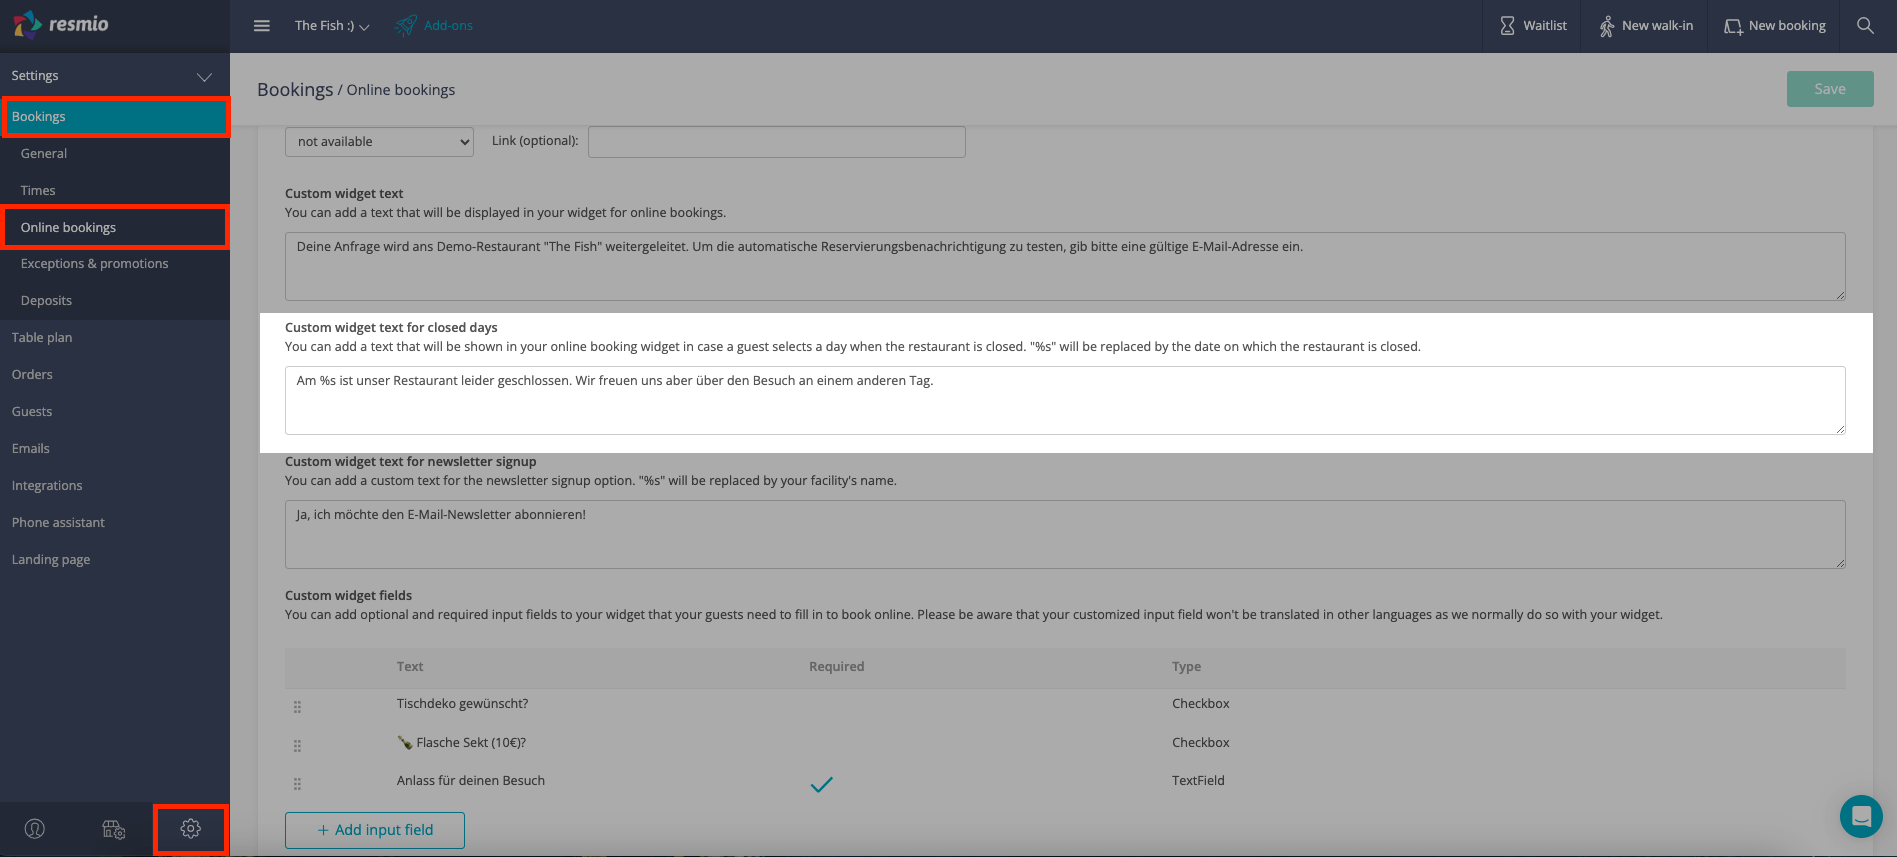
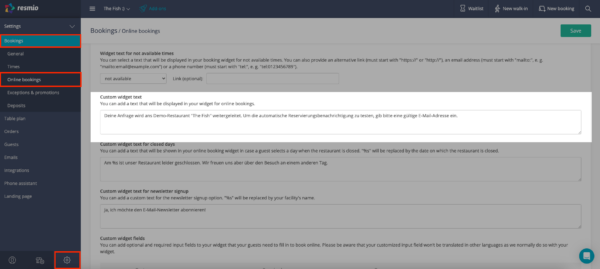
By default, the text for closed days is "Sorry, we are closed on %", which is translated into the language of your guests according to the language setting in the browser.
However, you can customize this text if needed.
- Click on “Settings”> “Bookings” > “Online bookings“, browse to the section “Custom widget text for closed days” and add your desired text.
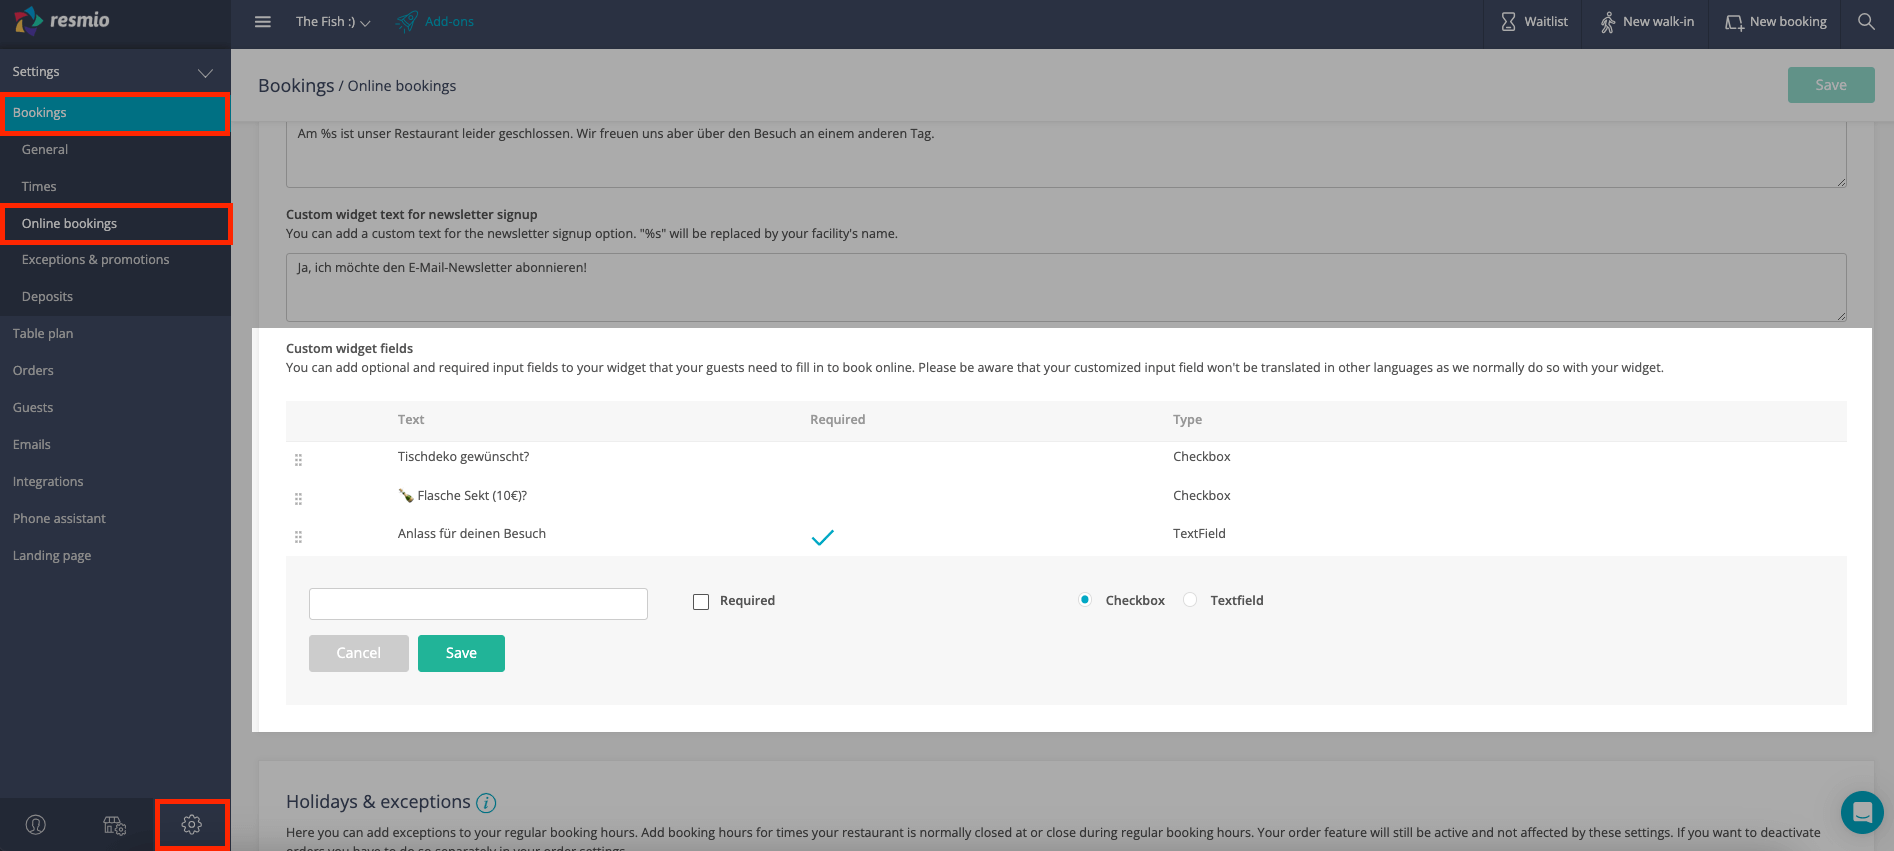
If you want to ask your guests for further reservation details besides contact details (e.g. occasion of the visit), you can set custom input fields for your booking widget.
- You can find the feature under “Settings” > “Bookings” > “Online bookings“ > “Custom widget fields”.
- Via the button “+ Add input field” you can set individual fields.
- You have the choice between a free text field and a checkbox.
- It is also possible to decide whether the information should be a mandatory field or not.
- If you mark an item as a mandatory field, the booking can only be completed if a value is also entered in this field.

You can customize many emails that are sent automatically through your system (e.g. booking confirmation, order confirmation or information about waiting list entries, feedback emails) under ![]() “Settings” > “Emails“.
“Settings” > “Emails“.
You can customize the following basic elements:
- Header
- Title
- Message
- Greetings
- Show / hide elements (logo, contact details, address, buttons)
In addition to the text, you can also customize the color scheme of the email to suit your restaurant. To do this, go to “Settings” > “Emails“ and click on the “Color settings” button at the top right. There are several color themes to choose from, or you can create your own.

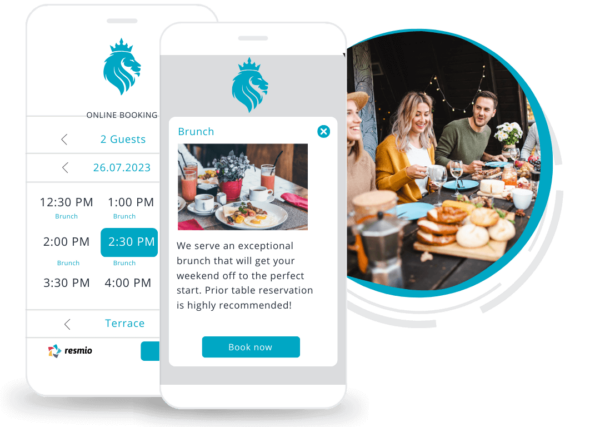
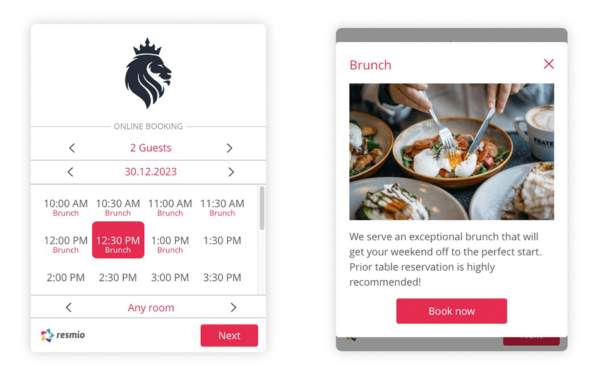
Use your reservation widget to notify guests of upcoming deals and events, such as available brunches or a happy hour in the evening. By doing so, you can, for example, get seats filled with guests at times when utilization is likely to be low.
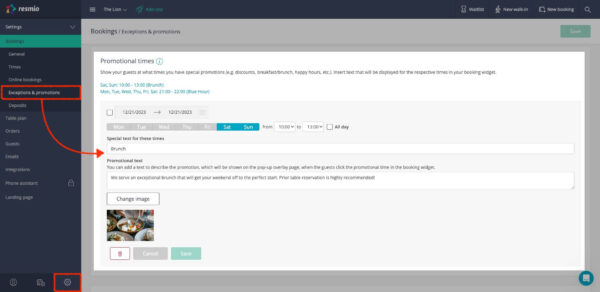
Here’s how it works:
- “Settings” > „Bookings” > “Exceptions & promotions“
- Click the + Set promotional times button and you will be able to select the days and times when the notice should appear.
- Add an attractive title for your special offer and an appealing description text.
- If possible, upload a suiting image that guests should see in your widget.
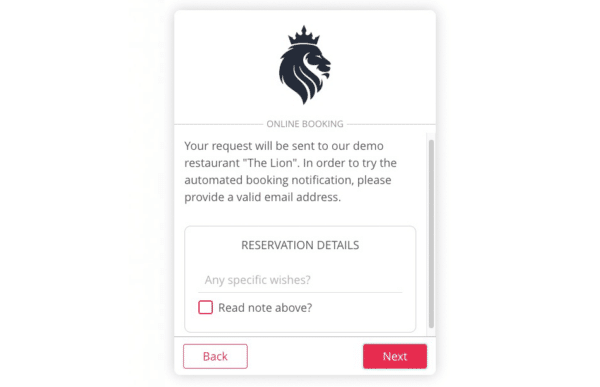
If you would like to provide your guests with relevant information in advance of the online booking, you can provide this information under “Custom widget text”.
Here’s how it works:
- You can find the feature under “Settings” > “Bookings” > “Online bookings“.
- Your note to guests will be shown in your booking widget immediately after choosing a booking time, i.e. in the second step.
Within your resmio account it is possible to define which guest details your staff has to fill in when adding ( phone ) reservations.
- Click on “Settings” > “Bookings” > “Online bookings” > “Required fields for bookings” to select “Name”, “Phone” und “Email” respectively.
Please note that this setting explicitly does not apply to walk-ins and incoming online reservations.
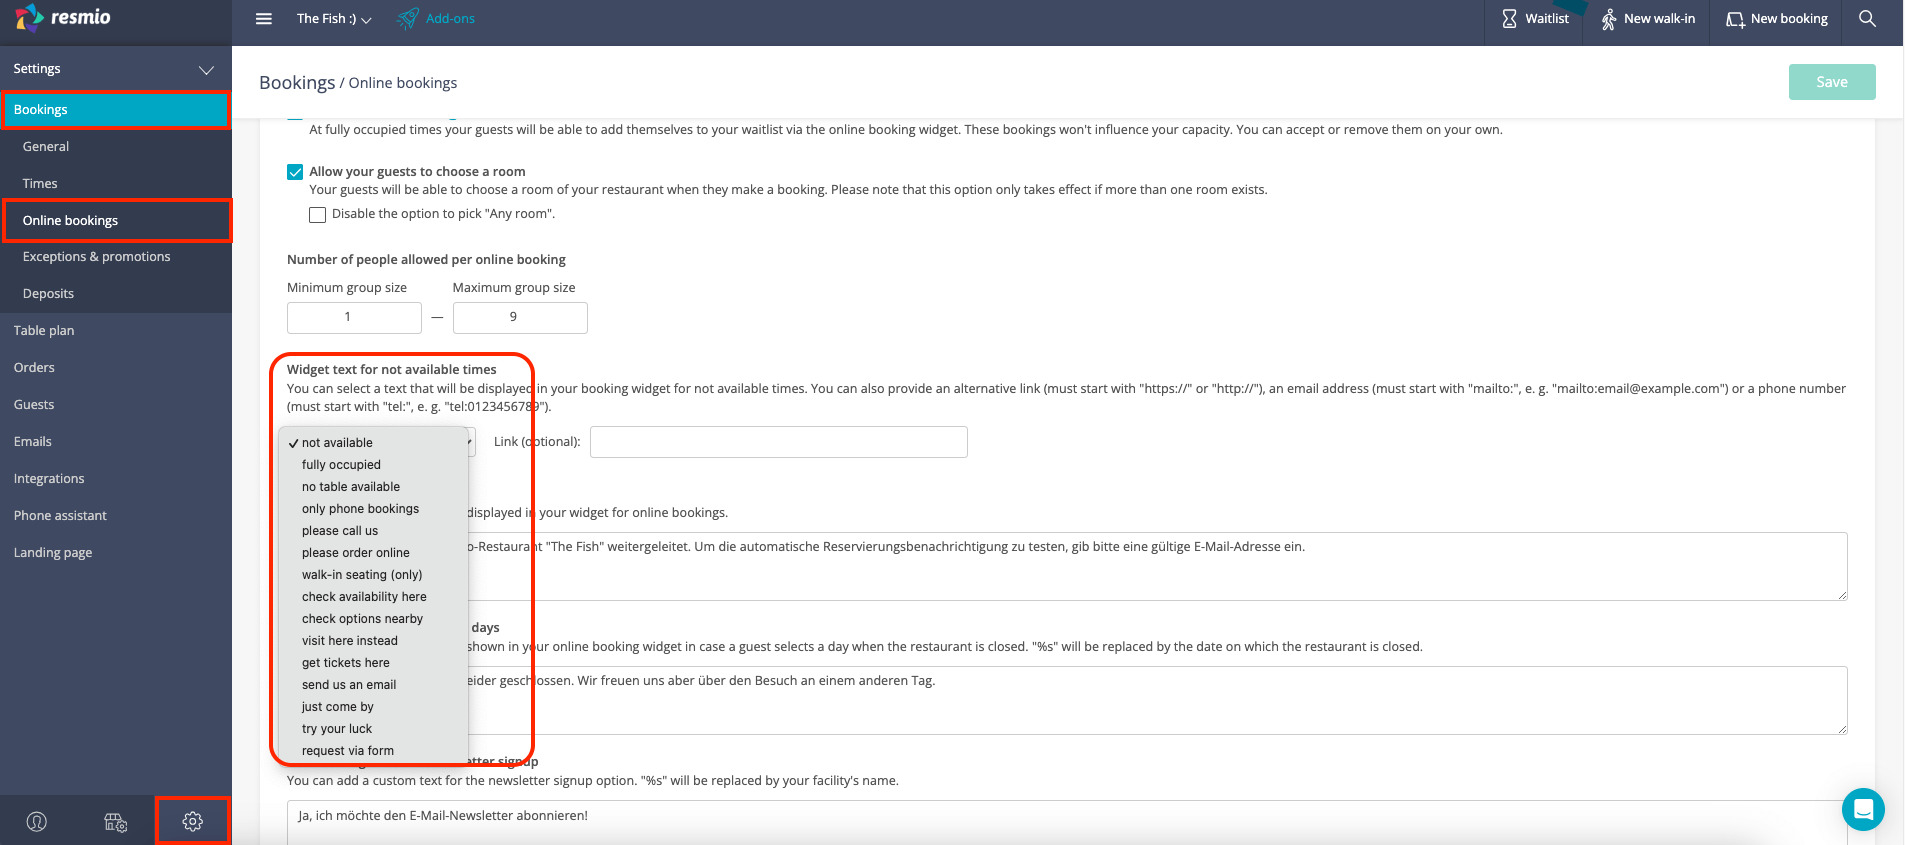
By default, your guest reservation widget will show “not available” as text for times that are currently unnavailable.
This text can be customized via your system::
- Choose under “Settings” > “Bookings” > “General“ > “Widget text for not available times” one of the available options.
- You can also optionally add a link, email or phone number to direct your guests to an online menu, for example, if there is no room in the restaurant.
The pre-selected widget text will be automatically translated into the language of your guests defined in the browser settings.
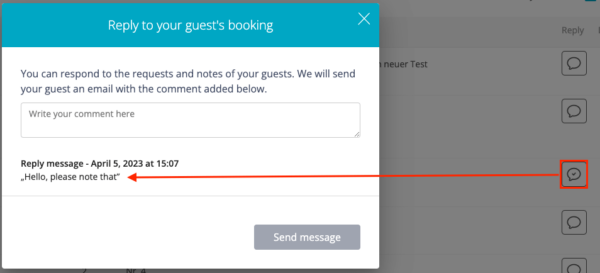
Your guests have the opportunity to ask questions in the notes field during booking. You can reply to these questions by clicking on the speech bubble next to the status on the right side. The guest will then receive an email with your message.
In order for the speech bubbles to be displayed, you need to go to ![]() “Settings” > “Bookings” > “General“ > check the box “Reply option for bookings”.
“Settings” > “Bookings” > “General“ > check the box “Reply option for bookings”.
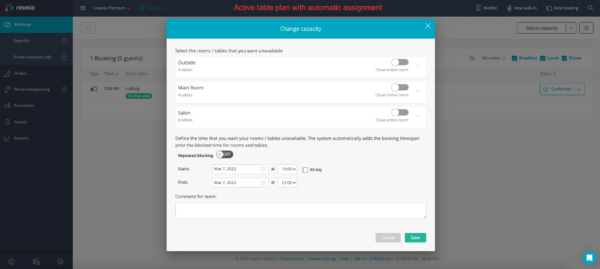
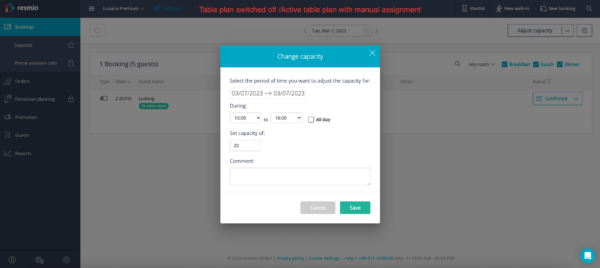
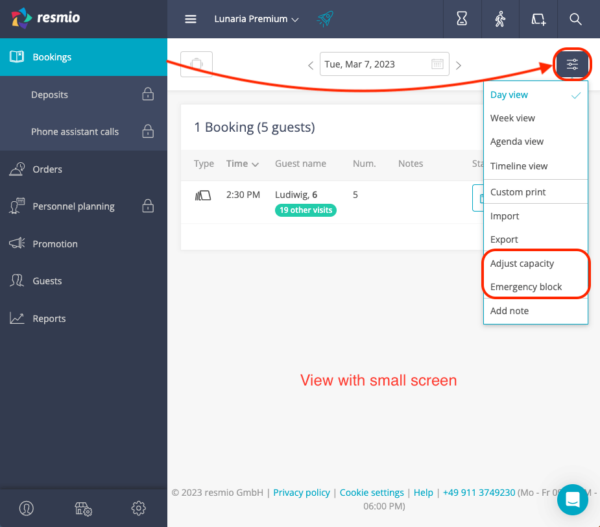
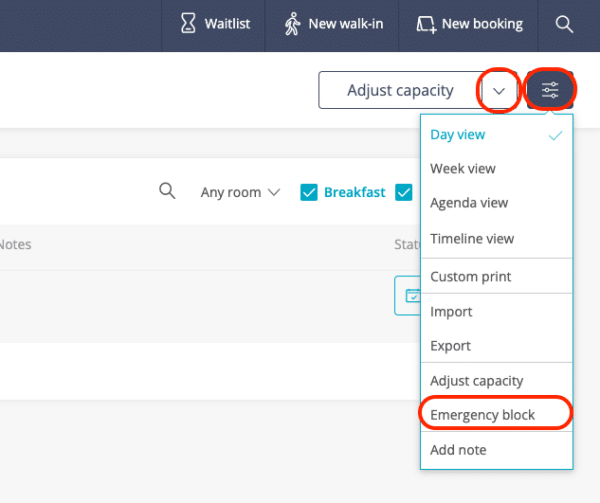
In your reservation book (at the top left under ![]() „Bookings”) you will find a button “Adjust capacities” at the top right.
„Bookings”) you will find a button “Adjust capacities” at the top right.
- If you have activated the table plan with automatic table assignment, you can easily block tables or even entire rooms via this button.
- To do this, simply click on the drop-down menu of the corresponding room and then on the tables you want to lock.
- You can alternatively click on the button next to the room and block the entire room.
- In addition, you have the option to specify how long the tables or rooms should remain blocked or that they should be regularly blocked at certain times.
- If you do not have a table plan or have activated the table plan with manual table assignment, you can directly adjust your capacities here. Also for this case you can define the period of the change.
If you want to deactivate the online booking for a whole day, there is an emergency block.
You can find the button by the filter symbol ![]() in the upper right corner of your reservation book.
in the upper right corner of your reservation book.
Simply set the slider to active (blue) and save. Your guests will then receive a message that no bookings are possible for this day.

In case of temporary measures (holidays, renovation works, company vacation, pandemic-related closure…) you can block your restaurant for all bookings.
- Go to “Settings” > “Bookings” > “Exceptions & promotions“ to specify exact dates when your restaurant is closed.
- Just click the “+ Add exception” button and set the period using the calendar.
- Below that, select “Closed” from the drop-down menu and either add specific times or check the “All day” checkbox to have your restaurant listed as closed for 24 hours.


