Account & Settings
Table of contents
Manage account
- How do I sign up for resmio?
- How do I log in to resmio?
- How do I reset my password?
- How can I change the language of the system?
Permissions and user management
Accepting payments from guests
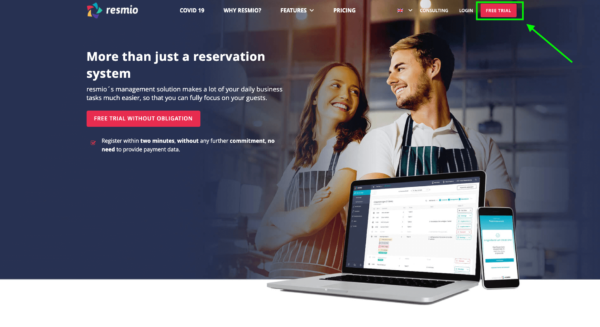
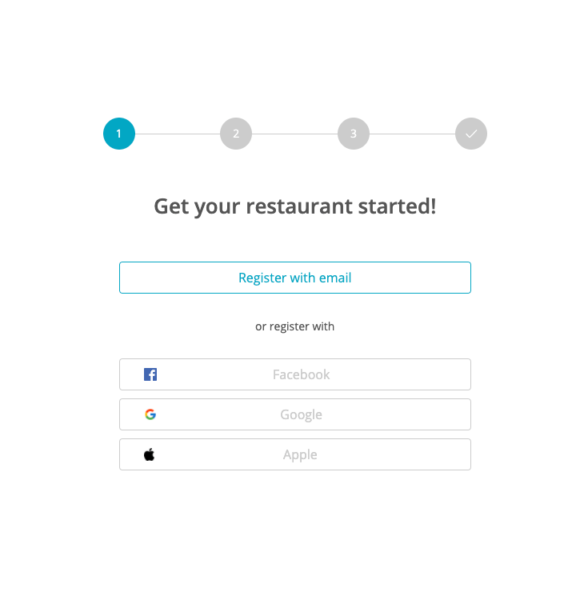
Registering with resmio is really easy. First, click on FREE TRIAL. You will be redirected to our registration page where you just have to enter your email address, the name of your establishment, as well as its physical address.
After registration, you have immediate access to resmio and can take your time exploring our features.
Also check your mailbox! There you should find an email from resmio with instructions on how to create your password. Just follow the instructions in the email.
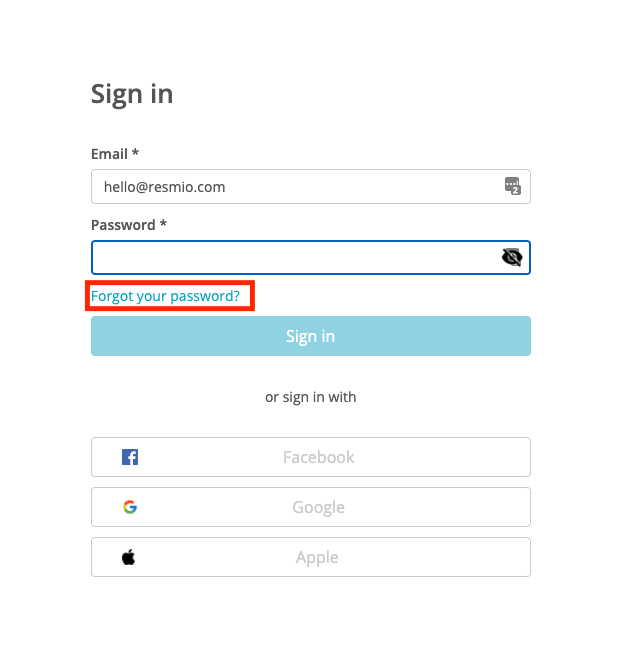
It’s very easy! In the resmio menu bar, click on the button Login. If you have already saved your login information, you will be automatically directed to the user interface. If you have not saved your login information, a login page will appear on which you need to enter your user name and personal password.
We recommend that you save your access information in your browser and mark the resmio user interface as a favorite

If you don’t remember your password, simply click on the link “Forgot your password?” and we will send a new password to your email address.
Your resmio reservation system will always adapt to the language you have set in your browser (e.g. German, English, French, Italian, Spanish, Portuguese). This also applies to the widgets ( booking, orders, ticket and voucher sales).
If you want to change the language, simply change it in the browser settings. If you refresh the browser window now, the system will automatically adapt to the language you have now set.
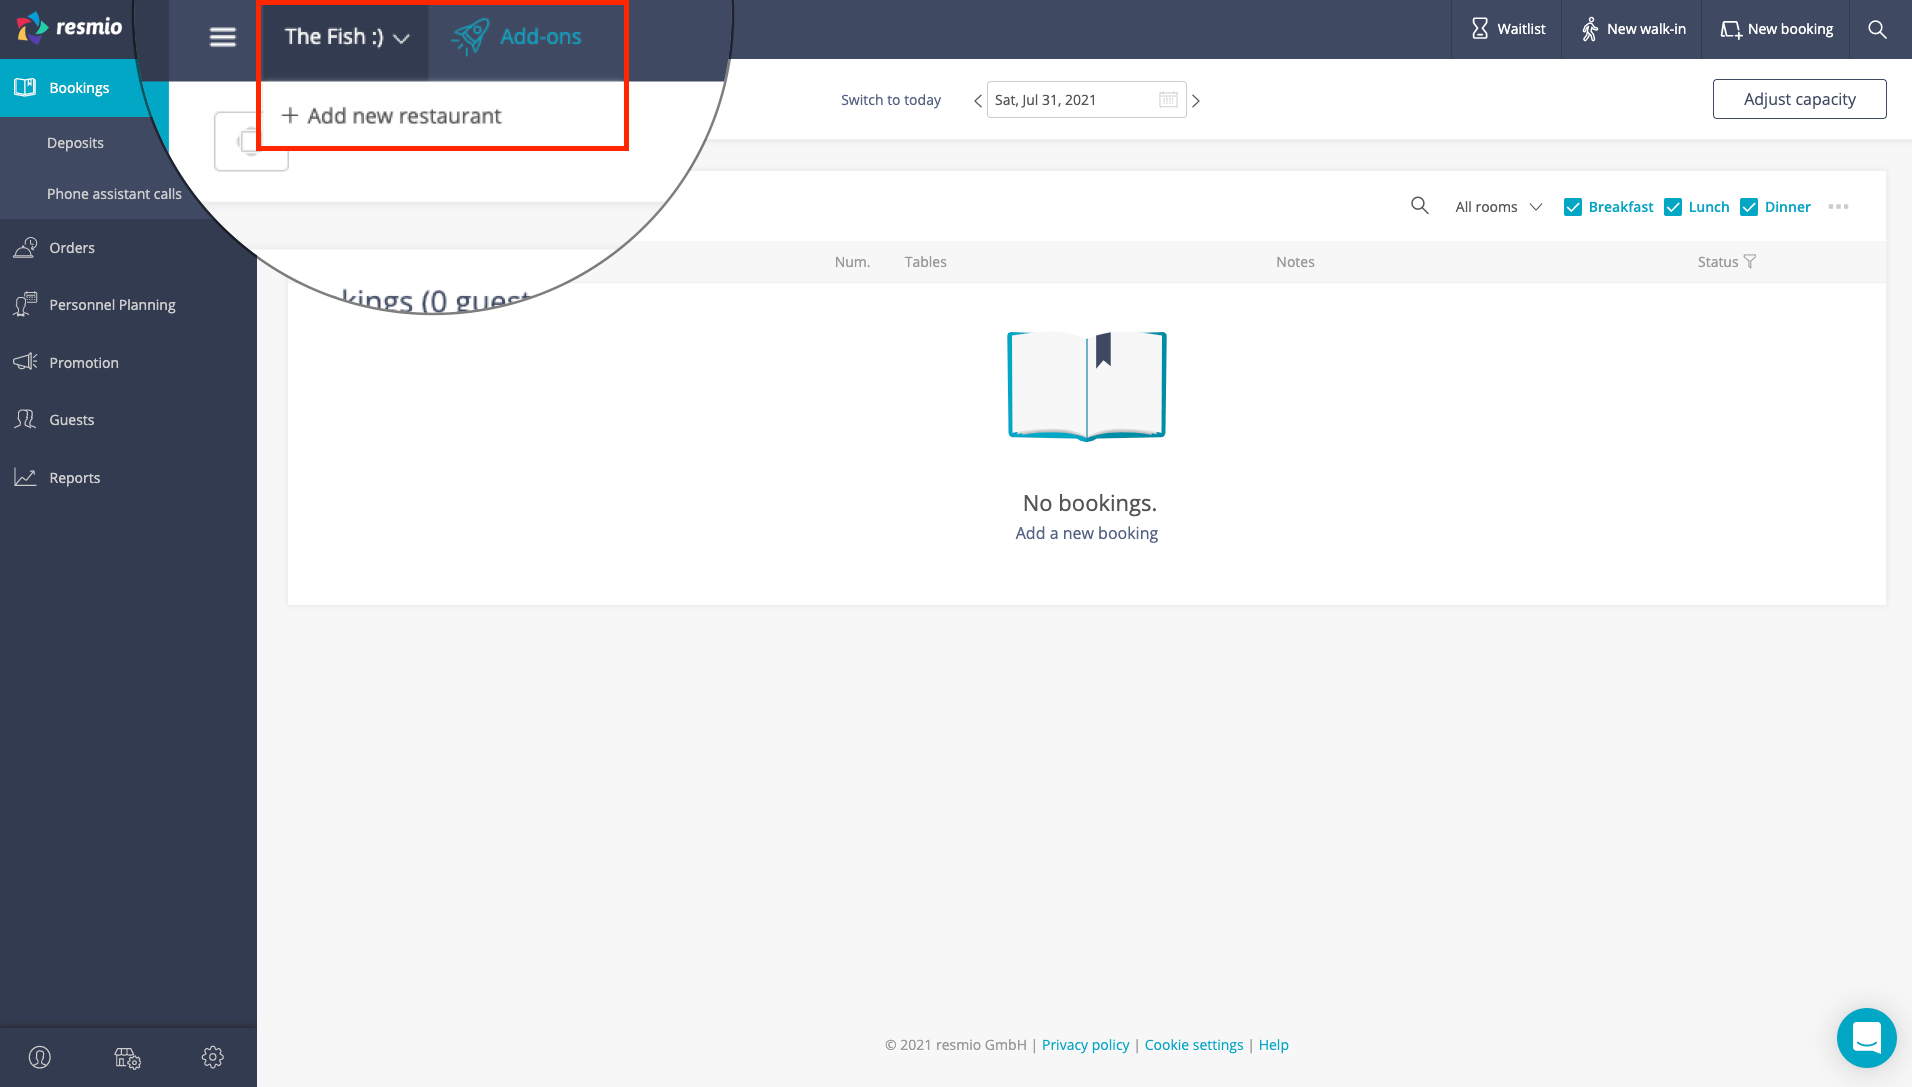
- First log in your “primary account” / restaurant at app.resmio.com/signin
- Click on the restaurant name in the top bar and in the next window on + Add new restaurant.
- Fill in all required form fields, confirm by clicking on the Next button and follow further instructions
- As soon as the restaurant has been created, you can switch between the restaurants by clicking on the restaurant name in the top bar.
User and user rights management is available if you at least booked the PREMIUM plan.
- Select the
 “Facility Account” icon in the middle of the menu at the bottom and then click “Users“.
 - In the next window you can select +Add user to invite other users to your account. You also have to determine the user role.
Please note: Only users with the administrative role “owner” can invite and remove other users. - Added employees will receive an email invitation asking them to create a password.
- As “owner” you also have the possibility to remove users. Therefore just select the employee account in the overview and in the next window click on the delete button.
User permissions
Waiters: These users cannot access the settings and facility account. But they can see and edit bookings, vouchers, tickets, events and orders.
However, in the reservation book, users also have access to the “Adjust capacity” button and can change the capacity.
Managers: They have limited access to the settings and management. What these users cannot view is the payment details/services, invoices and user settings.
Owner: With owner rights, you have access to all settings and can also add or delete new users.

Payments of tickets / coupons / vouchers, but also the processing of orders via the digital menu and deposits of bookings can optionally be made via the service provider PayPal.
-
- First create a new PayPal Business account. Please note that you cannot use an already existing private PayPal account.
- Then log in to PayPal Developer https://developer.paypal.com/developer/accounts/ with your credentials.
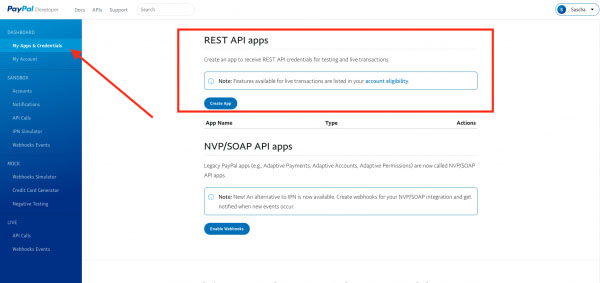
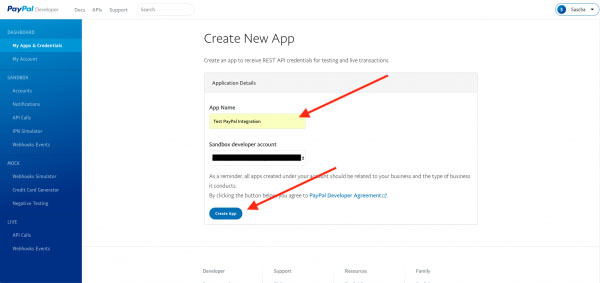
- To connect resmio with PayPal certain access data must be generated. Therefore go to the PayPal Developer interface to “My Apps & Credentials”.
- In the next window make sure that above the “REST API apps” section the slider is set to “Live” and then click the “Create App” button.
- Enter an app name and select “Create App”.
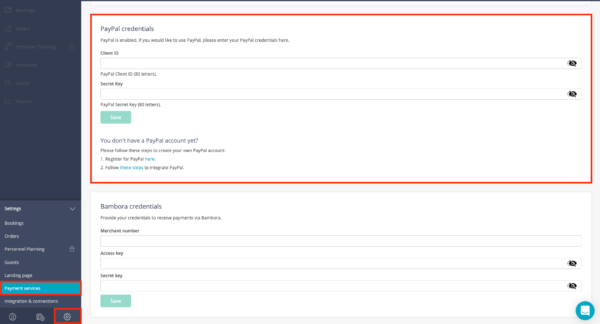
- You will receive a client ID as well as a secret key – copy this data with the key combination CTRL + C into the clipboard of your browser and add it to your resmio user account (below “Settings” > “Integrations” > “Payment providers“).
- Confirm the settings by clicking the “Save” button.
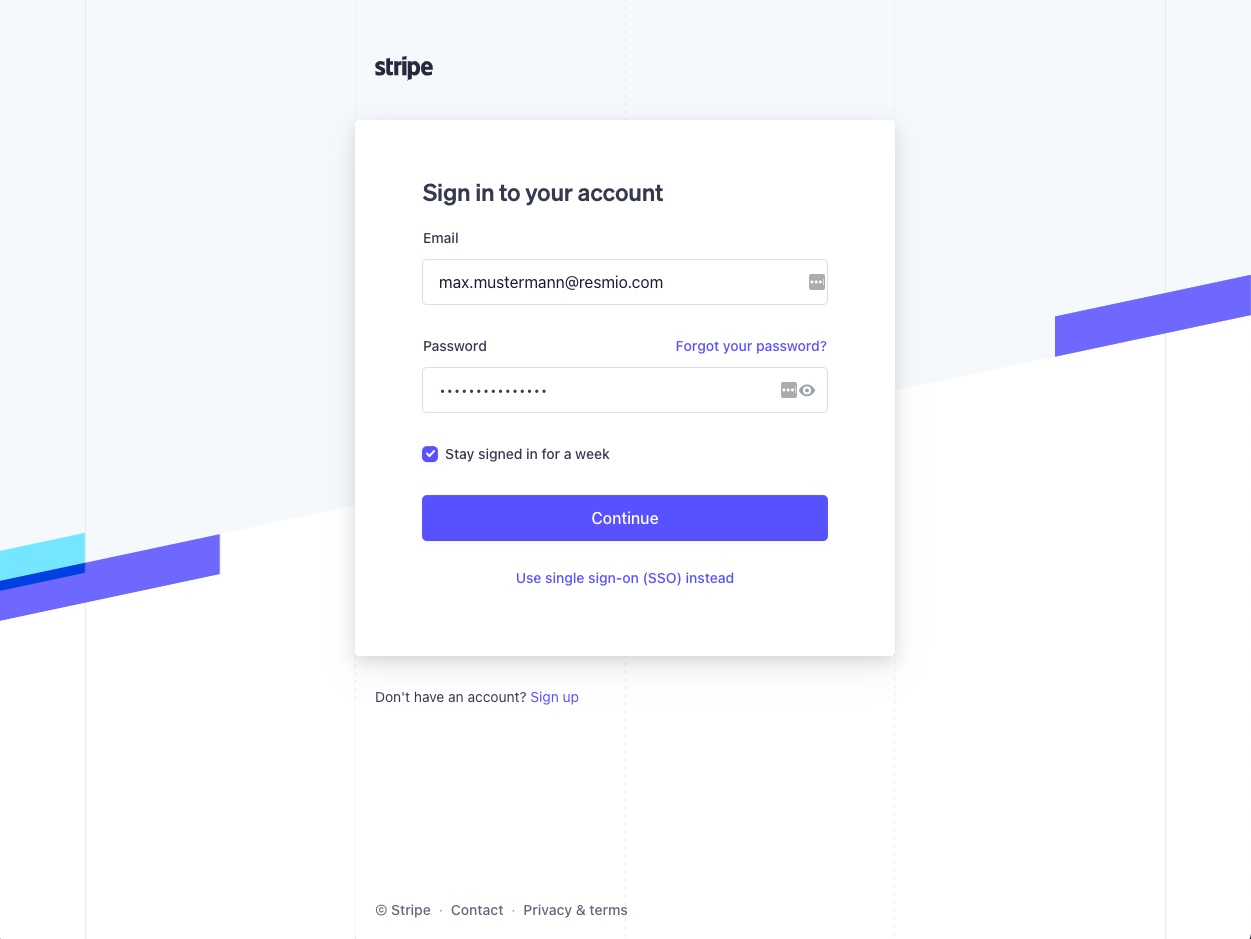
Payments of tickets / coupons / vouchers, but also the processing of orders via the digital menu and deposits of bookings can optionally be made via the service provider Stripe.
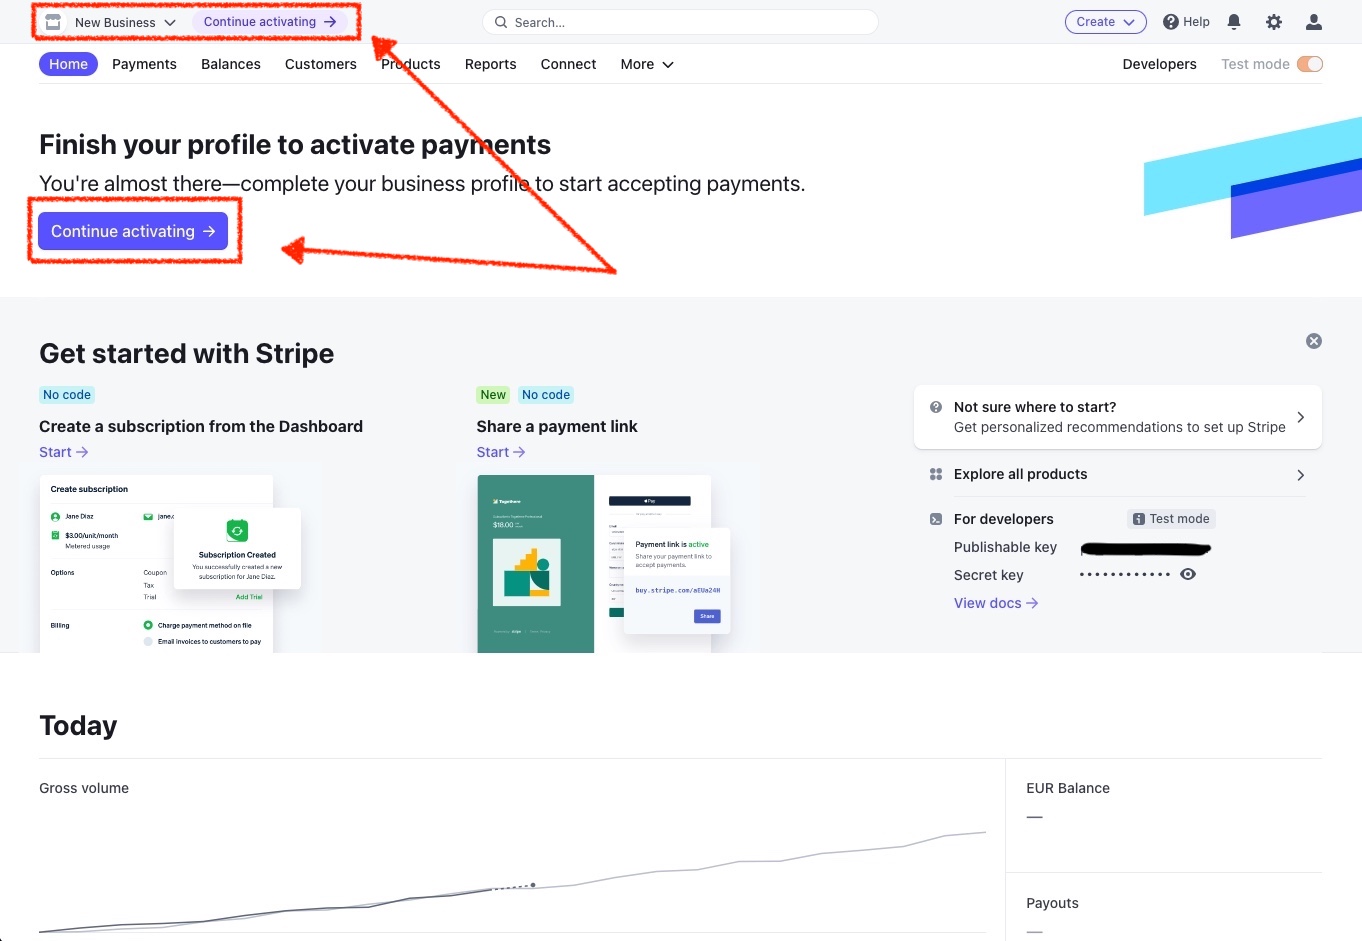
- First, sign up with Stripe.
- After logging in you will be asked to confirm your previously provided email address.
- Once your email address is verified, you need to verify your Stripe account. To do this click on the “Activate account” menu item in stripe and fill in all the required fields. It is especially important to enter your account details below “Bank Details”. Once you are done click the “Submit Registration” button at the bottom of the page.
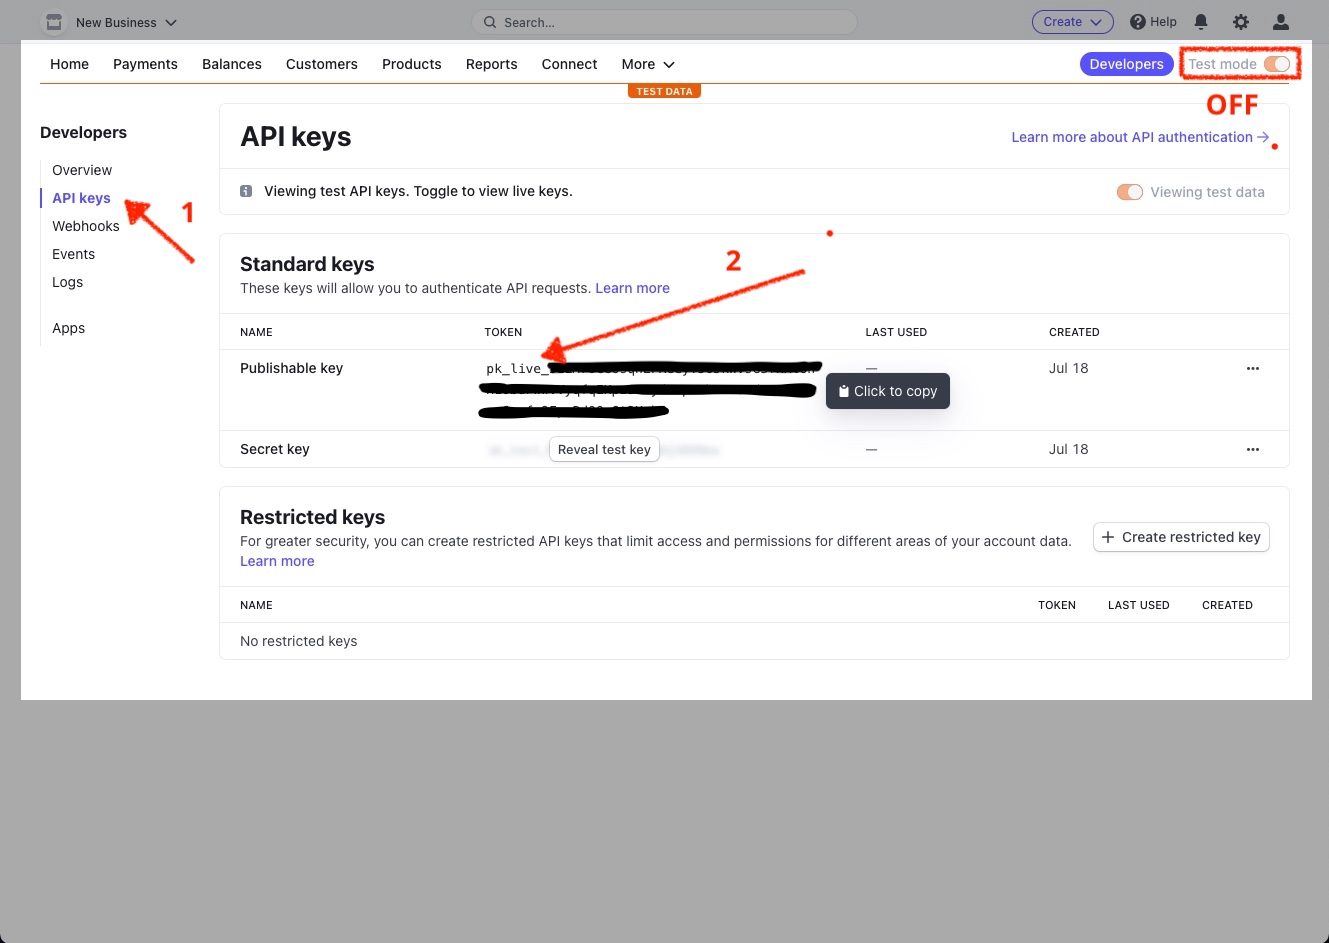
- The next step is to copy the Publishable- and Secret keys to your browser’s clipboard. In stripe select “Developers” in the menu on the left and then on the sub-item “API Key”.
Important: The “Test data is displayed” slider must be deactivated. The Publishable Key field should say “pk_live … “. - Copy the Publishable– and Secret keys to your browser’s clipboard using the CTRL + C keyboard shortcut.
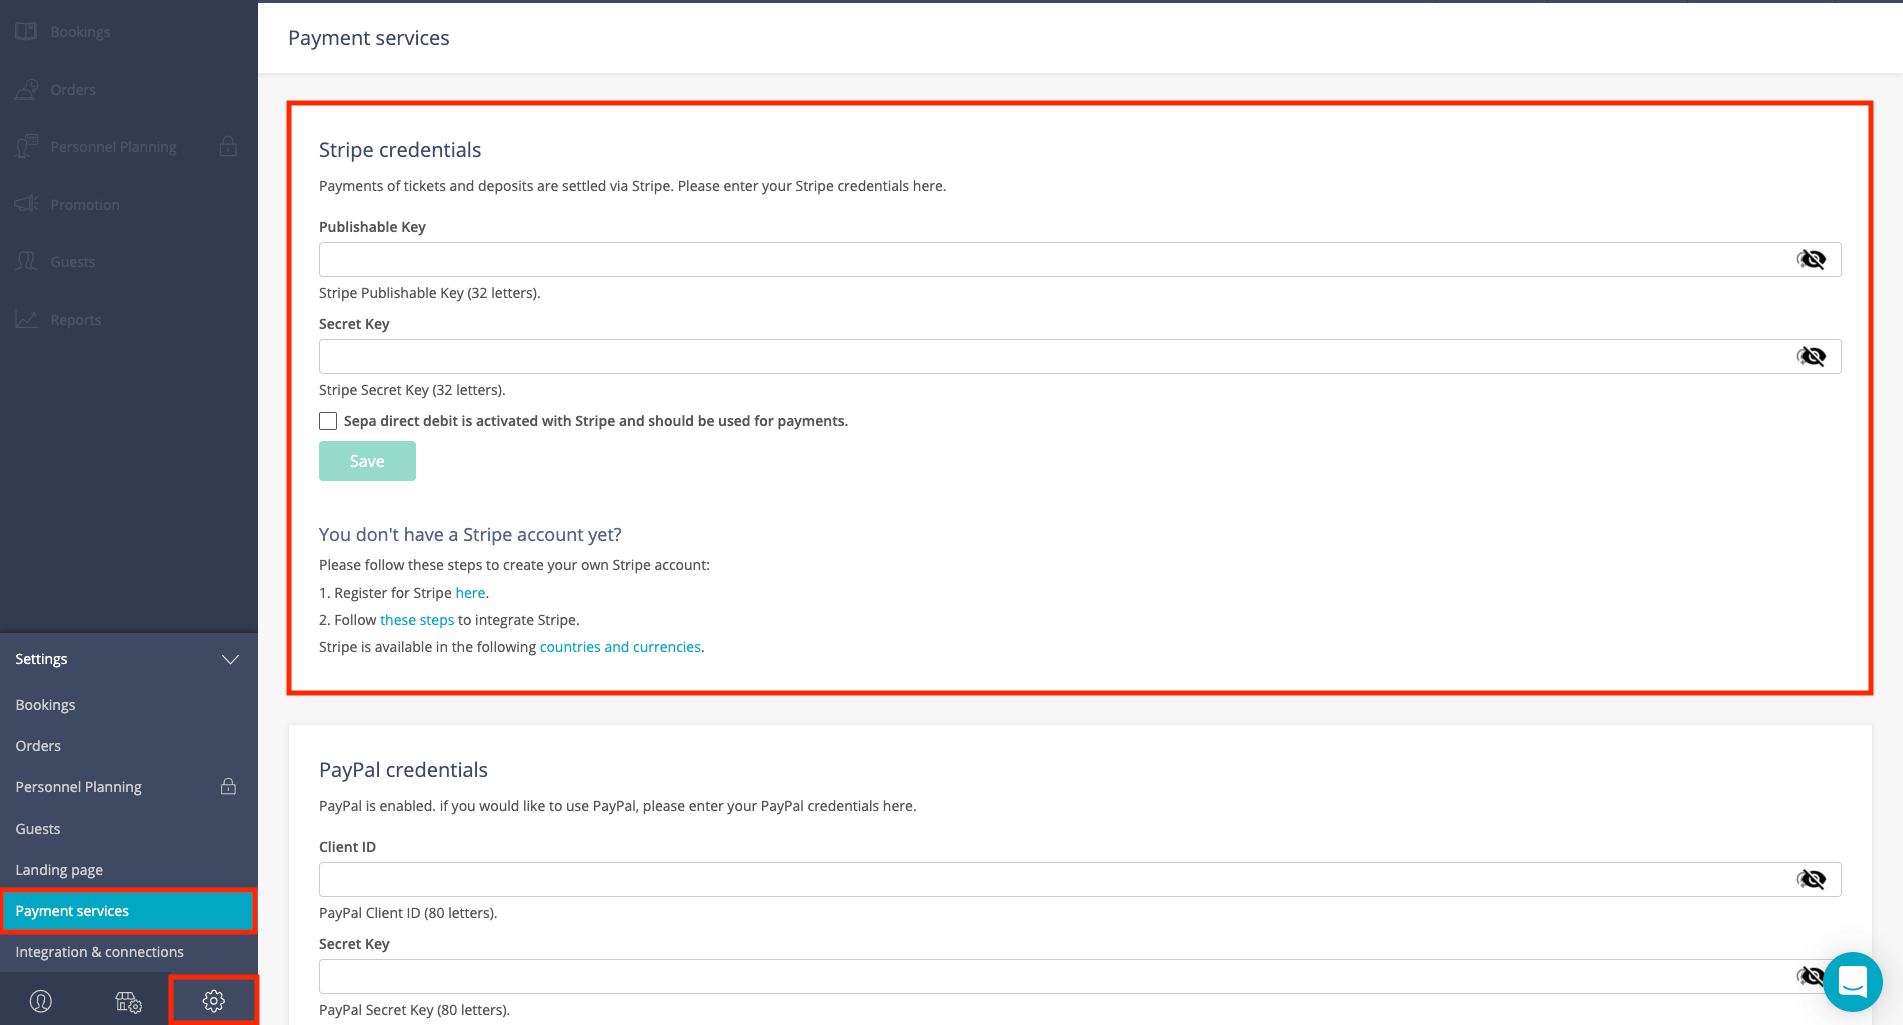
- Add these keys to your resmio user account (log in to app.resmio.com > “Settings” > “Integrations” > “Payment providers“) using the key combination CTRL + V and then click “Save”.
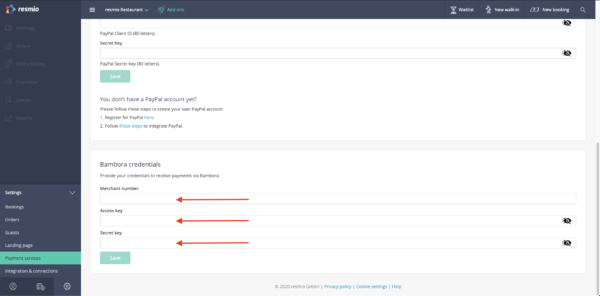
(Optional) We work with the service provider Worldline (formerly Bambora) in order to enable guests to pay for tickets / coupons / vouchers and also for online orders or deposits with credit cards.
- Create an account at Worldline by clicking on the button “Contact us now” and fill out the form.Please note that your account needs to be activated by Wordline before you can proceed with further steps. We have no control over the activation process.
- Visit https://merchant.bambora.com/auth/signin, enter your login credentials and gain access to your Worldline account.
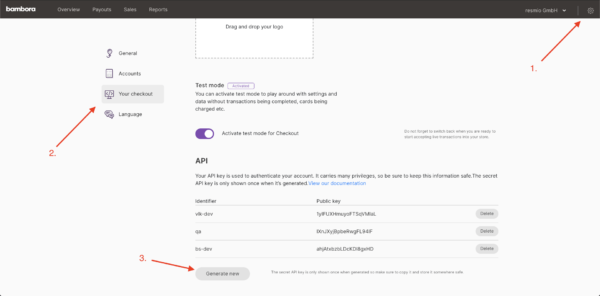
- Click in the menu on the “gear” icon (settings) and then on the left on the button “Your checkout“.
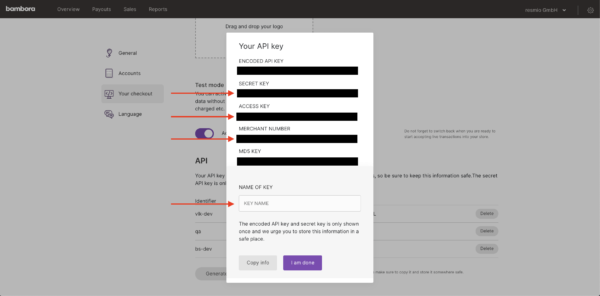
- In the next step we have to generate an “API key”, which we need to connect Bambora with your resmio account. To do so, click the button “Generate new”. In the new window you will see the “Secret Key”, the “Access Key” and your “Merchant Number”. Copy (CTRL + C) all three codes to the clipboard of your browser.
- Open a new browser tab and add/paste copied data (CTRL + V) to your resmio user account (log in to app.resmio.com -> “Settings” (gear icon) -> “Payment services“). Then click on “Save”.
- Switch back to the first browser tab (Worldline website), enter any name for your API key in the field “Name of Key”. Then click on “I am Done”.

Just click in the upper bar next to your restaurant name on![]() “Add-ons”. Here you can see which plan you are in. You have also booked all blue outlined add-ons rep. services. You can also access this overview via the
“Add-ons”. Here you can see which plan you are in. You have also booked all blue outlined add-ons rep. services. You can also access this overview via the ![]() “Facility Account” > “Plans & add-ons“ section.
“Facility Account” > “Plans & add-ons“ section.
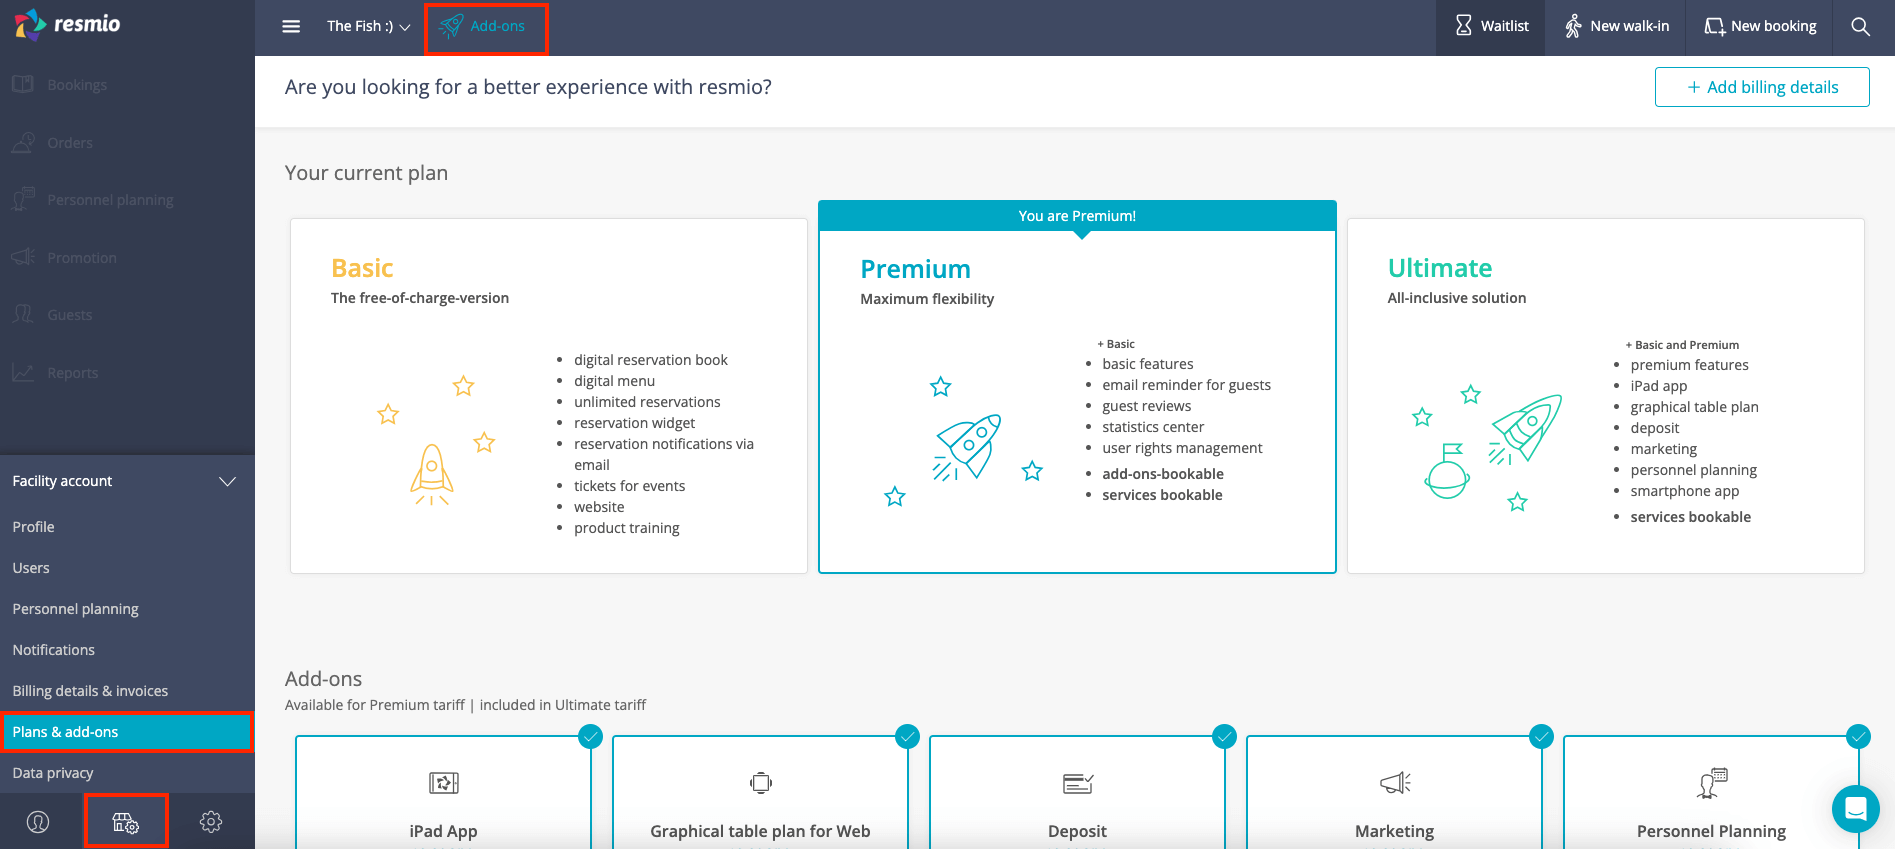
You use resmio in the BASIC plan and want to change to the paid plan PREMIUM or ULTIMATE and benefit from more features?
This is how it works:
- Just click on the left side on “Facility Account” > “Plans & add-ons“.
- You can also just click on the rocket icon in header and you will also get to the “Plans & add-ons” section.
- Here you find all our plans, add-ons and services for selection and you can book an additional service by clicking on “Details”.


