Lightspeed Integration (K-Series)
In the following article we will show you how to integrate your Lightspeed POS (K-Series) step by step.
Table of Contents
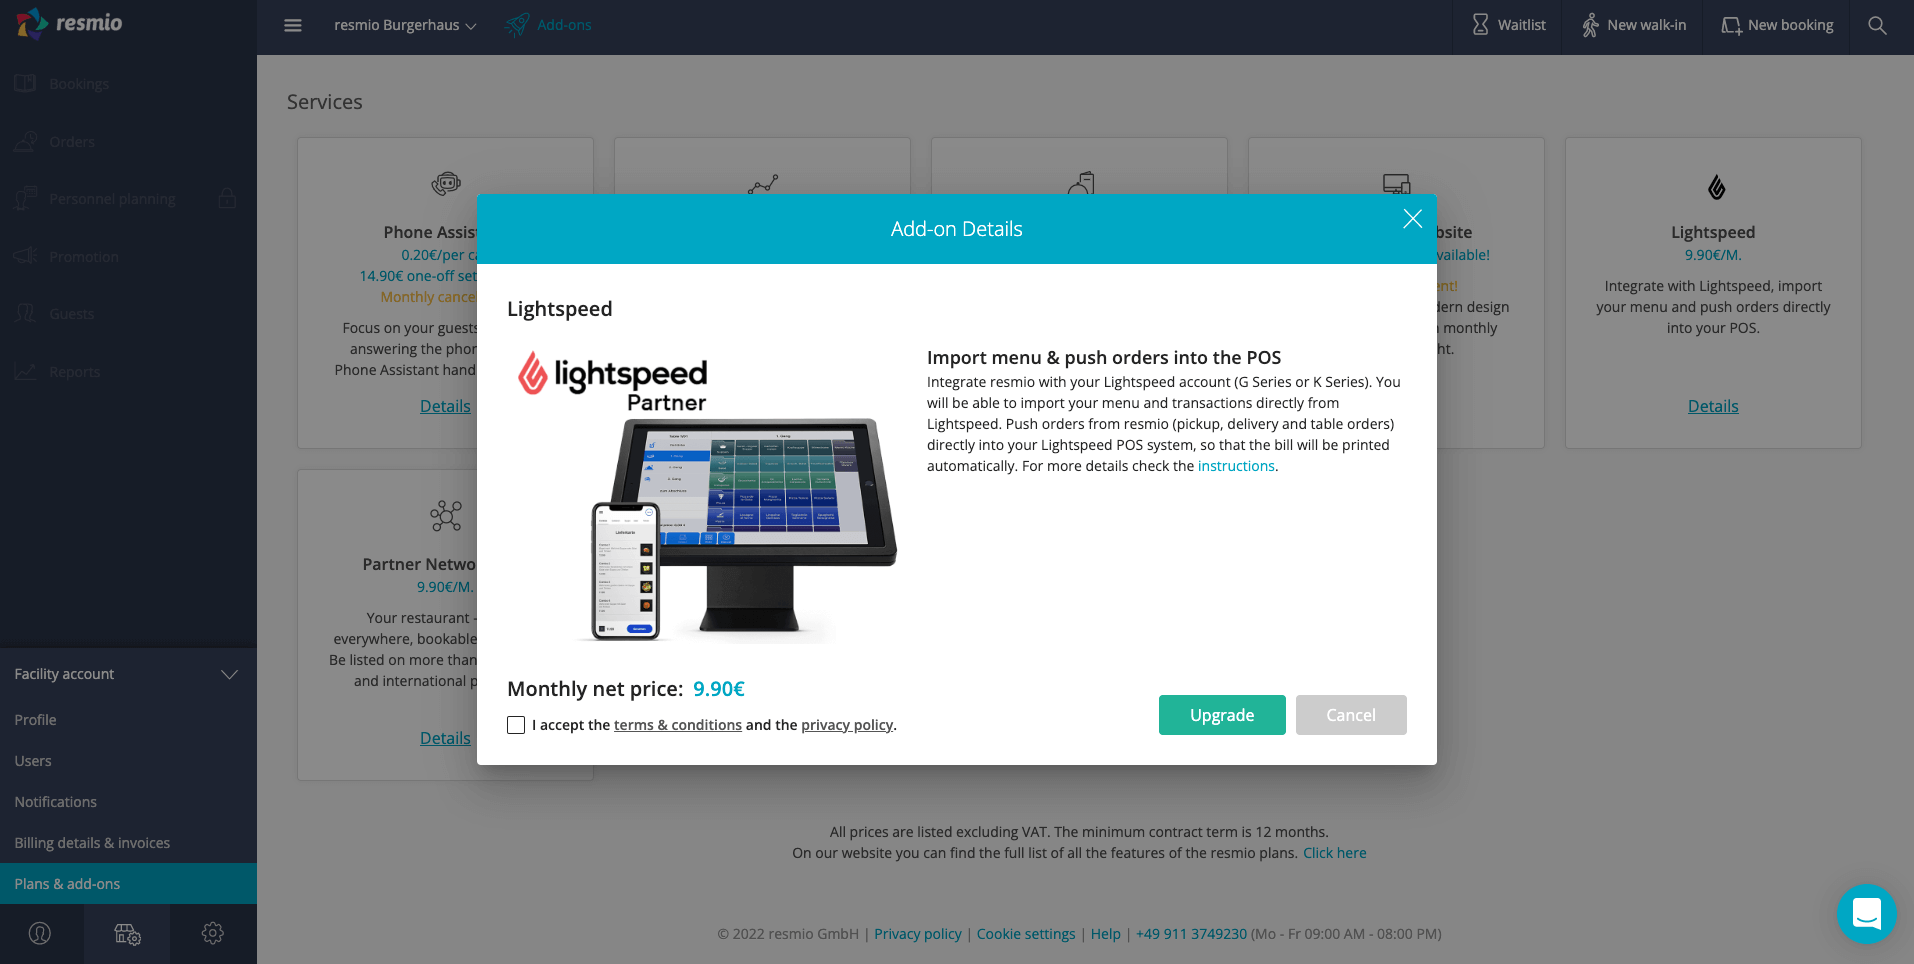
1. Purchasing the Lightspeed Service
- In order to activate the Lightspeed integration, the Service “Lightspeed” has to be activated in the add-on shop (“Facility account” > “Plans & add-ons”).
- Therefore please log in to your resmio webapp with your login details (https://app.resmio.com).
- Select the add-on shop (“Add-ons” in the navigation bar or “Facility account” > “Plans & add-ons”)
Scroll down until “Lightspeed Service” and select “Details”
Please note that the Lightspeed Service can only be activated when a Premium or Ultimate plan is activated in the same account.

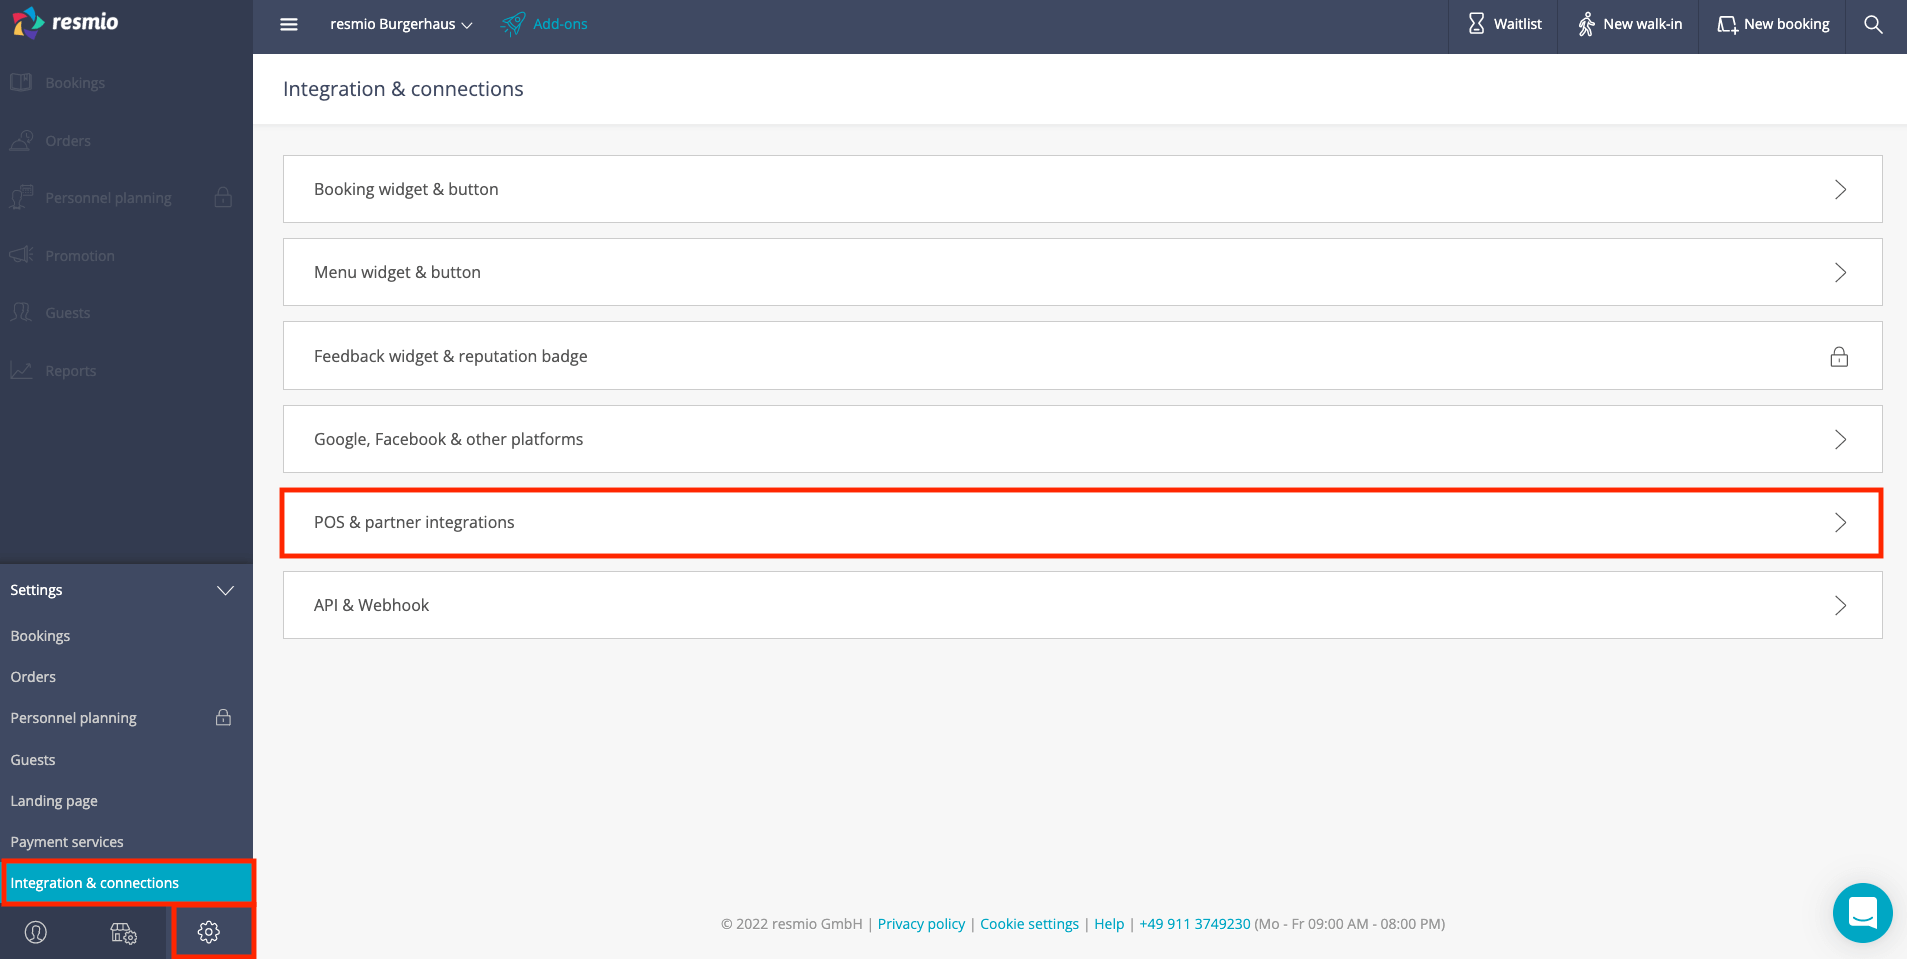
2. Connect resmio with Lightspeed
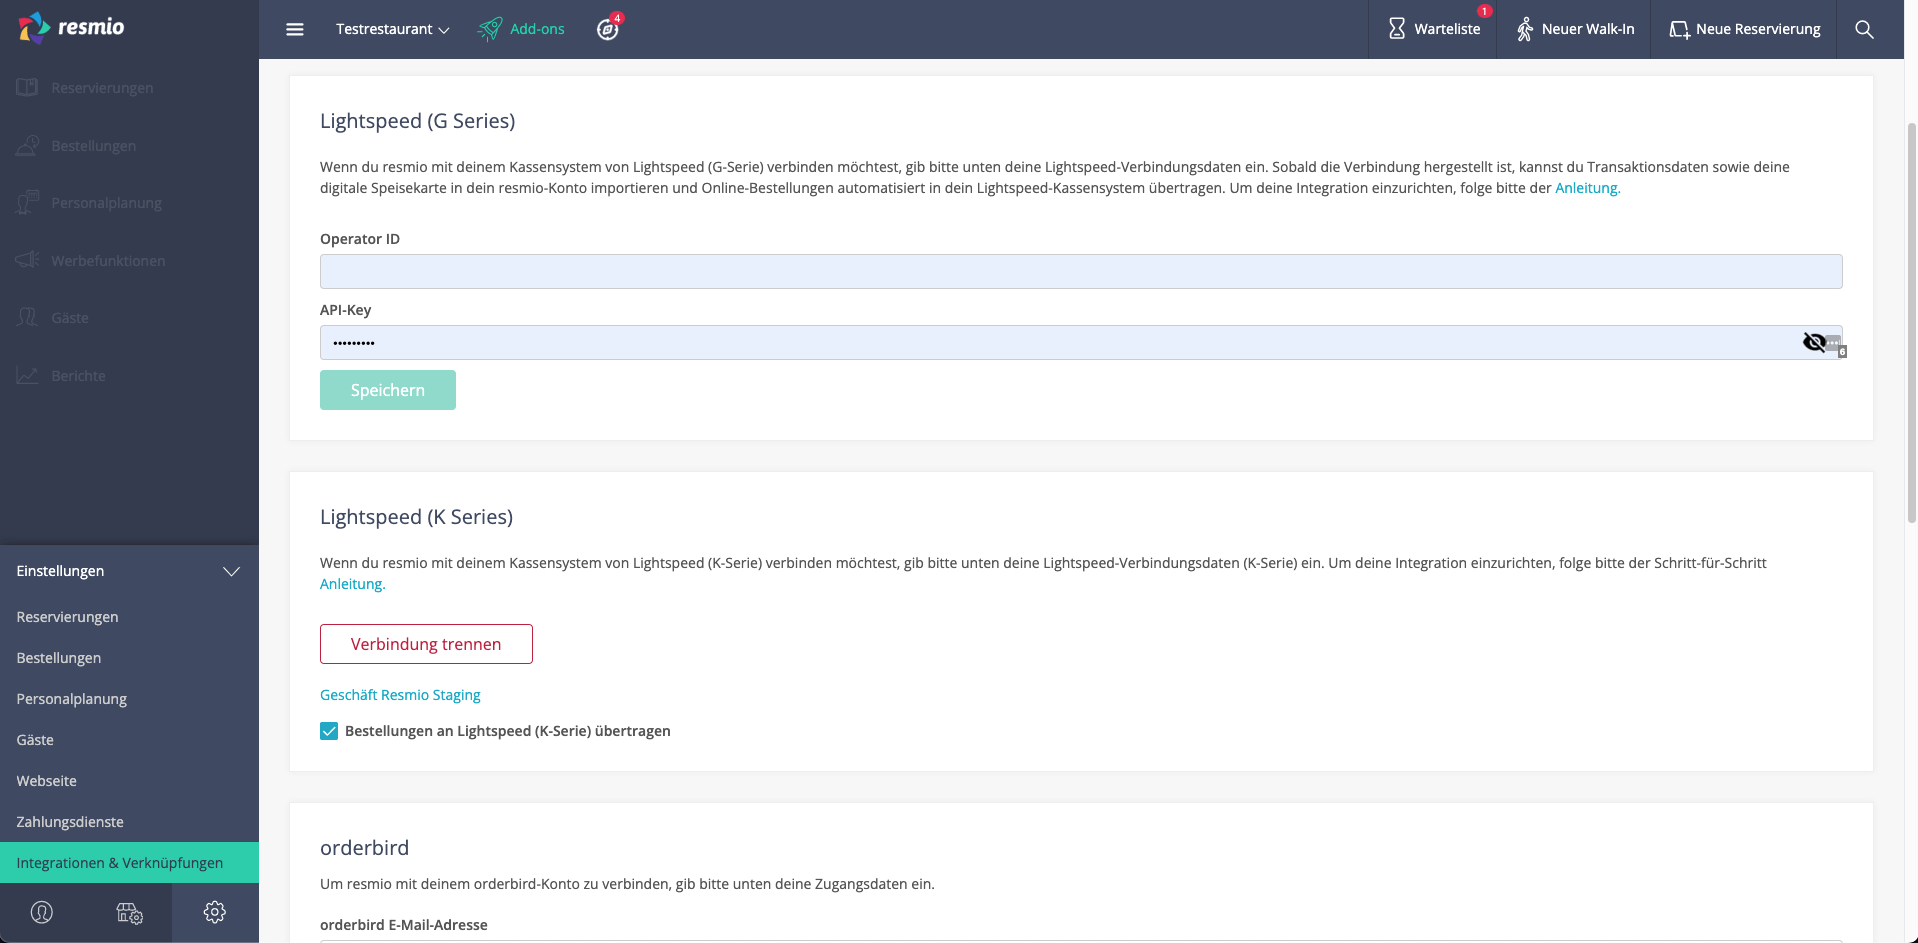
- Go to “Settings” > “Integrations & Connections” > “POS & Partner Integrations”
- Scroll down until you see the Lightspeed integration (K-Series)
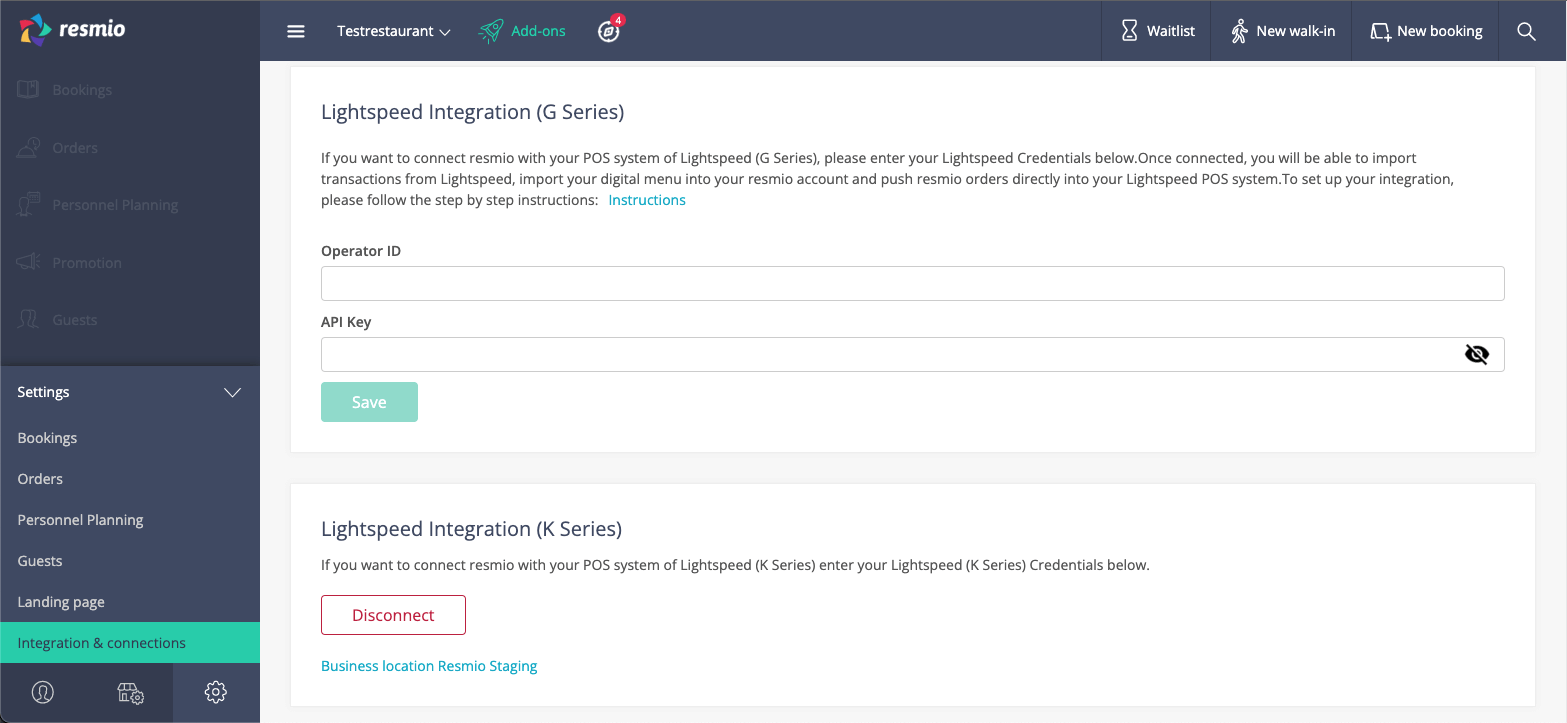
3. Connect resmio with Lightspeed (K-Series)
- Click on the link “Log in to the Lightspeed Service”, you will be forwarded to Lightspeed. Afterwards enter your login details for the Lightspeed POS here.
- In the next step you have to authorize the data transmission. Please make sure all four switches (“financial-api / reservations-api / orders-api / items”) are activated.
- Your resmio account should be connected to your Lightspeed account (the button “Disconnect” is displayed).
- In case you have multiple locations with Lightspeed, you can switch the “Business Location” below the button.

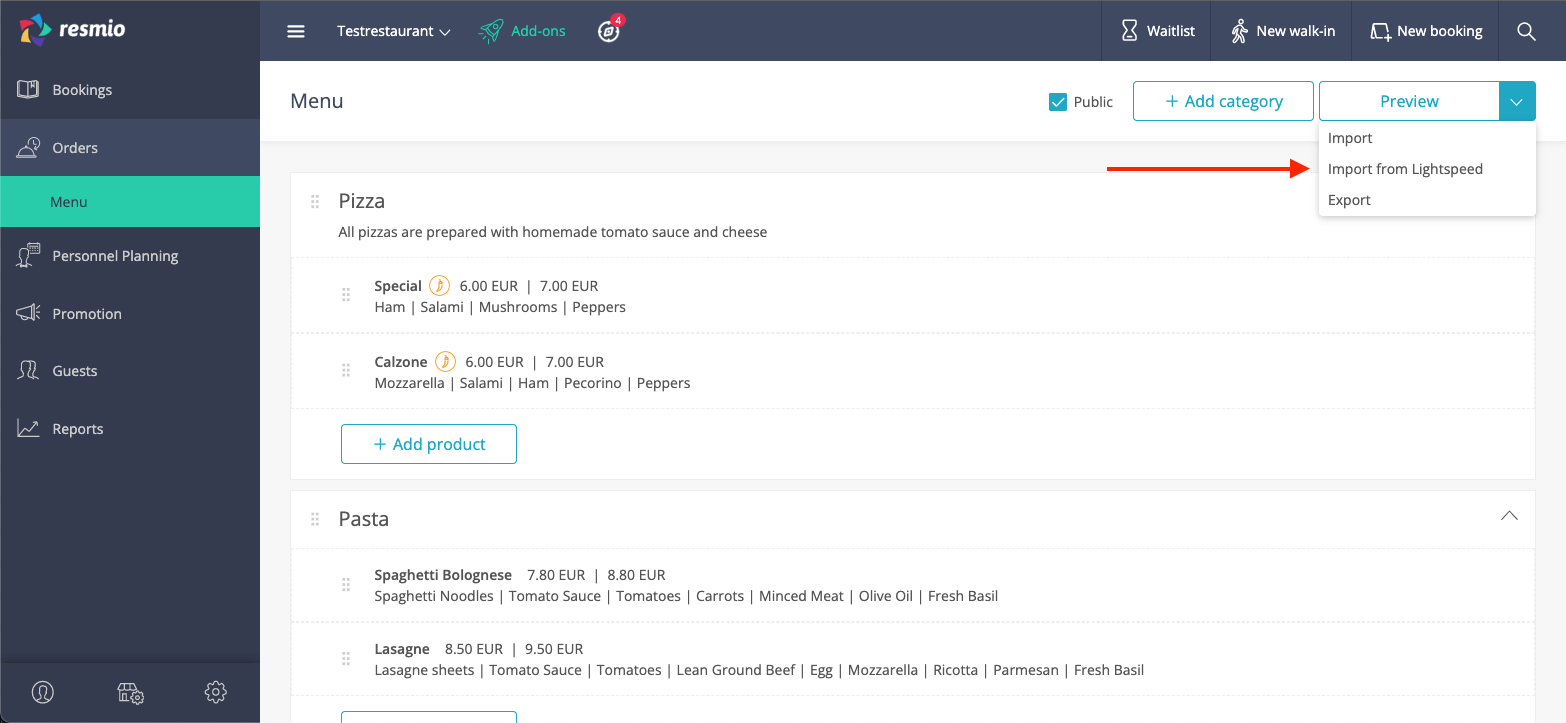
4. Menu Import
resmio WebApp: Product import from Lightspeed
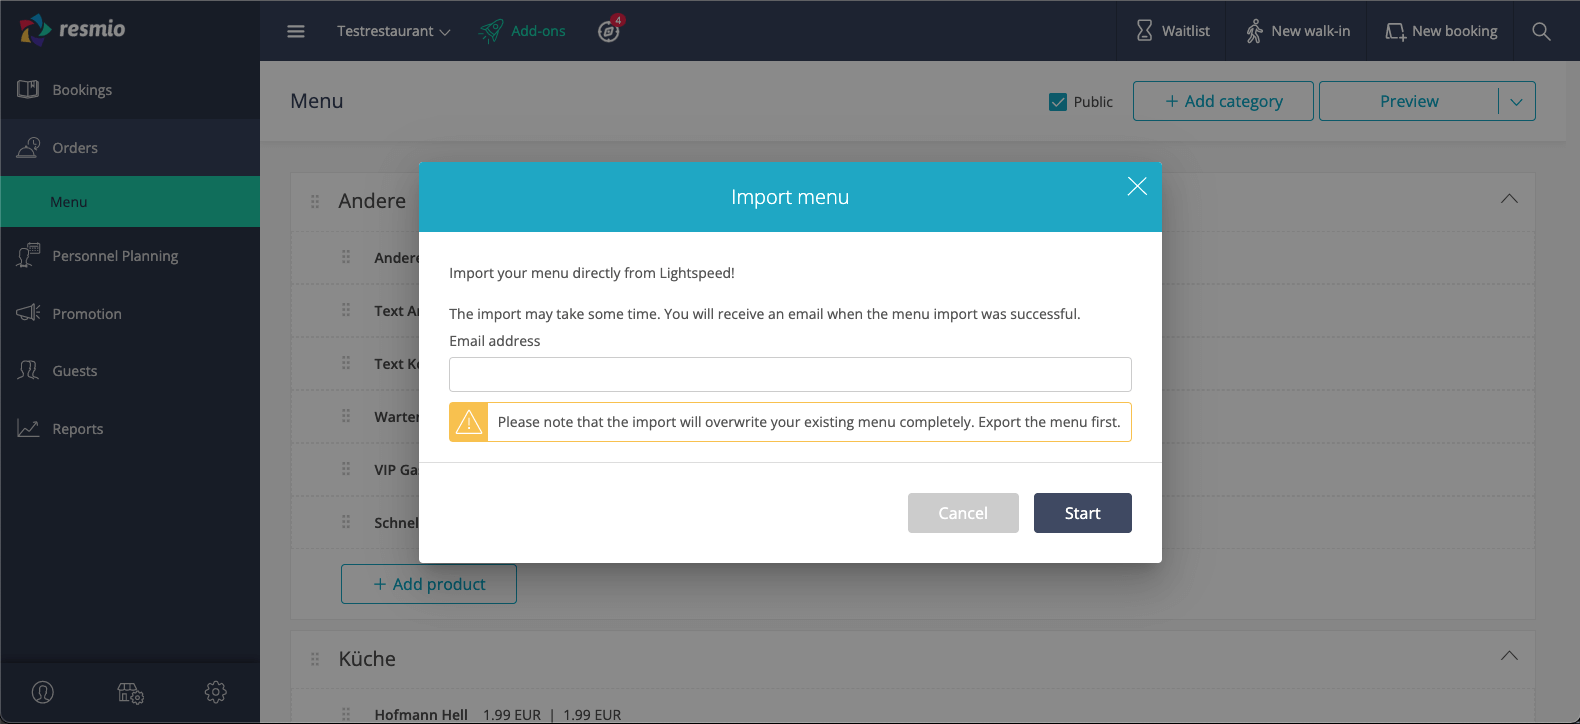
- Go to “Orders” > “Menu” > click on the arrow next to the button “Preview” and afterwards select “Import from Lightspeed”
- Enter your email address and click on “start”
- Your digital menu including every product will now be imported from Lightspeed. You should also receive an email once the menu import has gone through.
You can transfer orders to your Lightspeed POS automatically. Takeaway and delivery orders will be shown in your Lightspeed system directly after the order was received.
We recommend generating QR codes with an already integrated table number which therefore cannot be changed (table number QR code = table number in the Lightspeed POS) and installing them on the tables permanently (compare instructions).
Please make sure you record all data correctly and without mistakes in your Lightspeed account!
Step 1: Creation of the Real-time Notification URL
Lightspeed Back-Office
- Log in to your Lightspeed account with username and password in order to see the dashboard. Link: https://console.ikentoo.com/
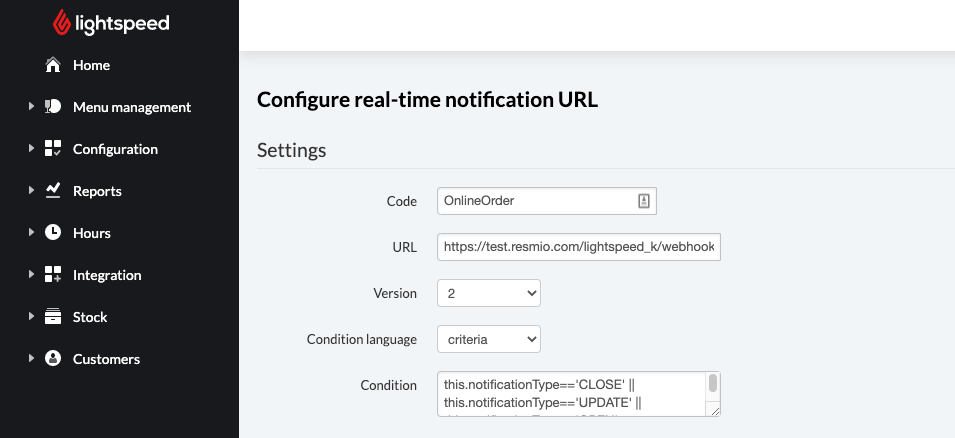
- Open the following link in your browser: https://console.ikentoo.com/configuration/realtimeNotifications
- Select “Add a new URL” and enter the following information:
Code: OnlineOrder

URL: https://app.resmio.com/lightspeed_k/webhook/realtime/

Version: 2

Condition language: Criteria

Condition:

this.notificationType=='CLOSE' ||

this.notificationType=='UPDATE' ||

this.notificationType=='OPEN'
Step 2: Create a Generic POS User
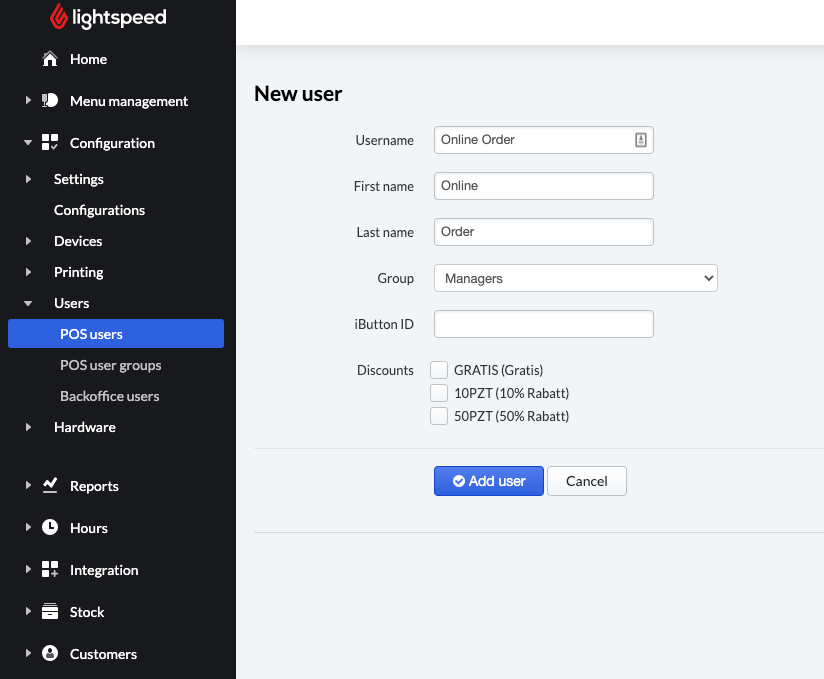
- First select “Configuration” > “Users” > “POS users”
- Click on “Add a new user”
- Enter the following information:
Username: Online Order
First name: Online
Last name: Order
Group: Managers
Confirm your entries by clicking on the button “Add user”.
Step 3: Create a Generic Payment Method
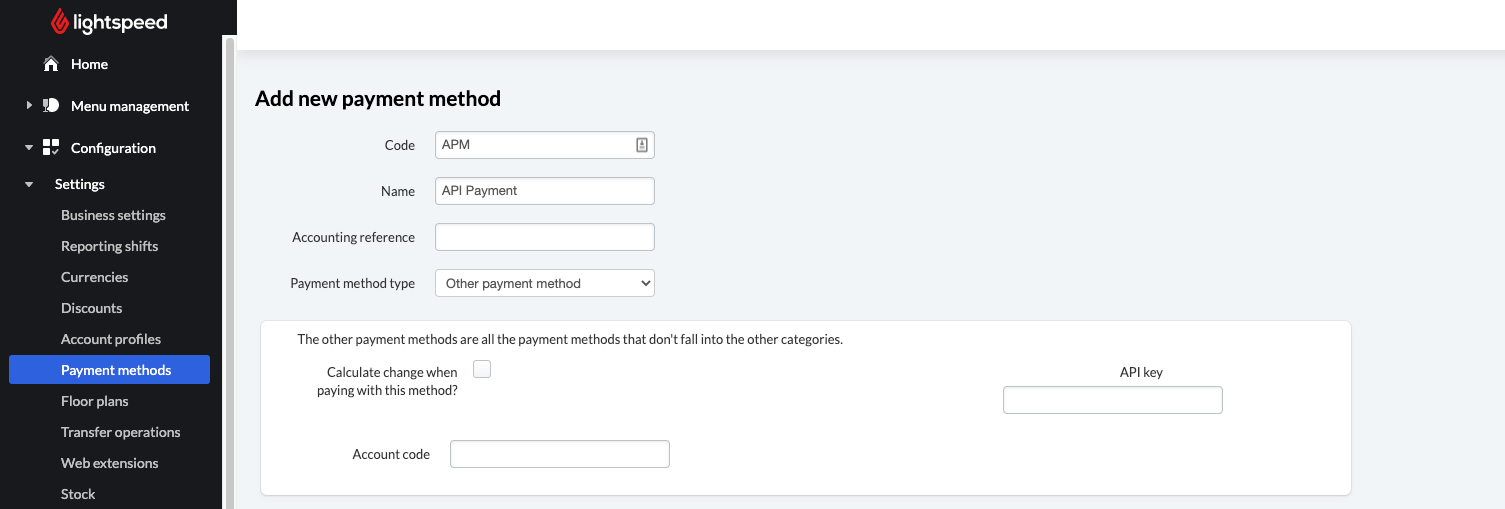
- Select “Settings” > “Payment methods”
- Click on “Add a payment method”
- Add the following details:
Code: APM
Name: API Payment
Payment method type: Other payment method
Save the payment method.
Step 4: Create a Generic Account Profile
Step 4.1: Account Profile Pickup
- Select “Settings” > “Account profiles”
- Click on “Add an account profile”
- Add the following details:
Name: API Profile Pickup
Code: aap-pickup
Takeaway mode: Pickup
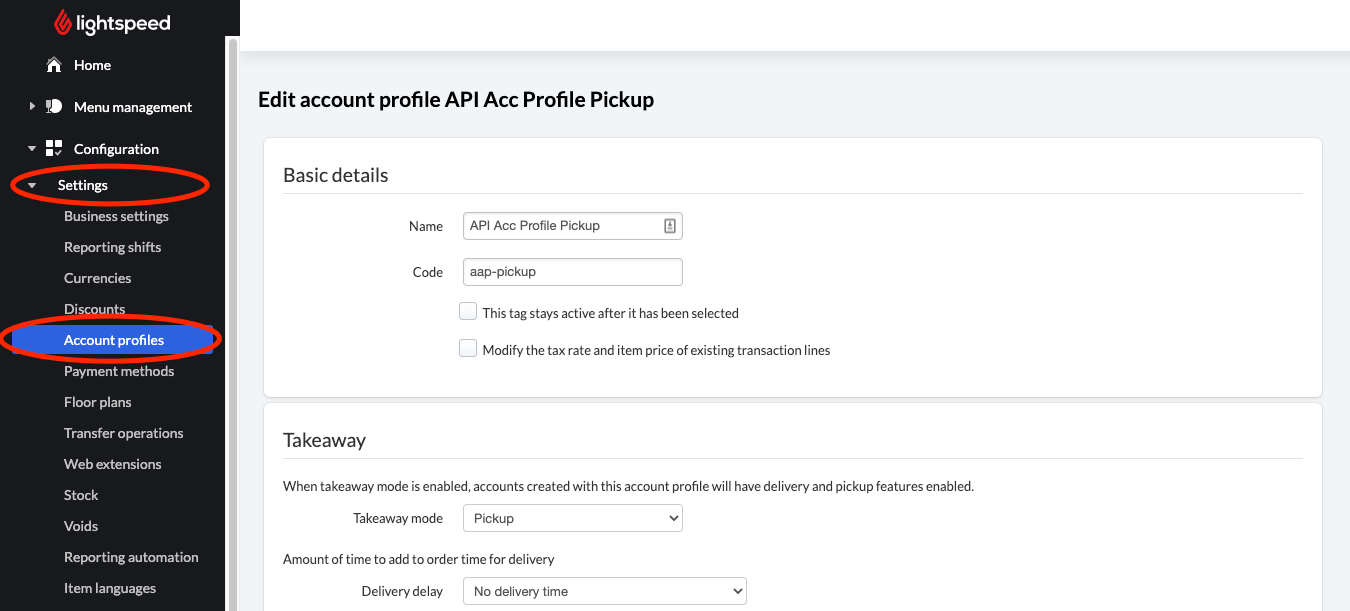
If you do not want to have takeaway orders displayed in your POS system which have already been paid, wish to automatically close orders and only print the voucher, select “Complete when payment is received” in the “Takeaway” section below “Order completion”.
If you yourself want to close orders which have already been paid, select the entry “Complete manually in POS”.

Save the account profile.
Step 4.2: Account Profile Delivery
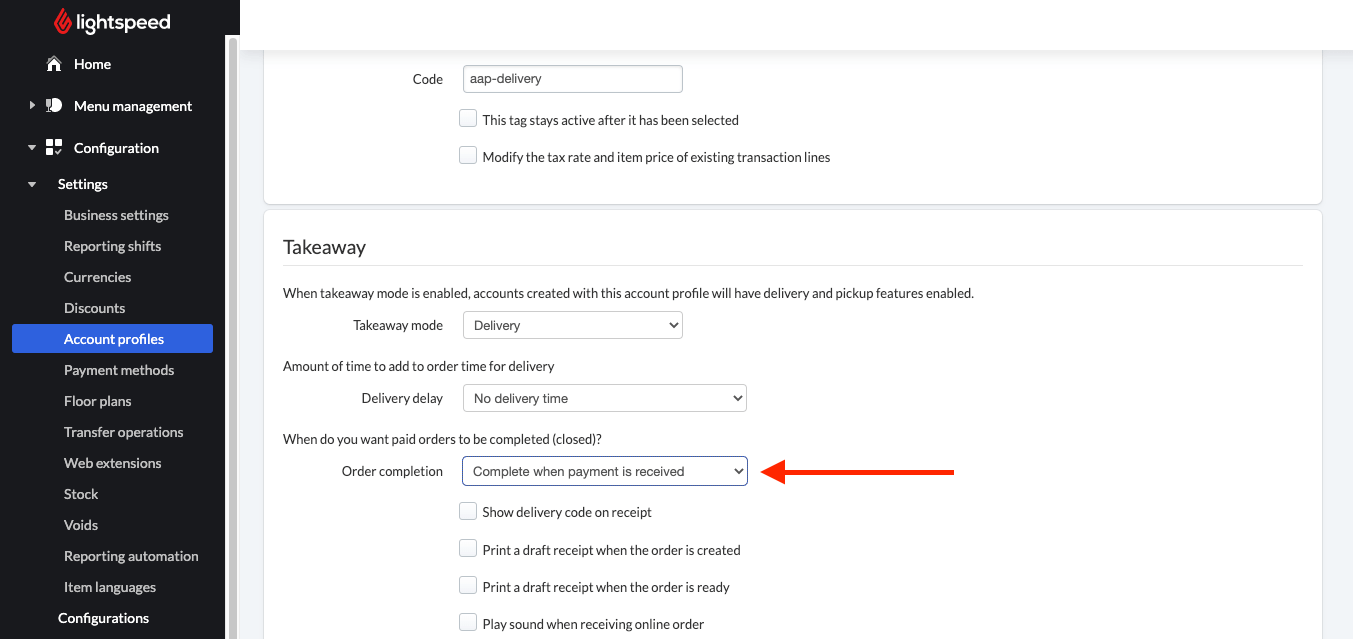
- Click on “Add an account profile” once again
- Add the following details:
Name: API Profile Delivery
Code: aap-delivery
Takeaway mode: Delivery

If you do not want to have orders for delivery displayed in your POS system which have already been paid, wish to automatically close orders and only print the voucher, select “Complete when payment is received” in the “Takeaway” section below “Order completion”.
If you yourself want to close orders which have already been paid, select the entry “Complete manually in POS”.
Step 4.3: Account Profile Local
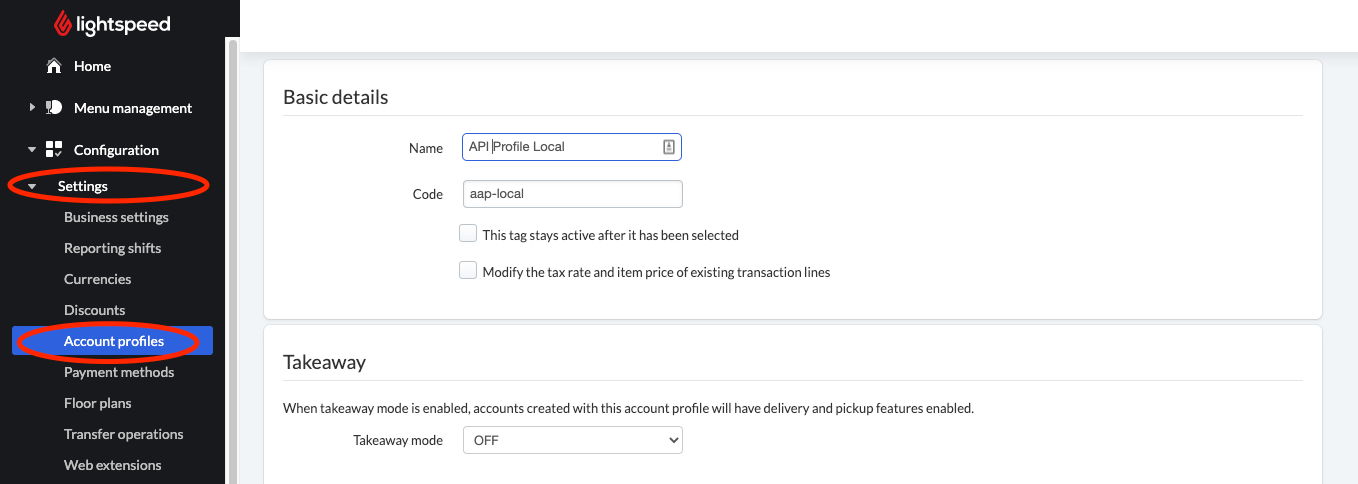
- Click on “Add an account profile” once again
- Add the following details:
Name: API Profile Local
Code: aap-local
Takeaway mode: OFF
Save the account profile.
Step 5: Deactivate Generic Fields of the POS Configuration
Once you created the POS user, the payment method and the account profiles, please do not forget to deactivate the POS configuration.
- Select “Configuration” > “Configurations” and select “Edit” at your POS.
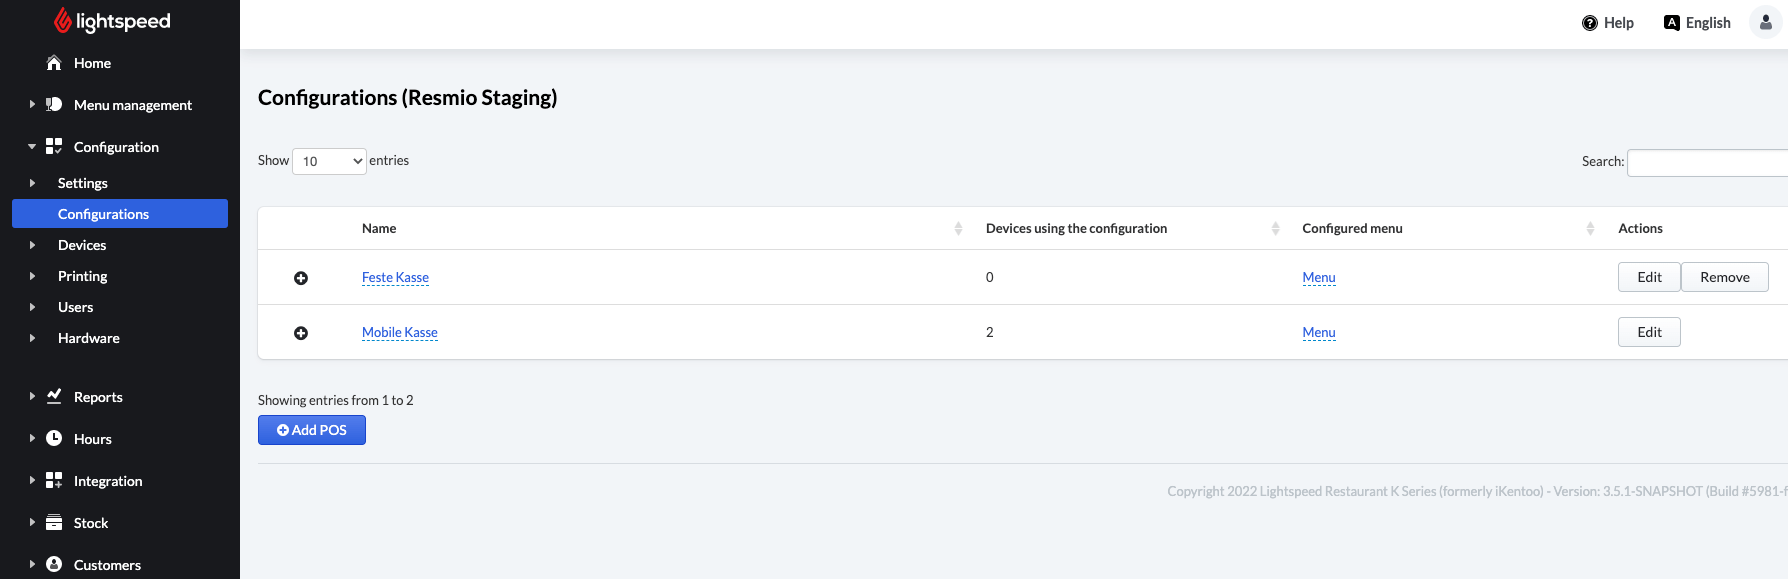
Deactivate the following fields:
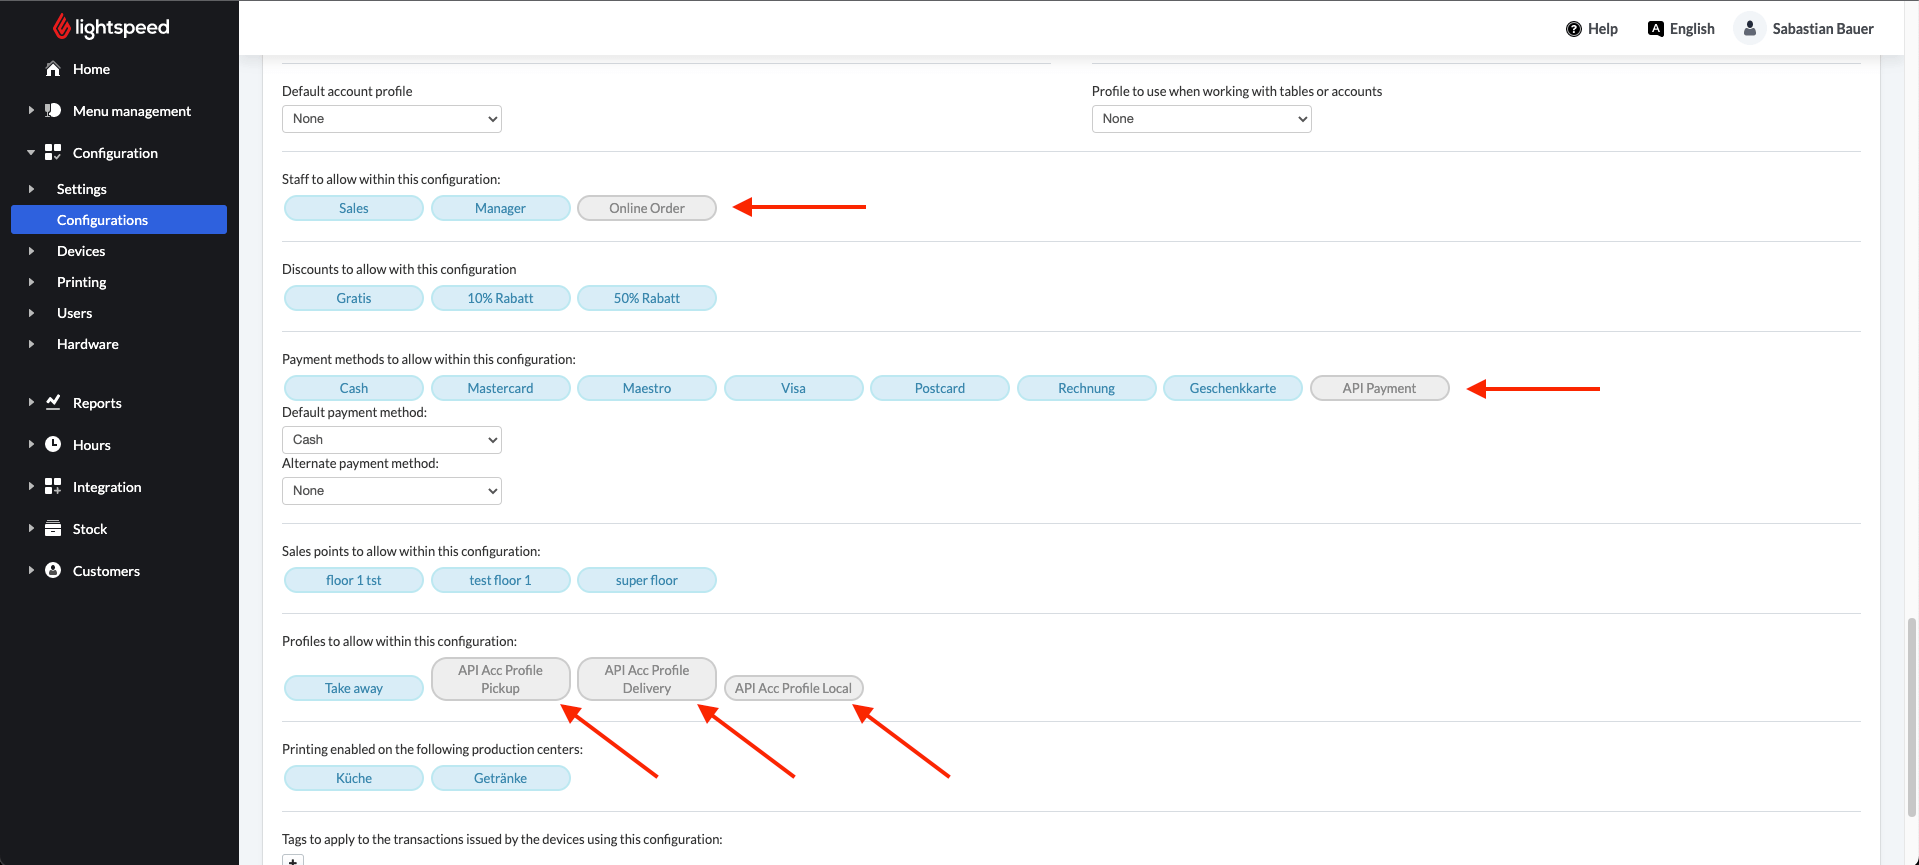
Select “Save”
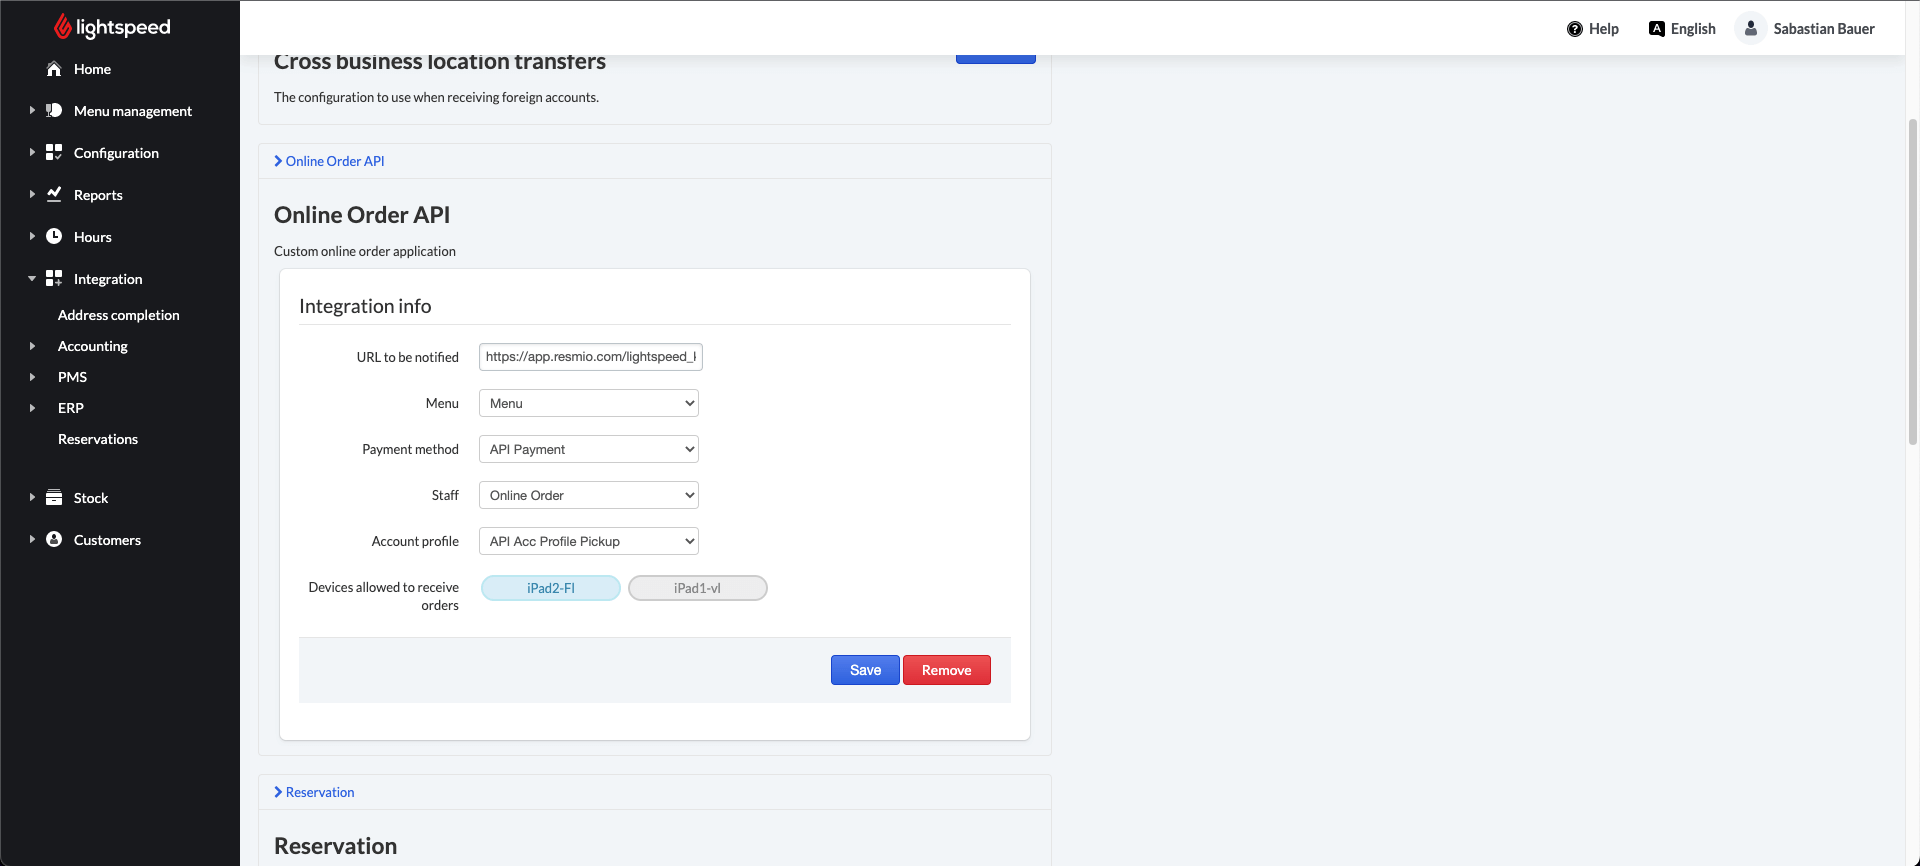
Step 6: Online Order API Activation
- Open the following URL in your browser: https://console.ikentoo.com/integration/onlineOrderingIntegrations
- Go to “Online Order API”
- Add the following details:
URL to be notified: https://app.resmio.com/lightspeed_k/webhook/online_order/
Menu: Menu
Payment method: API Payment
Staff: Online Order
Account profile: API Profile Pickup
Device allowed to receive orders: Here you choose the device you want to receive online orders on
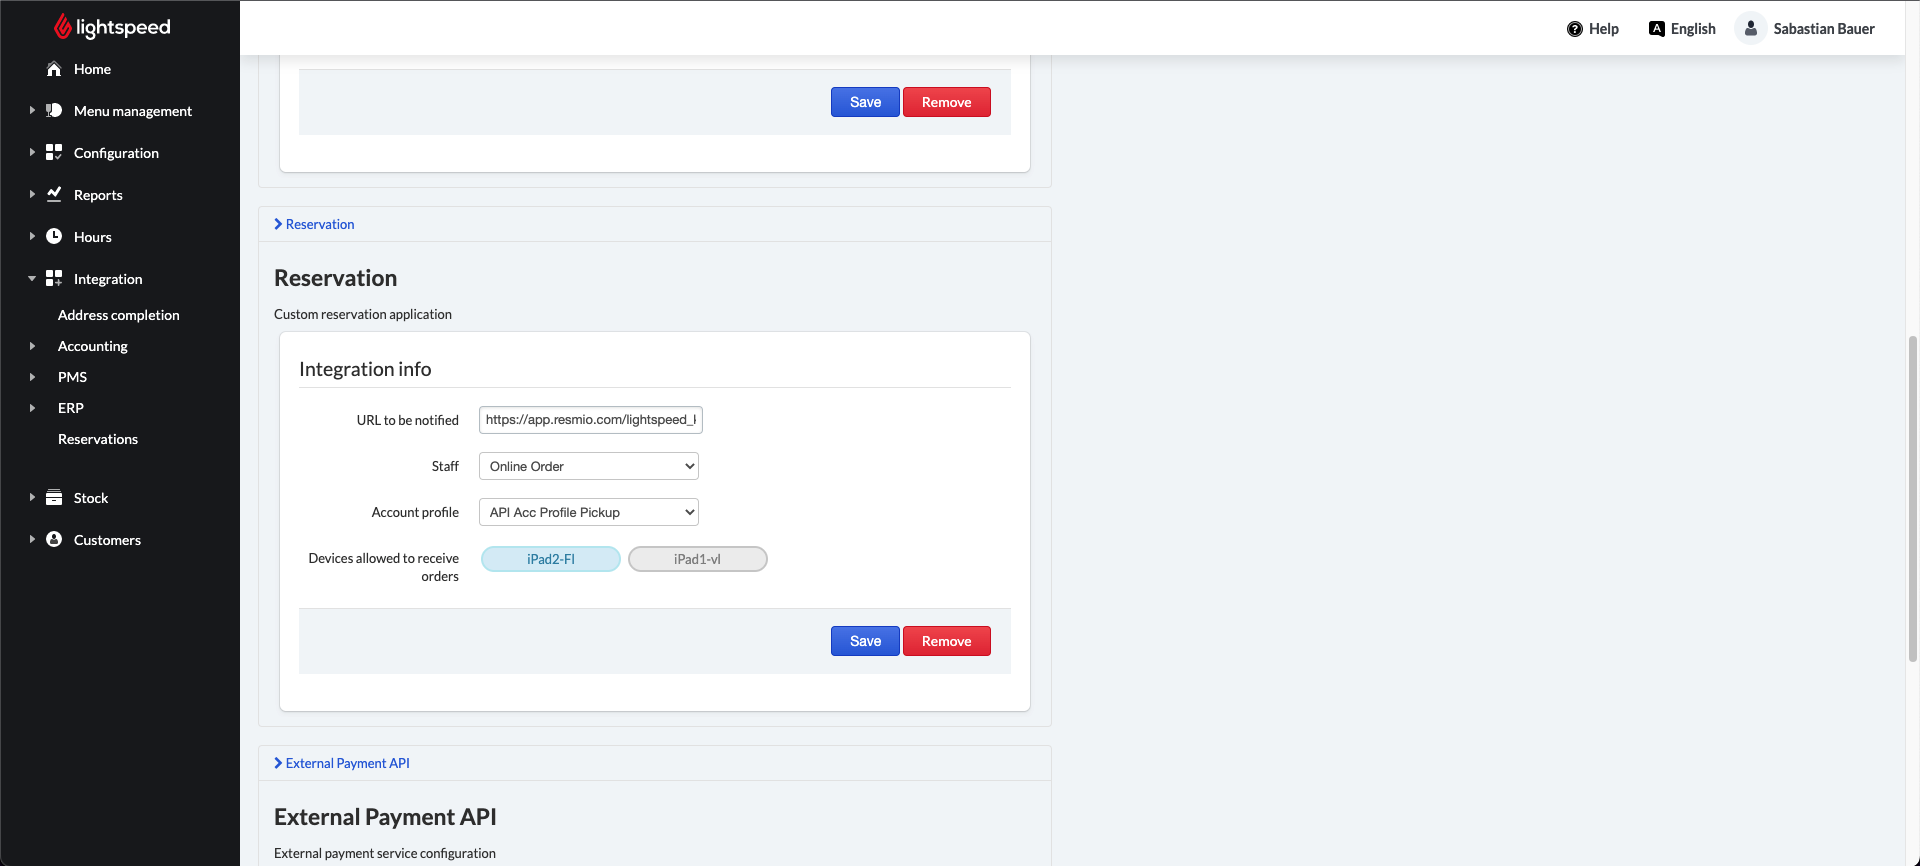
- Scroll down to “Reservation”
- Add the following details:
URL to be notified: https://app.resmio.com/lightspeed_k/webhook/reservation/
Staff: Online Order
Account profile: API Profile Pickup
Device allowed to receive orders: Here you choose the device you want to receive online orders on
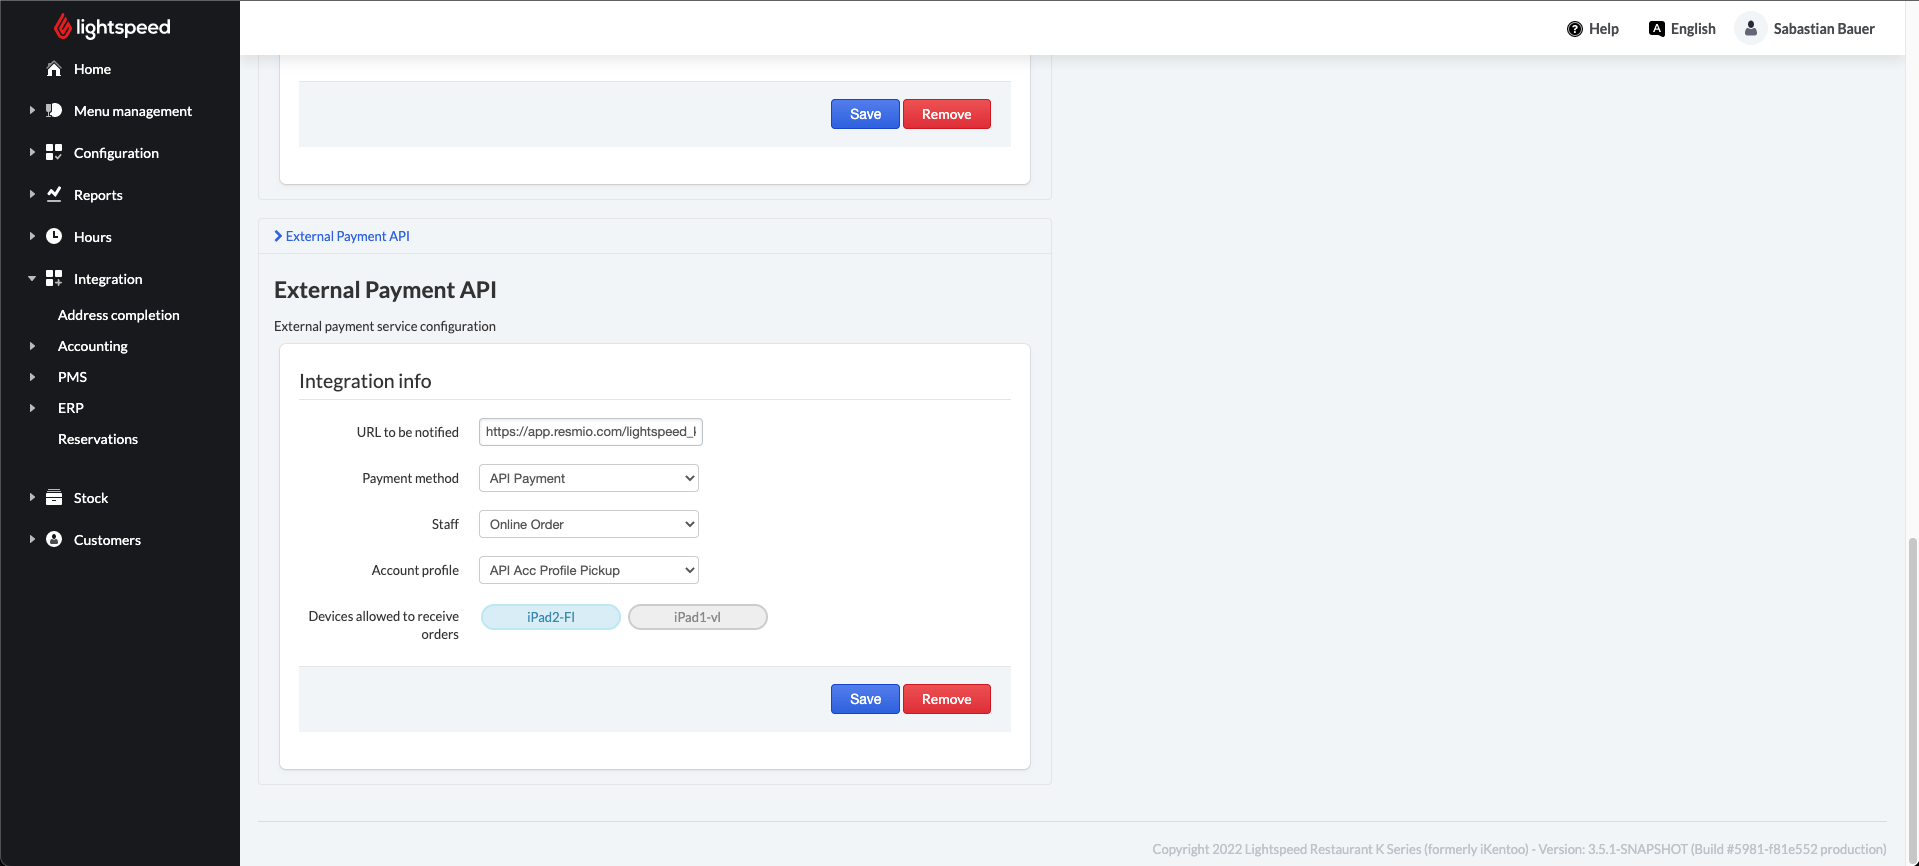
- Scroll down to “External Payment API”
- Add the following details:
URL to be notified:
https://app.resmio.com/lightspeed_k/webhook/external_payment/
Payment method: API Payment
Staff: Online Order
Account profile: API Profile Pickup
Device allowed to receive orders: Here you choose the device you want to receive online orders on
Step 7: resmio WebApp: Activate “Push Orders to Lightspeed”
- Once again go to „”Settings” > “Integrations & Connections” > “POS & Partner Integrations”
- Scroll down until “Lightspeed Integration (K-Series)” and tick the box next to “Push order to Lightspeed (K-Series)”
- Before you can transfer the orders into your Lightspeed POS automatically, you should import the menu from Lightspeed (“Orders” > “Menu” > arrow next to the “Preview” button > “Import from Lightspeed“).
- You can edit descriptions, allergens and details etc. anytime. This information won’t be overwritten when carrying out another import.
Step 8: Activate Online Orders in your POS
- Click on the 4 dots in the bottom right corner of your iPad cash register
- Select “Reload”(2 arrows)
- Once the cash register has restarted, check if online orders are activated via the 4 dots once again