Marketing-Tools
Table of contents
Coupons, Tickets and Vouchers
- Differences between tickets for events, coupons and vouchers
- How do I create tickets for an event, coupons or vouchers?
- How do guests pay for tickets, coupons and vouchers? What happens in case of invalid payment or failed payment?
- How and where can my guests purchase the tickets events, coupons and vouchers and how do they receive them?
- Where can I view vouchers/event tickets that have already been sold and check whether they have been redeemed?
- How can I stop the coupon or ticket selling?
Keeping guests up to date on the latest deals and exciting news is best done through email marketing.
Sending newsletters is easier than you think with resmio! Your marketing campaign is ready to send in just a few minutes.
Using pre-selected contact lists, you are able to send your newsletter to specific groups of guests (e.g. guests who have been absent for a longer period of time) and thus mobilize them to re-visit your restaurant.
We will guide you step-by-step through the process of sending your first email newsletter.
Overview of email newsletters and drafts
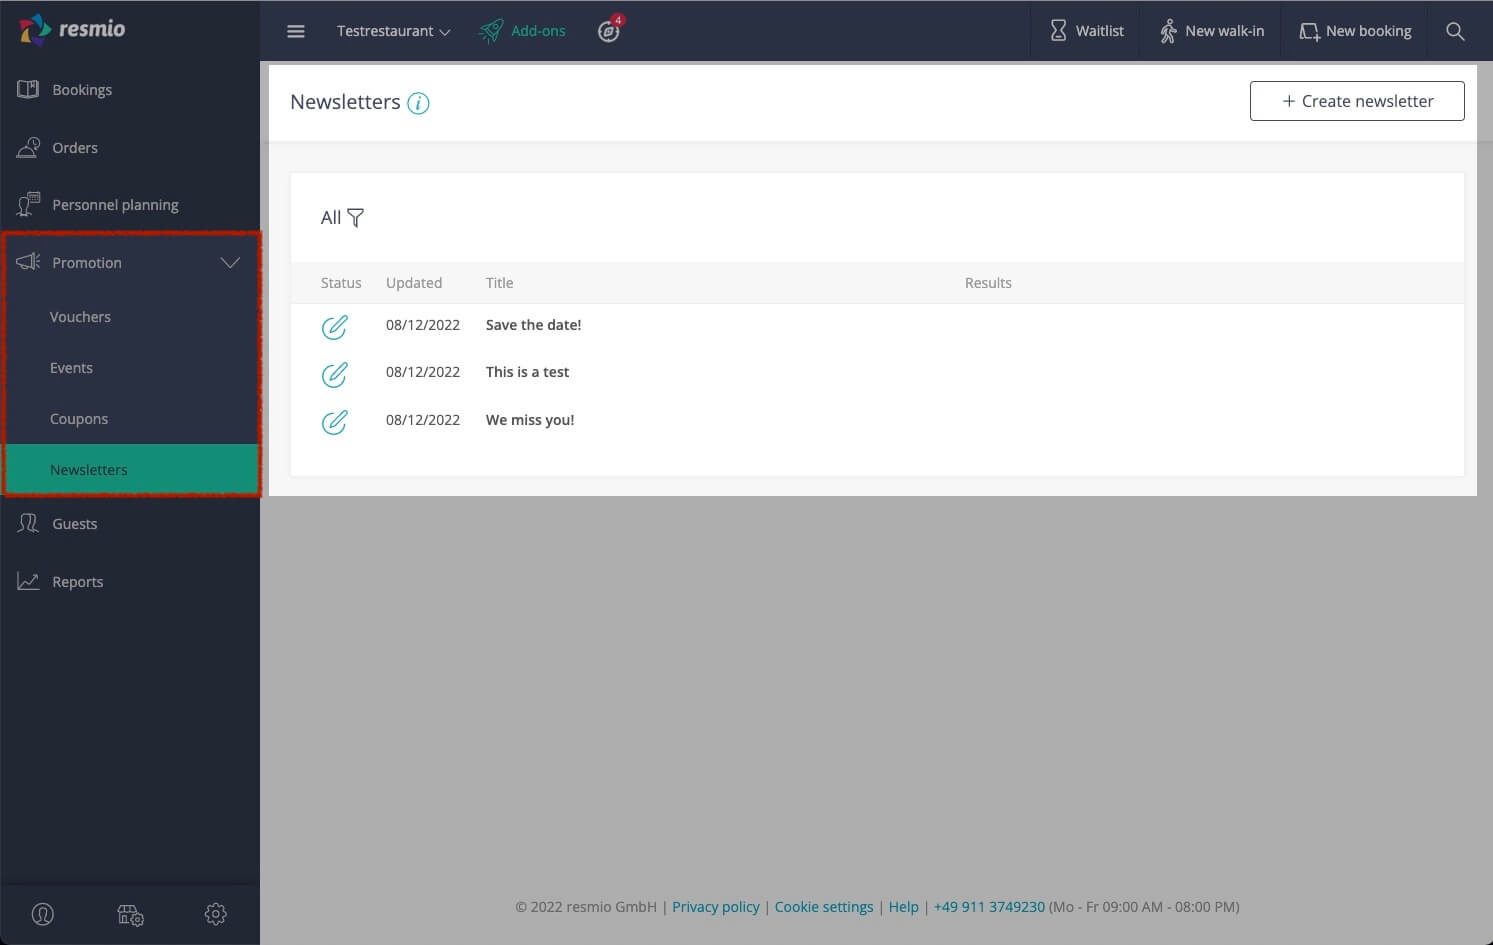
1. To create your email newsletter, first click on ![]() ““Promotion” and then on “Newsletter“.
““Promotion” and then on “Newsletter“.
You will get an overview of all your drafts and sent email newsletters so far.
Newsletters can be assigned to one of the following three statuses:
 Draft (mailings not yet sent)
- One time sent newsletter
- Automatically sent newsletters with recurring sending interval
Creating newsletters – Choosing your campaign goal
2. After you have customized the template colors, we can start creating your email newsletter.
- Click on the button “+ Create Newsletter“.
- In the following dialog box, first select a “Campaign goal” that most precisely matches what you want to achieve by sending out your email newsletter.
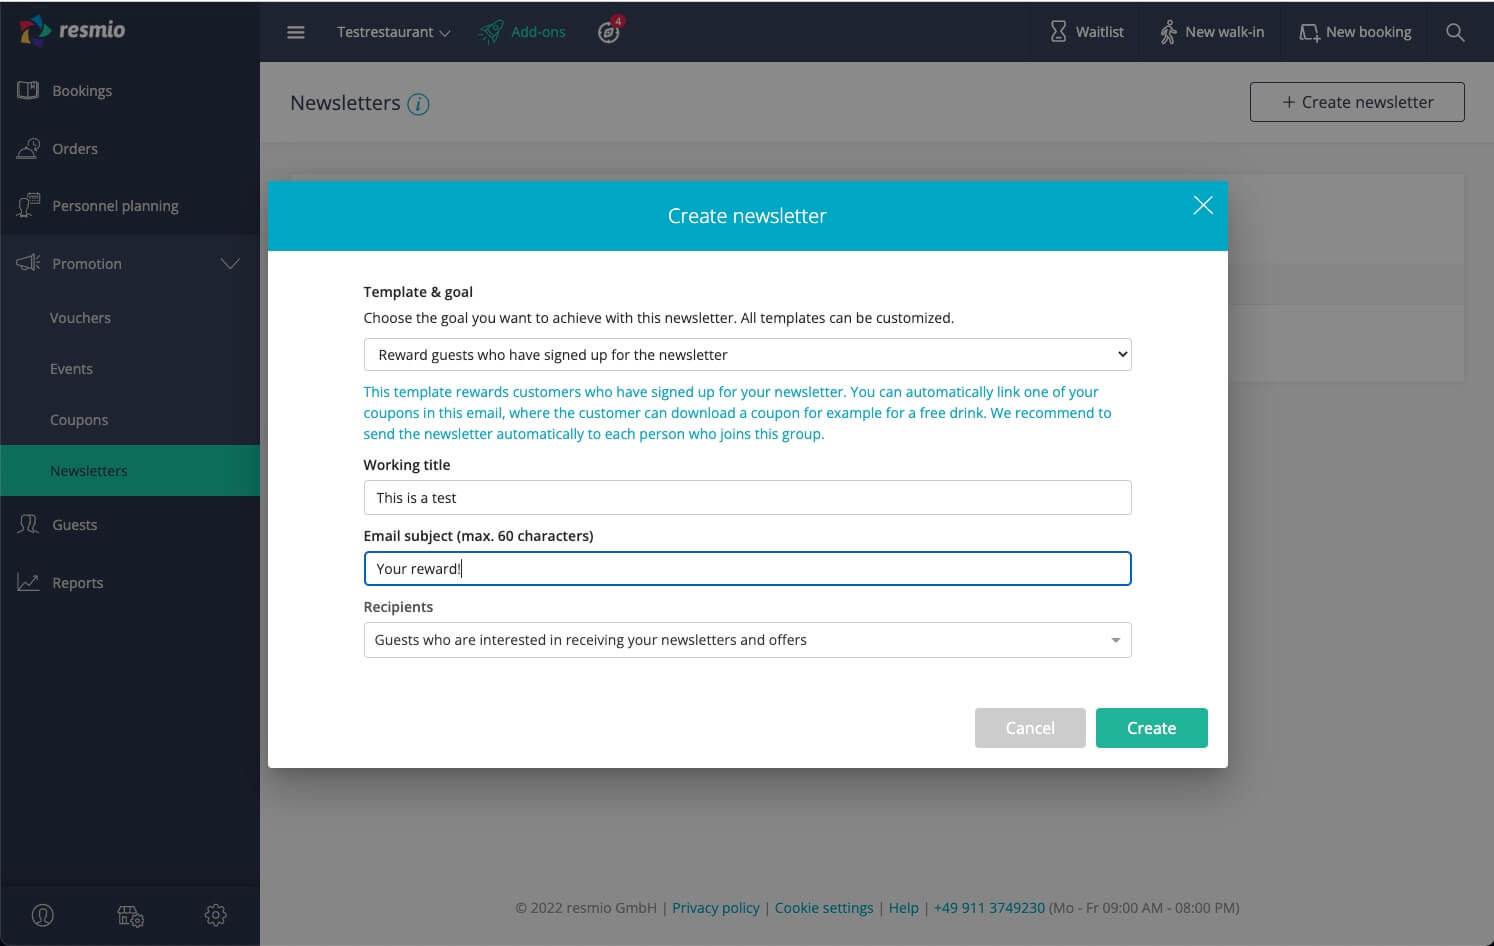
- The “recipient group” and number of contacts is pre-selected according to the campaign goal. However, if you wish, you can also select a different group of contacts that is closer to your goal.
- The “working title” of your email newsletter is visible only to you. When you customize the color theme in your layout later, that theme will be named after the working title automatically.
- Choose a compelling subject line: the content has a significant impact on the opening rate of your email newsletters. Here are a few tips:
- The optimal subject line should be written briefly (under 60 characters), be concise, and spark interest.
- Avoid flashy marketing buzzwords (e.g. “free”, “sexy” or “urgent”), especially in capital letters.
- According to studies, emojis in the subject line have a positive effect on the open rate ?. But make sure to use them in moderation!
- Personalized subject lines (e.g. “Markus, your invitation to the steak dinner has arrived!”) boost the customer retention rate.
Don’t worry, you can still adjust the above settings in the next step via the “Properties” button.
Click “Next” when you are confident with your choice.
Create Newsletter – Customizing look & feel
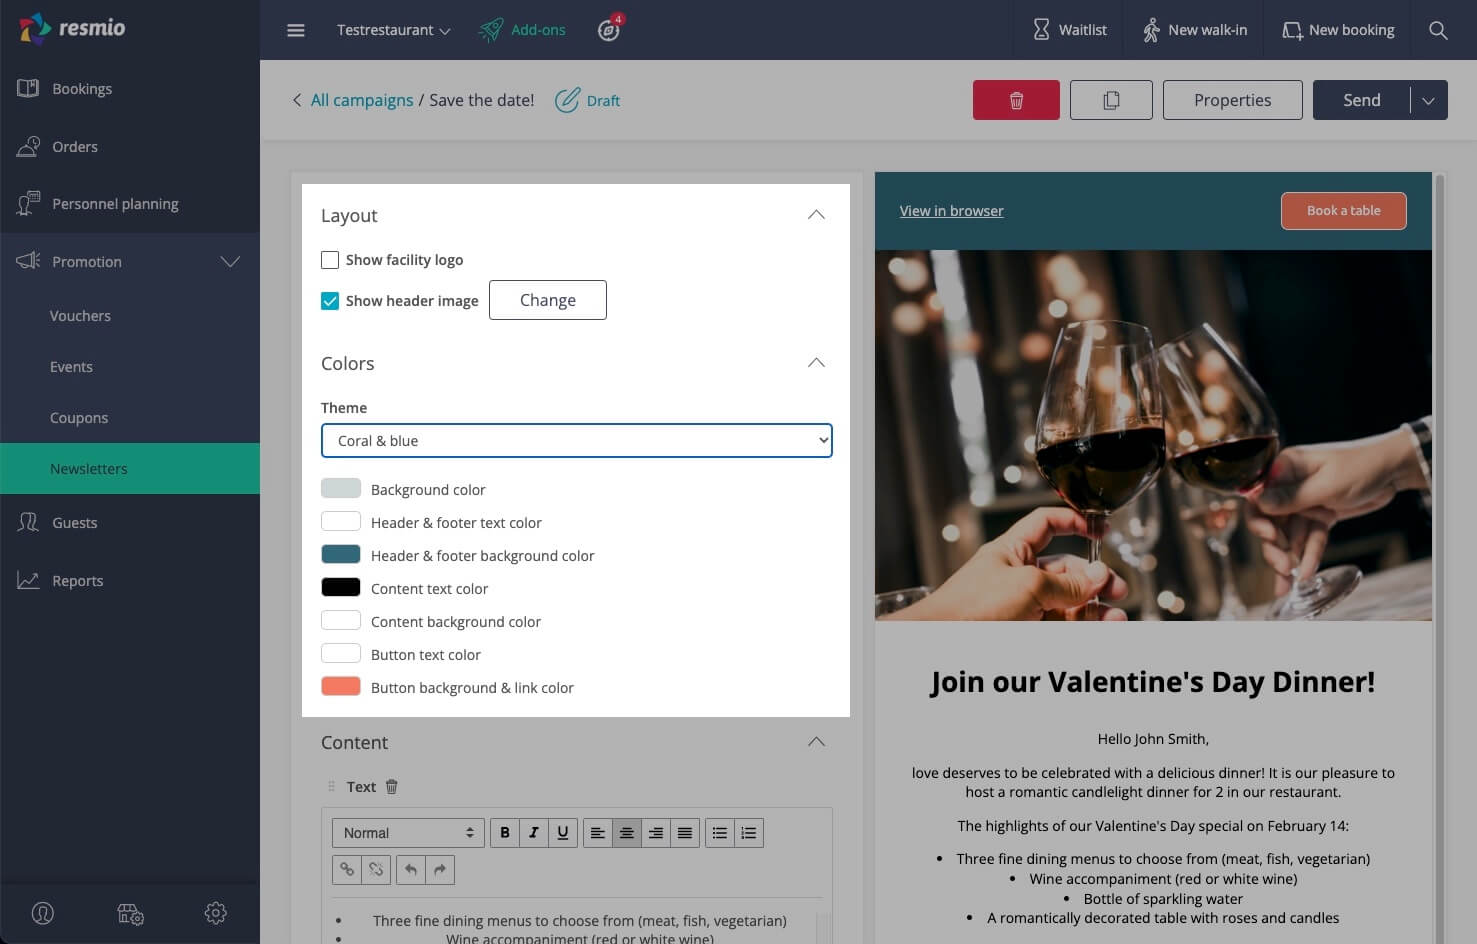
3. For a high level of brand recognition, the look and feel of your email newsletters should match your corporate identity (CI) as closely as possible.
With resmio, you can include your logo in your e-mail newsletter and customize the colors to match your corporate design.
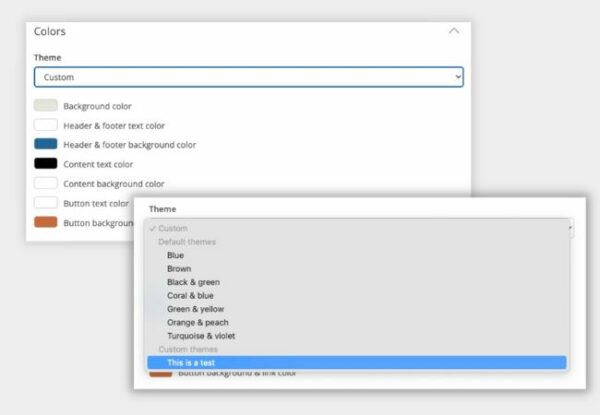
- To customize your email template, choose one of the predefined color schemes under “Colors” from the menu…
- … or style elements such as header and buttons individually based on your corporate design. To do so, click on the corresponding boxes to set the color codes.
Create newsletter – add content and sections
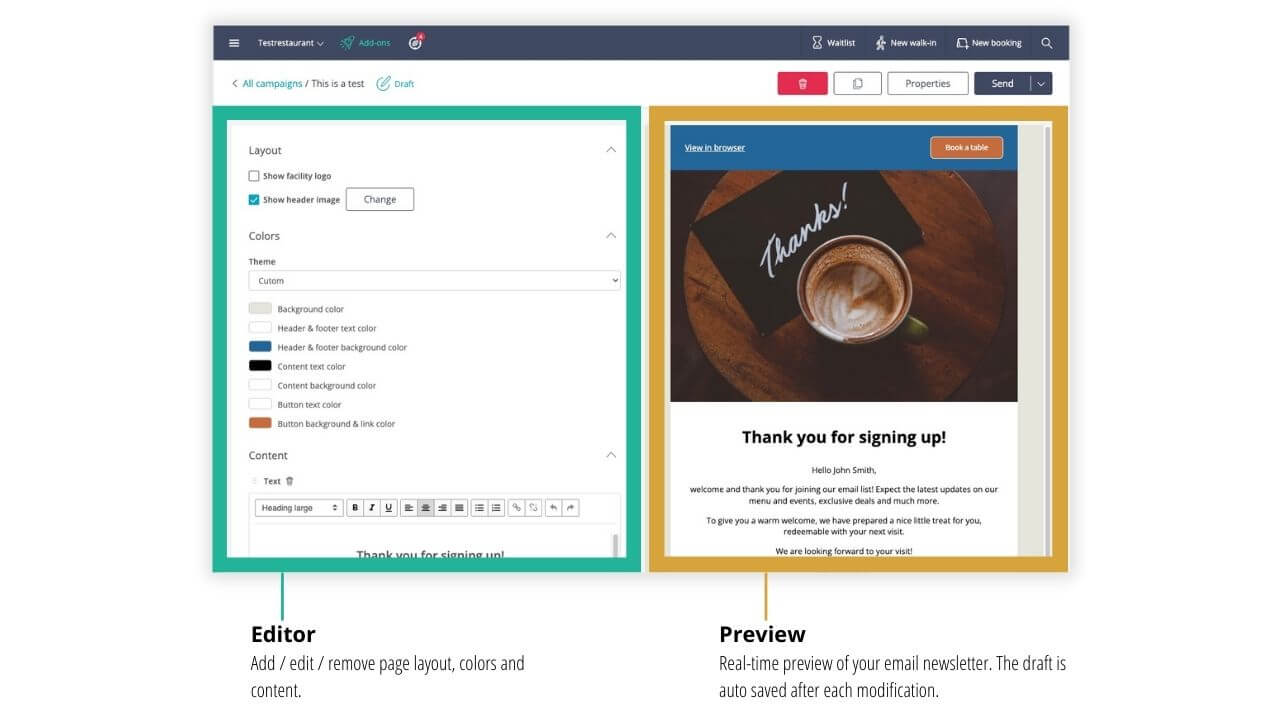
4. Now that we’ve set up the basic settings and the design, we’ll move on to the actual content of your email newsletter.
You’ll notice that we’ve already pre-selected the content that follows the layout based on your campaign goal:
- Header with logo, “book a table” button and “view in browser link”.
- Lead image
- Headline with text
- Button (call-to-action element)
- Footer with opening hours, contact details and legal information

You can edit the existing elements, remove them using the ![]() trash icon and / or add quite simple sections using the “Add Text”, “Add Image” and “Add Button” buttons.
trash icon and / or add quite simple sections using the “Add Text”, “Add Image” and “Add Button” buttons.
Text
In the text element you are able to use the following shortcodes
[customer_name]
to personalize your email campaign. Instead of the shortcode, the guest’s name will appear in the sent email.
Button
In order to achieve your desired campaign goal (e.g. get more table bookings), a call-to-action is crucial. The button is such an element. You should always have one button, although for longer emails you could have several.
Image
Besides the large lead image below the header, you also have the option to add additional images (e.g. highlight of your menu).
To drag and drop single items, click on the ![]() icon and move the section to the appropriate position in your layout.
icon and move the section to the appropriate position in your layout.
Sending newsletters – The (“test”) mailing
5. If you’re happy with your draft, be sure to test it before sending it out.
For this purpose, you can trigger a test e-mail to one or more e-mail addresses via resmio.
- To do this, click on the arrow icon at the top right, right next to the “Send” button, and then on “Test”.

Überprüfe in der Testnachricht vor allem, ob alle individuell gesetzten Links (z.B. in den Buttons) ordungsgemäß funktionieren.
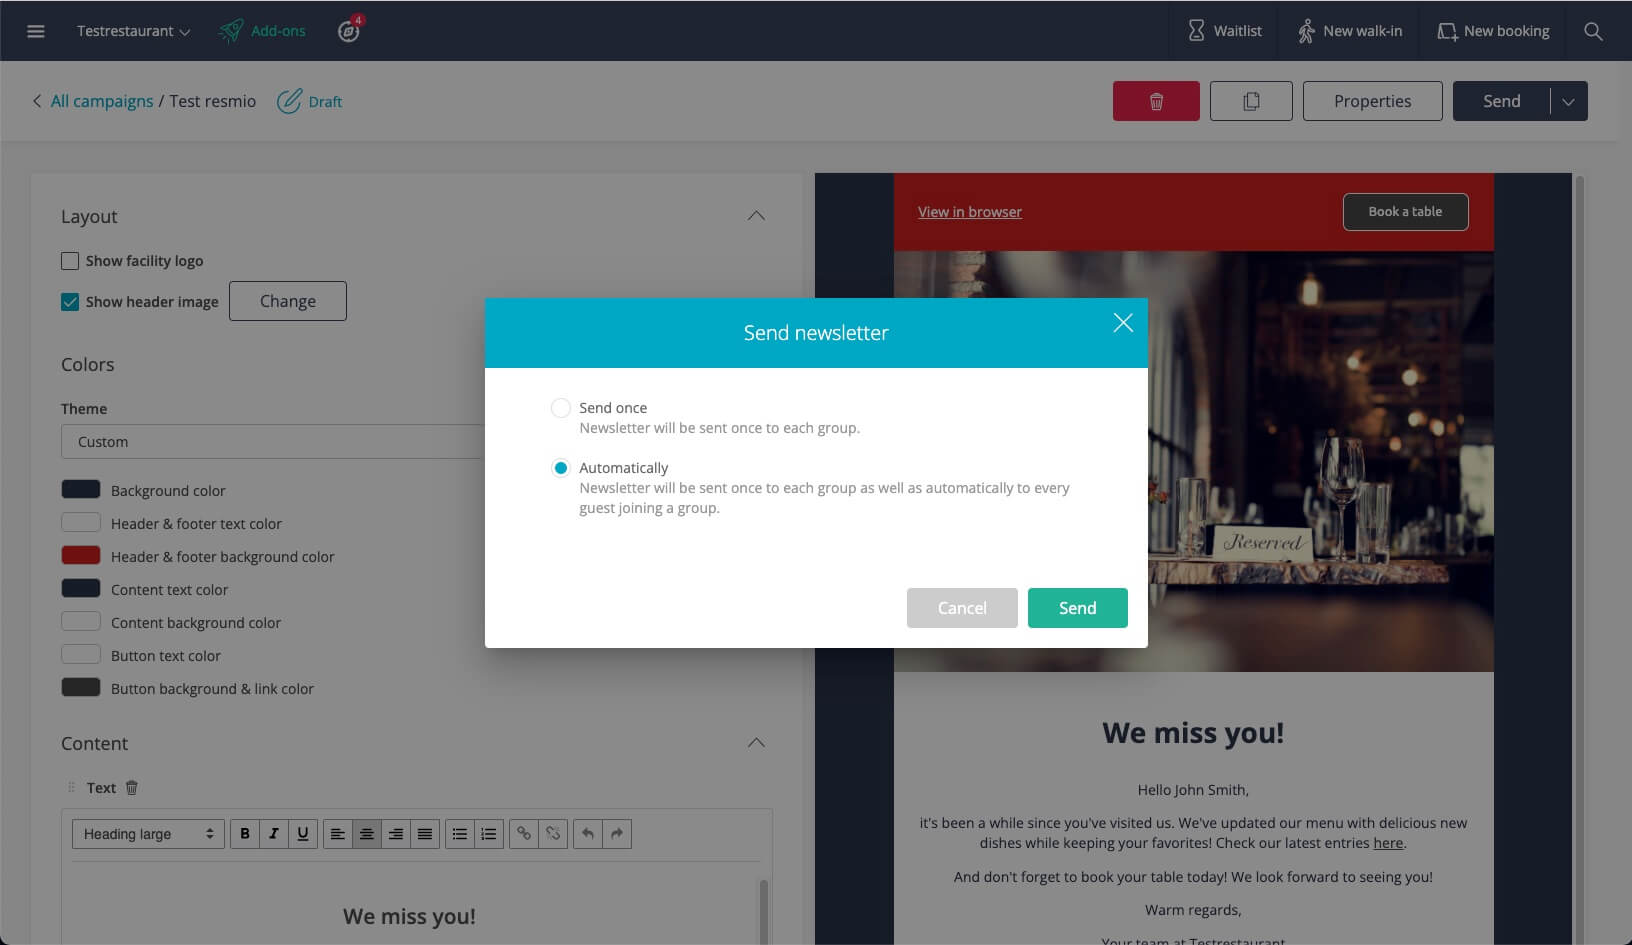
If everything is correct, switch back to resmio and click on “Send” in the upper right corner. Before the final mailing, you need to set the sending interval for the newsletter you have just created.
There are a couple of ways your guests can sign up for the newsletter.
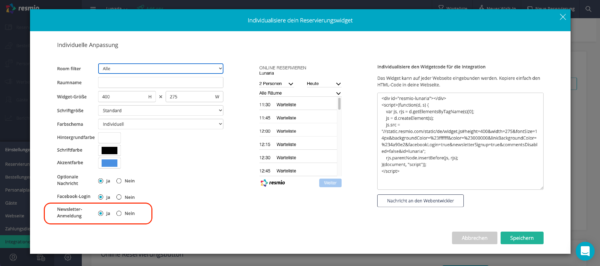
- Via booking widget of resmio (enabled by default)
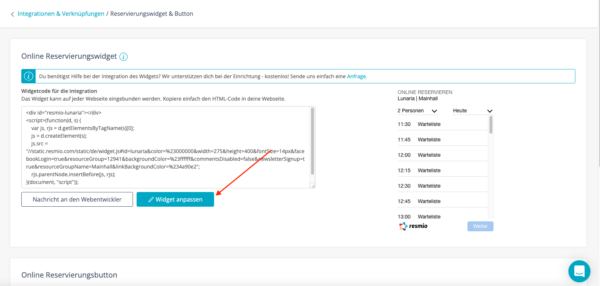
You can set in your booking widget whether your guests have the option to subscribe to the newsletter upon booking. You can set this option under ![]() “Settings” > “Integrations” > “Widgets & newsletter” >“Booking widget & button” > “Customize Widget”. When the checkbox is set, your guests will also be able to sign up for the newsletter after submitting their contact information.
“Settings” > “Integrations” > “Widgets & newsletter” >“Booking widget & button” > “Customize Widget”. When the checkbox is set, your guests will also be able to sign up for the newsletter after submitting their contact information.
- During the ordering process (checked by default)
Just like the booking widget, your guests can sign up for the newsletter while completing the order. To enable/disable the feature click on![]() “Settings” > “Integrations” > “Widgets & newsletter” > “Menu widget” > “Customize widget”.
“Settings” > “Integrations” > “Widgets & newsletter” > “Menu widget” > “Customize widget”.
- On your website
Under ![]() “Settings” > “Integrations” > “Widgets & newsletter“> “Newsletter Subscription Form” you will find a HTML code that you or your web designer can add to your website like the booking widget. Your guests can then subscribe to the newsletter at any time.
“Settings” > “Integrations” > “Widgets & newsletter“> “Newsletter Subscription Form” you will find a HTML code that you or your web designer can add to your website like the booking widget. Your guests can then subscribe to the newsletter at any time.

No, the newsletter will only be sent to the guests who agreed to get information from your restaurant. This is for data protection reasons.
Guests can sign up for your recipient list when making table reservations and placing orders via your booking widget or your digital menu.
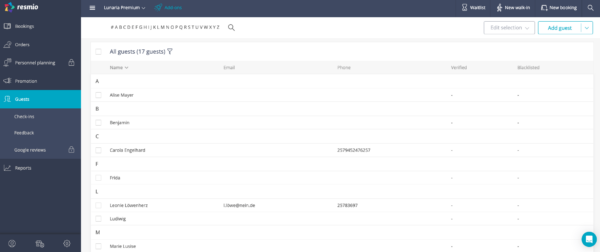
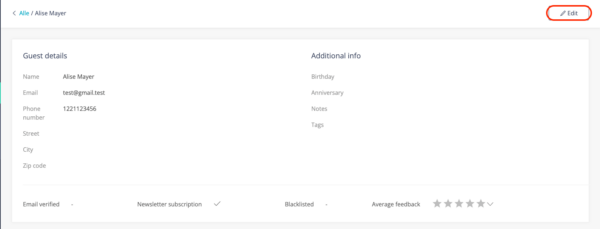
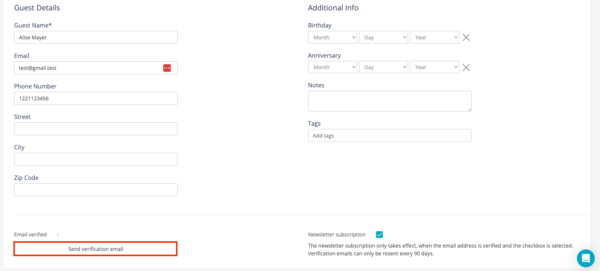
You can also obtain permission retrospectively from guests who are stored in your database at resmio.
- To do this, click on the category “Guest” in your account.
- Select the corresponding guest.
- Now click on the button on the right “Edit” and select here “Send verification email”.
Selling coupons and tickets is a fantastic way to generate additional revenue. (Discount) coupons are a popular form of incentivization and make it easier for you to get guests to perform a certain action (e.g. consider a restaurant visit that would otherwise have been missed).
- Tickets for events are designed for events and promotions that take place on a fixed date e.g. concerts, festivals, one-time discount / promotion on a dish such as a candlelight dinner.
- Coupons are used to promote special promotions and offers or as bulk coupons that extend over a longer period of time e.g. two dishes for the price of one valid from 01.04.2020 to 01.05.2020.
- Vouchers are value vouchers, which are intended to fulfill the purpose of a gift voucher. Here, the guest purchases the voucher for an amount of his choice. This is not bound to a fixed date or a certain period and can be redeemed at any time. Redemption conditions can be added individually in the description text.

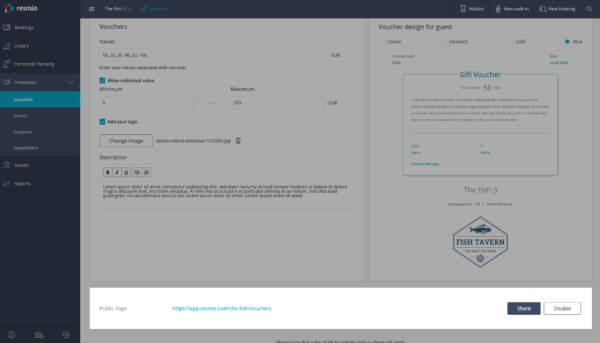
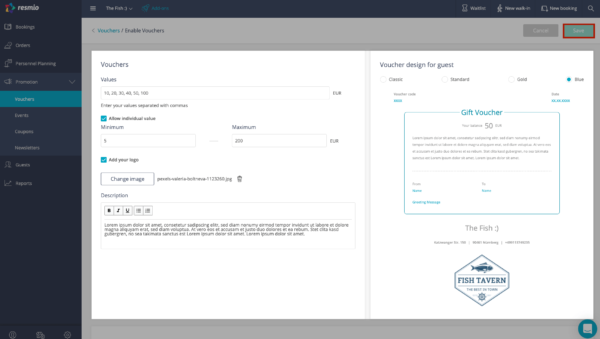
Vouchers
- Go to “Vouchers” and then click on “Edit vouchers”.
- Choose the different amounts/values for your vouchers (e.g. 10, 20, 50 and 100 €)
- Instead of fixed amounts you can allow your guests to select individual value by ticking the corresponding checkbox. Please note that you need to define a minimum and maximum amount.
- Please click on “upload image” if you want to add a logo or a picture.
- Finally you can choose between “Classic”, “Standard”, “Gold” and “Blue” layout.
- Please save your settings by clicking the corresponding button.
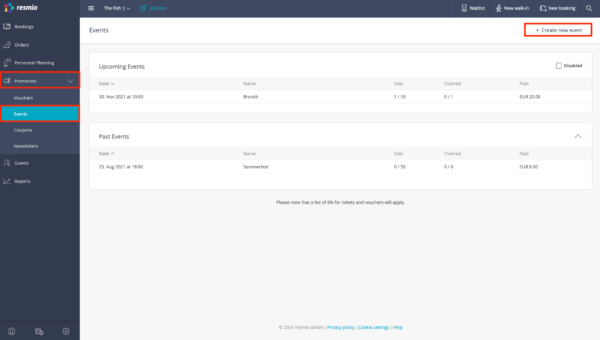
Events
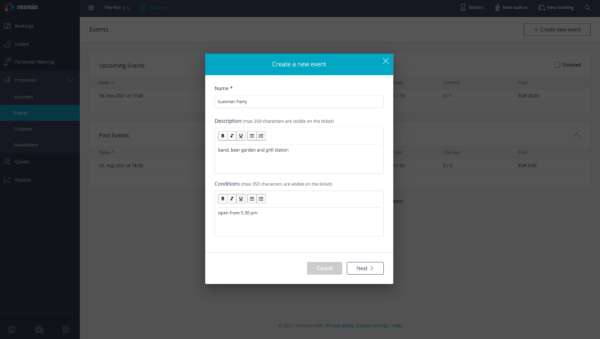
- Go to “Events” und click on “+ Create new event”.
- On the following window please choose a name for your event (e.g. Summer Party), add a description (e.g. band, beer garden and grill station) and define terms and conditions. Then please click on “next”.
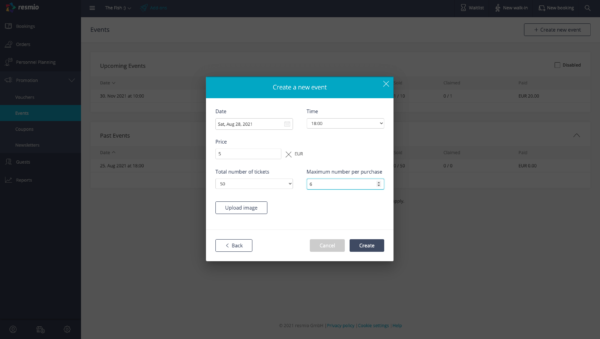
- In the next step you can fill in the basic information for your event: date (e.g. 28.08.2021), time (e.g. 18:00), price (e.g. 5 €), total number of tickets (e.g. 50) you want to sell and the maximum number of tickets that can be purchased at once (e.g.6). You can also upload a logo or a picture.
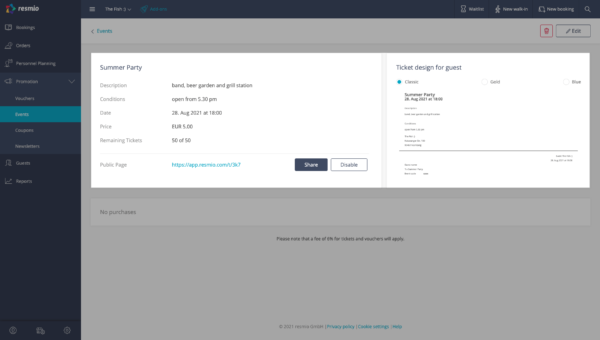
- Finally you can choose between “Classic”, “Gold” and “Blue” layout.
- Please save your settings by clicking the corresponding button.
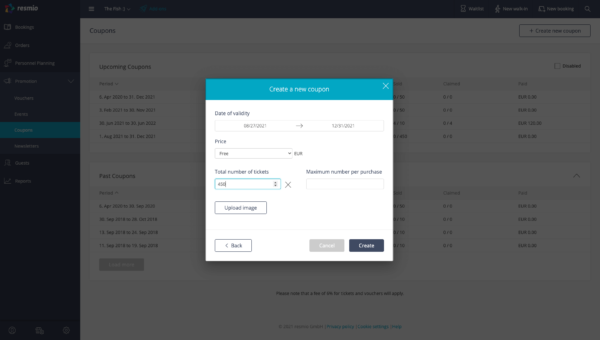
Coupons
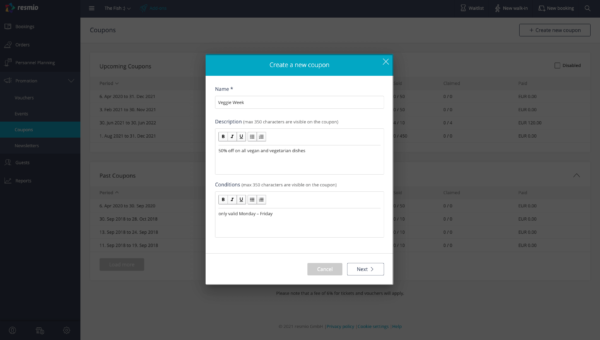
- Go to “Coupons” and click on “+ Create new coupon”.
- A window will open: choose a name for your coupon (e.g. Veggie Week), add a description (e.g. 50% off on all vegan and vegetarian dishes) and define terms and conditions (e. g. only valid Monday – Friday) and click on “next”.
- In the next step you can fill in the basic information for your coupon: date of validity (e.g. 27.08.2021 – 31.12.2021), price (e.g. free), total number of coupons (e.g. 450) you want to sell and the maximum number per purchase. You can also upload a logo or a picture.
- Finally you can choose between “Classic”, “Gold” and “Blue” layout.
- Please save your settings by clicking the corresponding button.

The payment is done online: the following methods of payment are accepted: direct debit, Paypal and credit card (Visa or Mastercard and American Express).
The purchase will be cancelled and the client receives an e-mail with the following information:
Your payment was not successful, thus your voucher/ticket is unfortunately not valid. You can try to purchase it again.
- After you created or activated a ticket for an event, a coupon or a voucher, a link will be generated within your web app. Please copy this link and place it on your website, e.g. with a button or within a separate menu item. Your guests will be redirected to a resmio subdomain where they are able to buy their voucher online.
- When you create your tickets, coupons and vouchers you also have the possibility to share them directly on your social media channels. Once the customer purchased it, she/he will receive an email with a PDF for download and print.
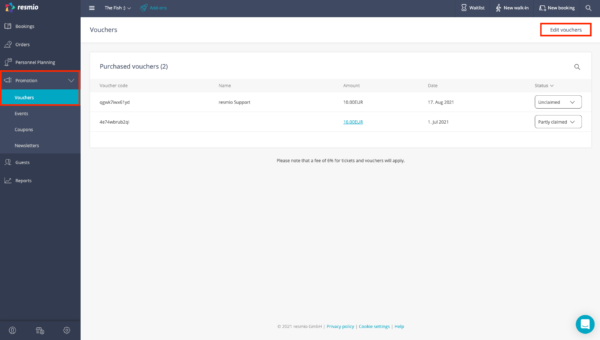
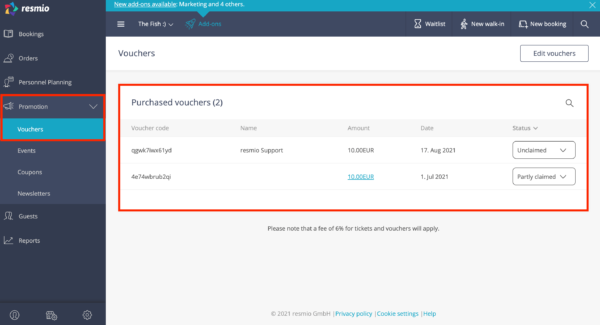
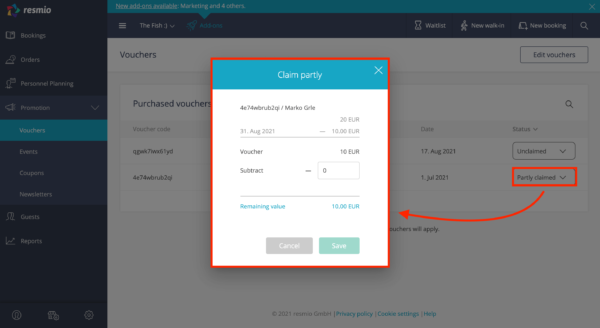
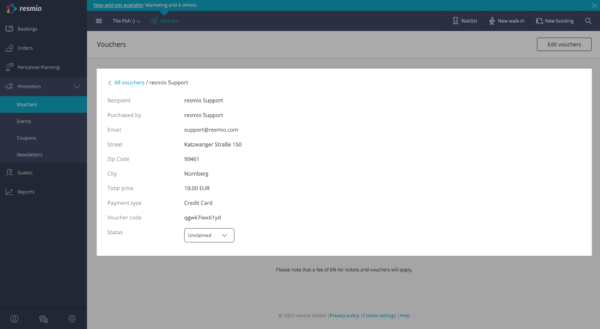
- Below “Promotions” > “Vouchers“ you will find the overview of your so far sold vouchers with information about the voucher code, name, amount, date and status. At the beginning the status is always “unclaimed”. You can then change it accordingly as soon as the guest has redeemed his voucher.
- You also have the option to mark the voucher as “partly claimed”. This option is useful if the guest does not redeem the entire voucher amount at once but in several stages. You can specifically enter how much of the total amount the guest has already redeemed, the system will then save the remaining value.
- You can also view more details by clicking on the purchased voucher entry.
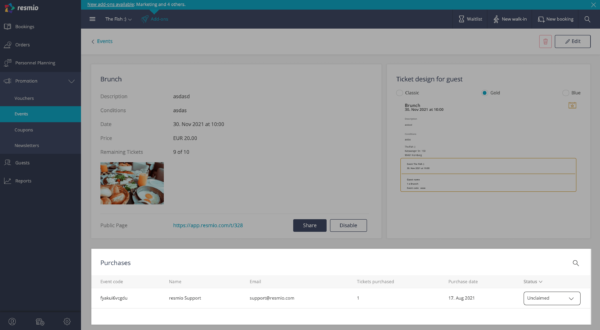
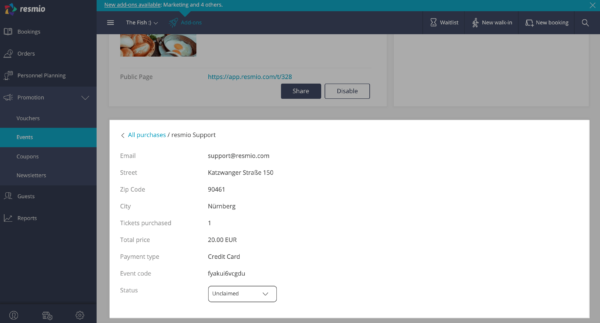
- You can see the tickets sold for events in the same way below “Promotions” > “Events“. Simply click on the corresponding event and you will find the tickets that have been sold below “Purchases”. By clicking on the entry you can also view the details. In the overview as well as in the detailed view, you have the possibility to change the status to “claimed”.
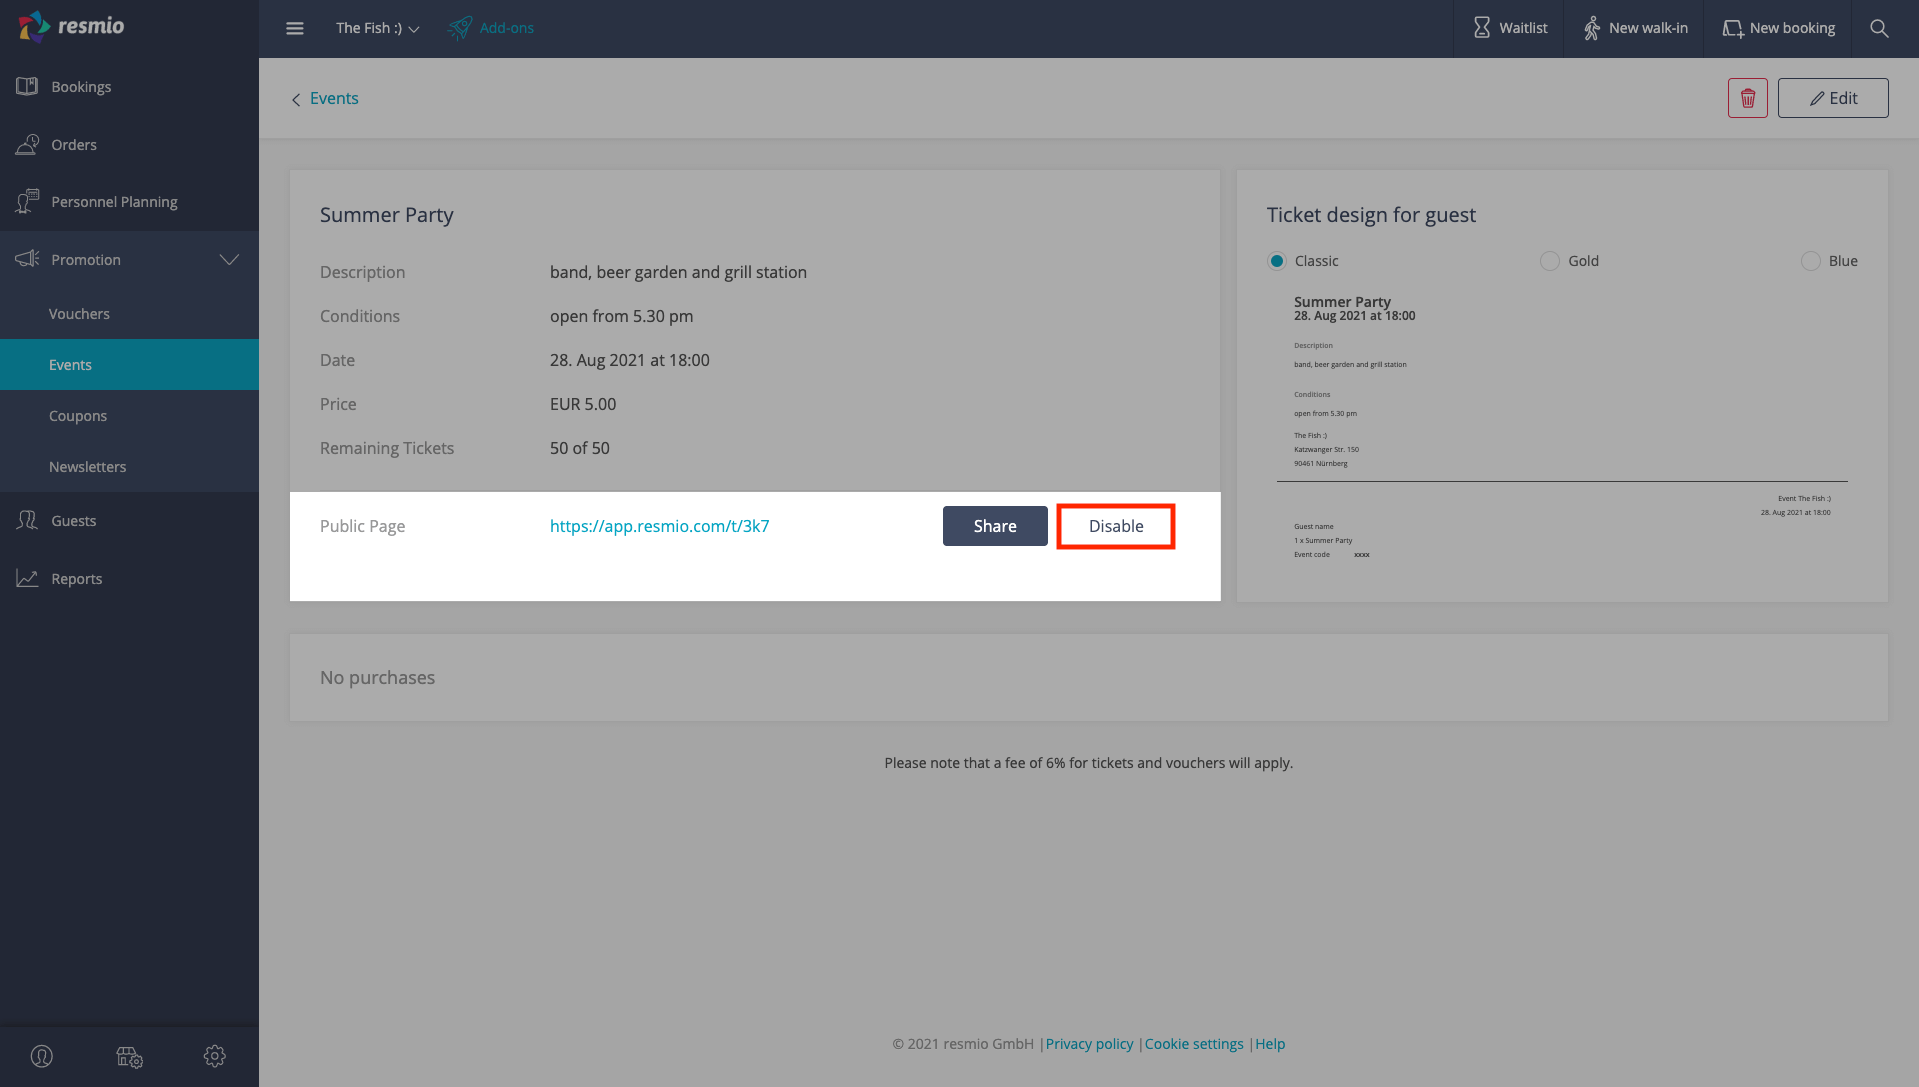
- Select the corresponding ticket then click on > “Edit” and afterwards on > “Disable”. The settings remain the same until you enable the link again.
- In addition you can also remove the link for ticket purchase from your website

