Lightspeed Integration (G-Series)
When integrated you are able to…
- import your digital menu from Lightspeed into resmio,
- import transactions from Lightspeed and match those to your bookings,
- push orders directly into your Lightspeed POS and print those directly!
Therefore, a new table and employee should be created in Lightspeed, under which resmio can book orders. Online orders which are paid by your guest are directly closed in Lightspeed.
resmio
- Login to the resmio WebApp with your credentials (https://app.resmio.com)
- Go to settings
- Click on Integration & connections
- Go to POS & partner integrations
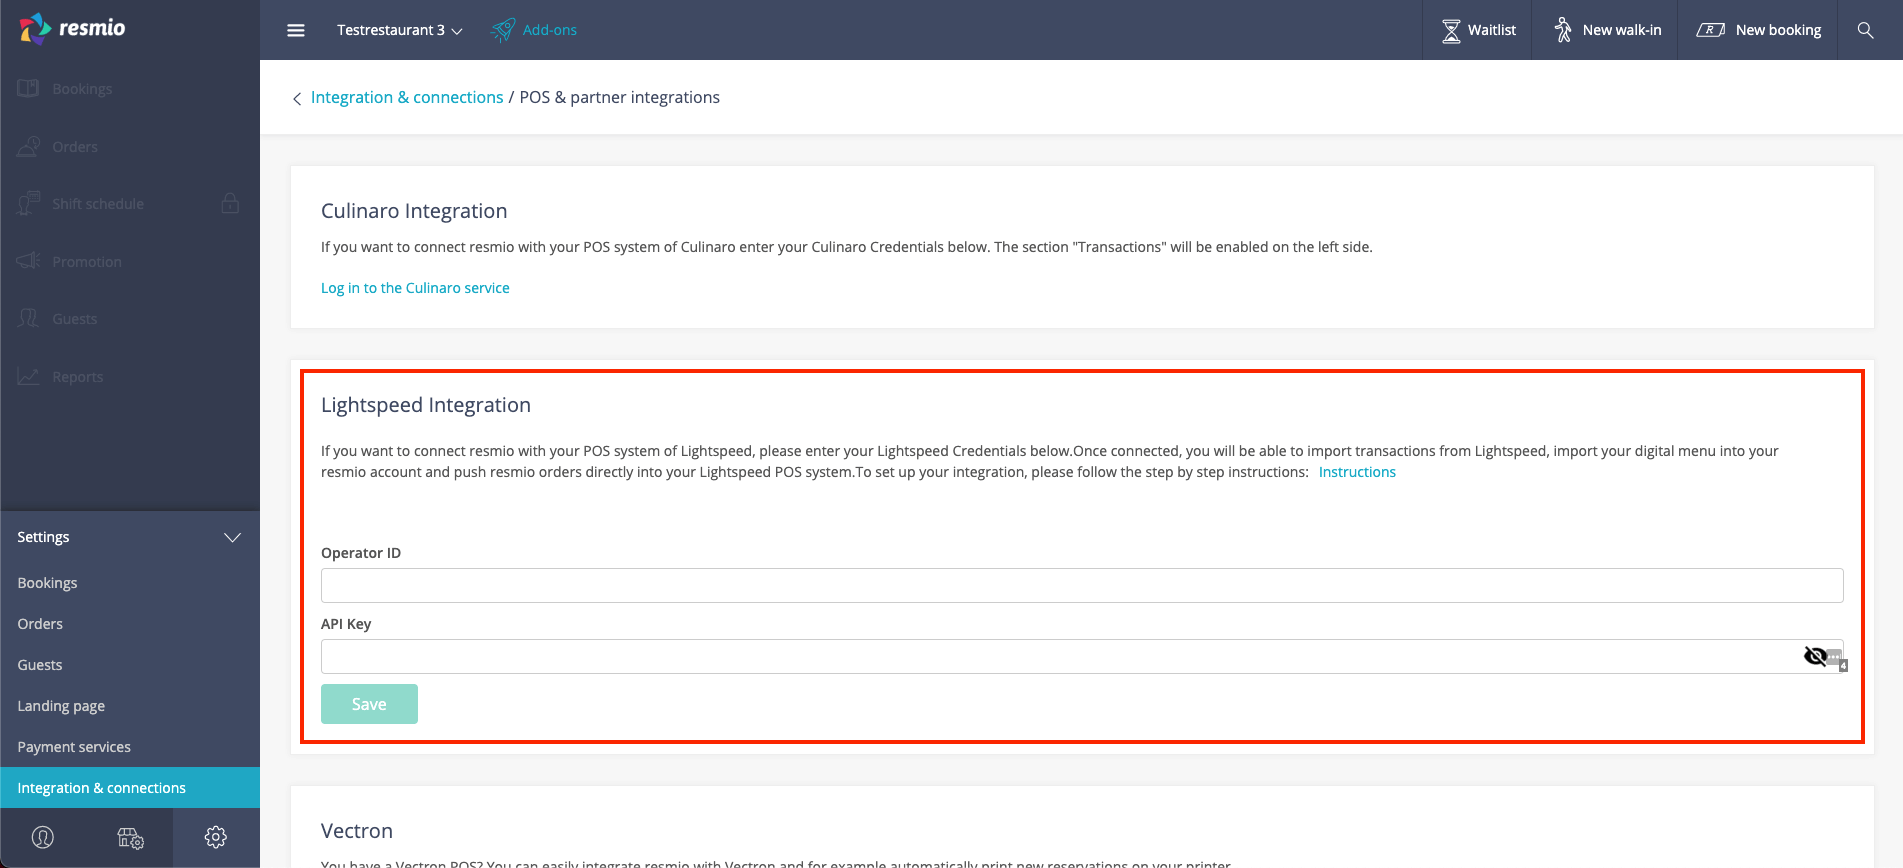
- See „Lightspeed Integration“
Lightspeed
- Go to the Lightspeed dashboard and login with your credentials (https://cloud.gastrofix.com)
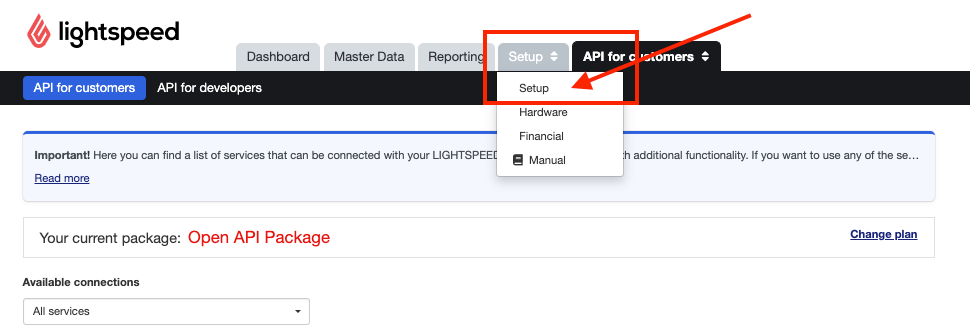
- Click on “Operator”
- Go to “API for customers”
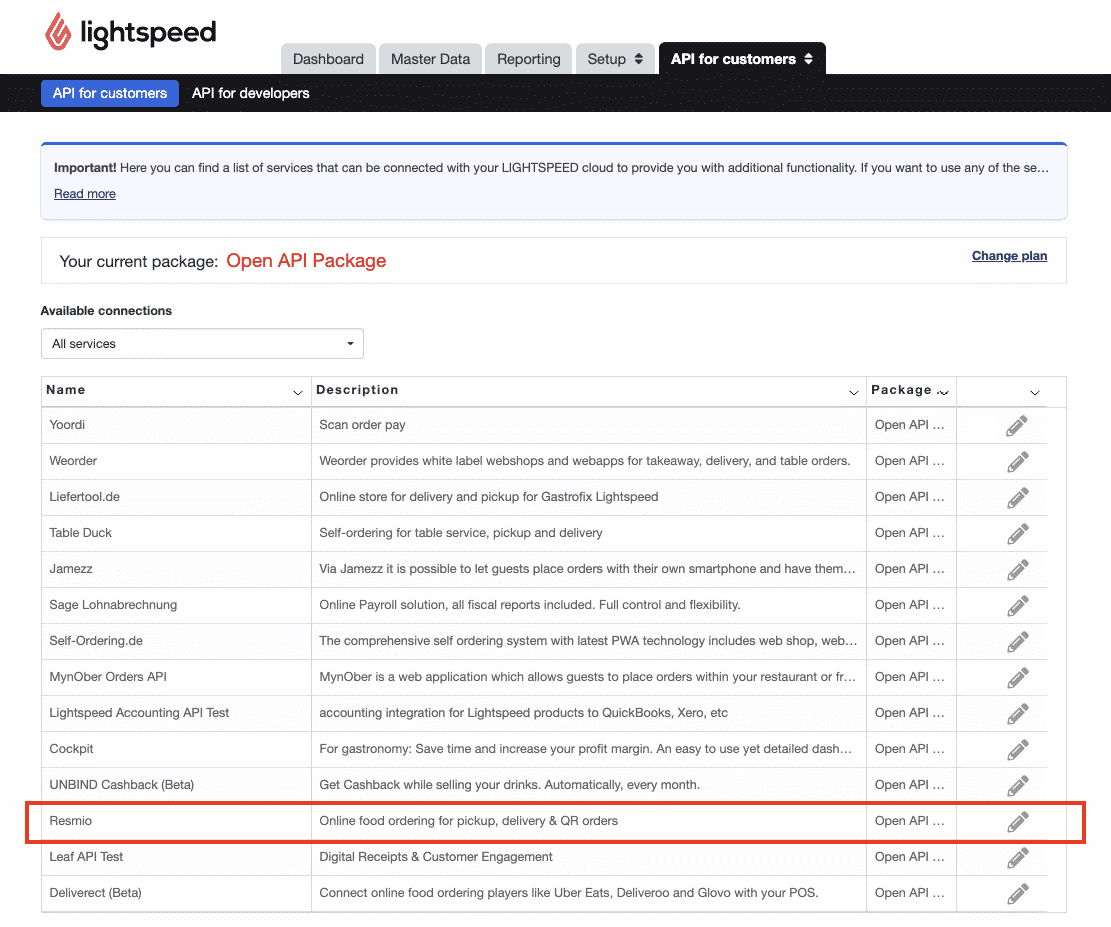
- Select service name “resmio” with the edit button on the right (Setup)
- Copy your “Operator ID” and paste it into resmio
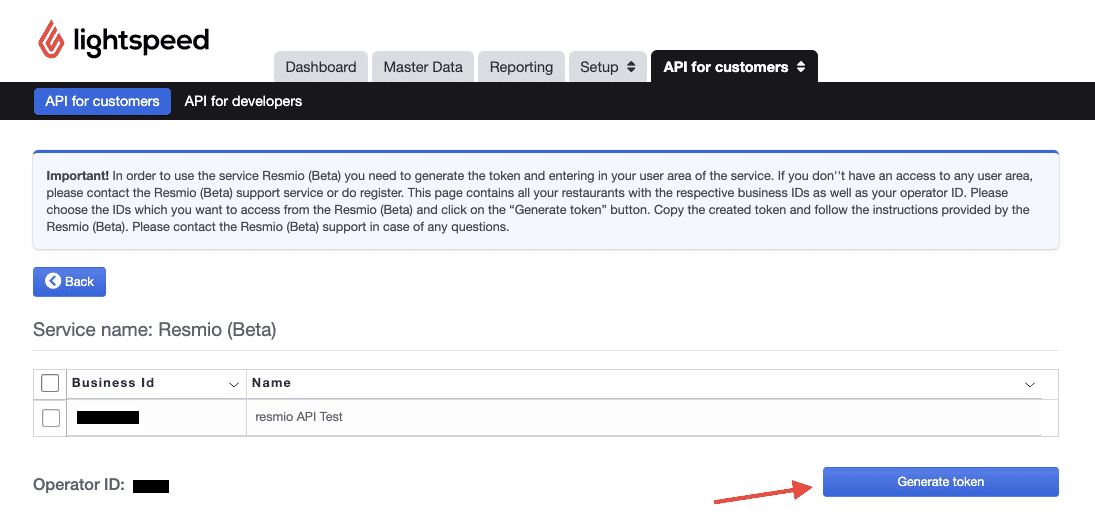
- Generate a token, save it somewhere so that you don’t loose it.
- Paste the token into your resmio account
- Click “Save”.
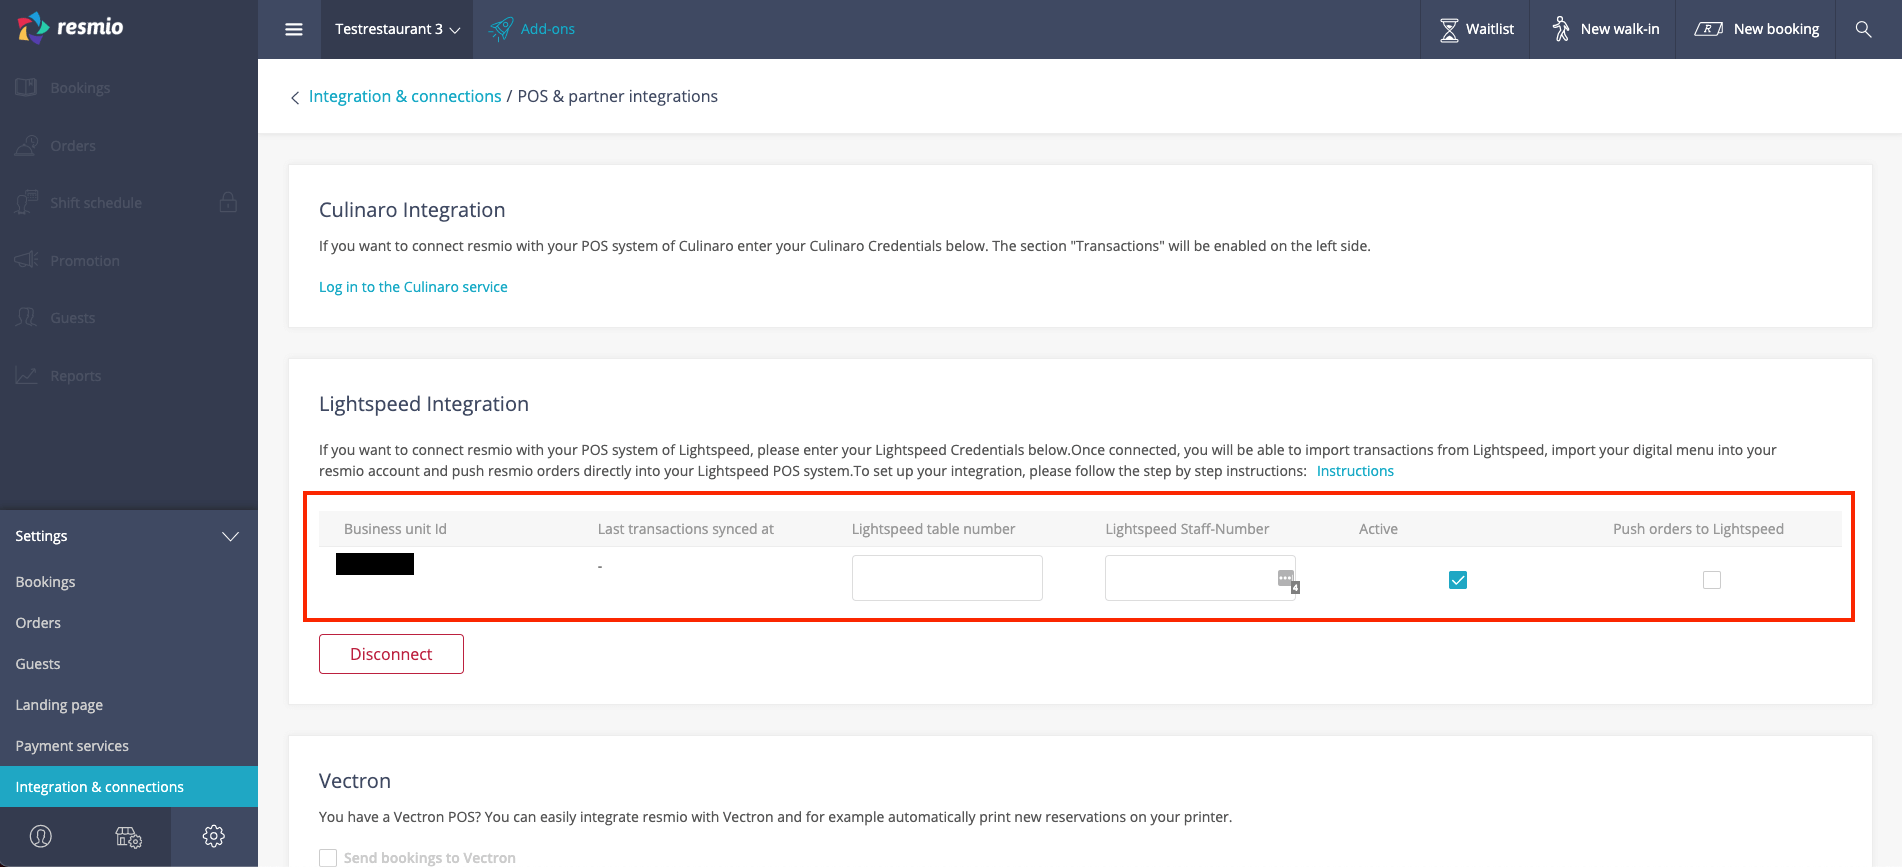
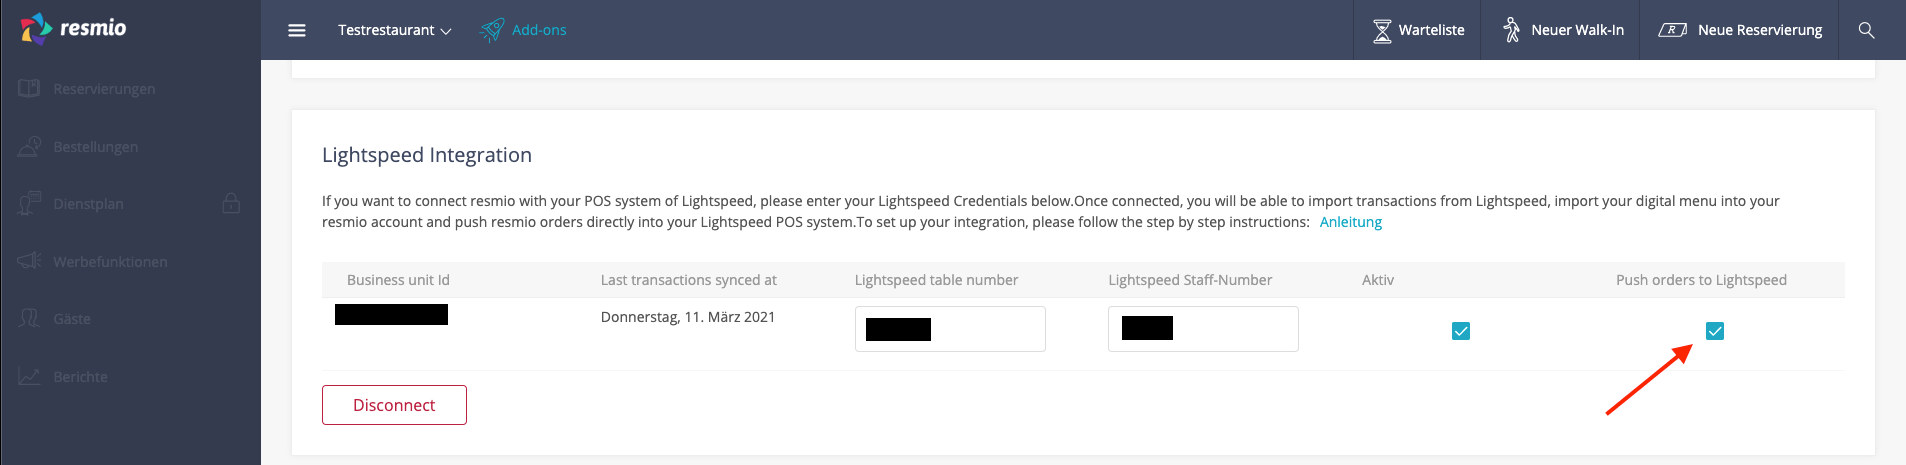
When the connection is made, it should look like this:
Your business unit id should be shown in the first column.
Lightspeed
- Go to your Lightspeed account again
- Click on “Setup” and “Setup” again
- Click on “Table”

- Create a new table which does not officially exist in your restaurant. You can assign it to an existing room.
- Copy the table number of the created table and paste it into your resmio account (“Lightspeed table number”).
In order to push resmio orders to Lightspeed, you need to import your digital menu from Lightspeed first.
Be careful: Your existing menu will be overwritten!
If you have ordering enabled, make sure to export your digital menu before!
Please note
- You are not allowed to make certain changes to the resmio menu in order to keep the connection with Lightspeed stable. Example: You are not allowed to create product variations, add product categories, changes prices, etc. Therefore we’ve deactivated certain functionality.
- Products with additional price levels in Lightspeed (e. g. happy hours) won’t be imported! Your menu import email will list in detail if there have been any import issues with products.
resmio
- Go to orders “Menu”
- Open the button “Preview” and click on Import menu from Lightspeed
- Add your email address
- Click on “Start”
- Your digital menu with products should be imported now.

Create your resmio ticket layout
Further information on how to connect a printer with Lightspeed can be found here: https://support.gastrofix.com/hc/de/articles/360011050157-Drucker-einrichten
- Switch back to your Lightspeed account again.
- Click on”Master Data”

- Click on “Employee”

- Create a new dummy employee for the connection (Example: First name: resmio, Last name: ordering, Staff-Number: 2000, User-Group: Employee)
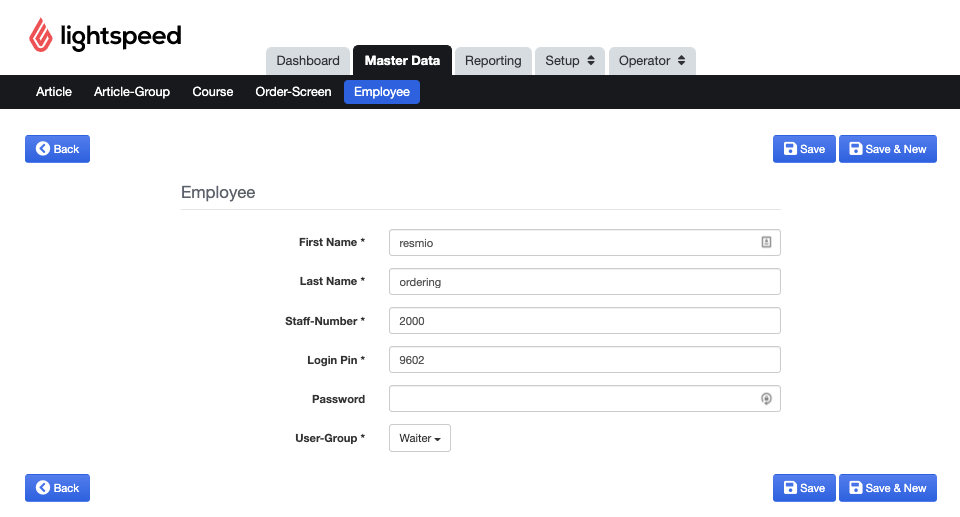
- Copy the Staff-Number of this employee and paste it into your resmio account.
- Your resmio connection should look like this now:

- “Active” should already be enabled.
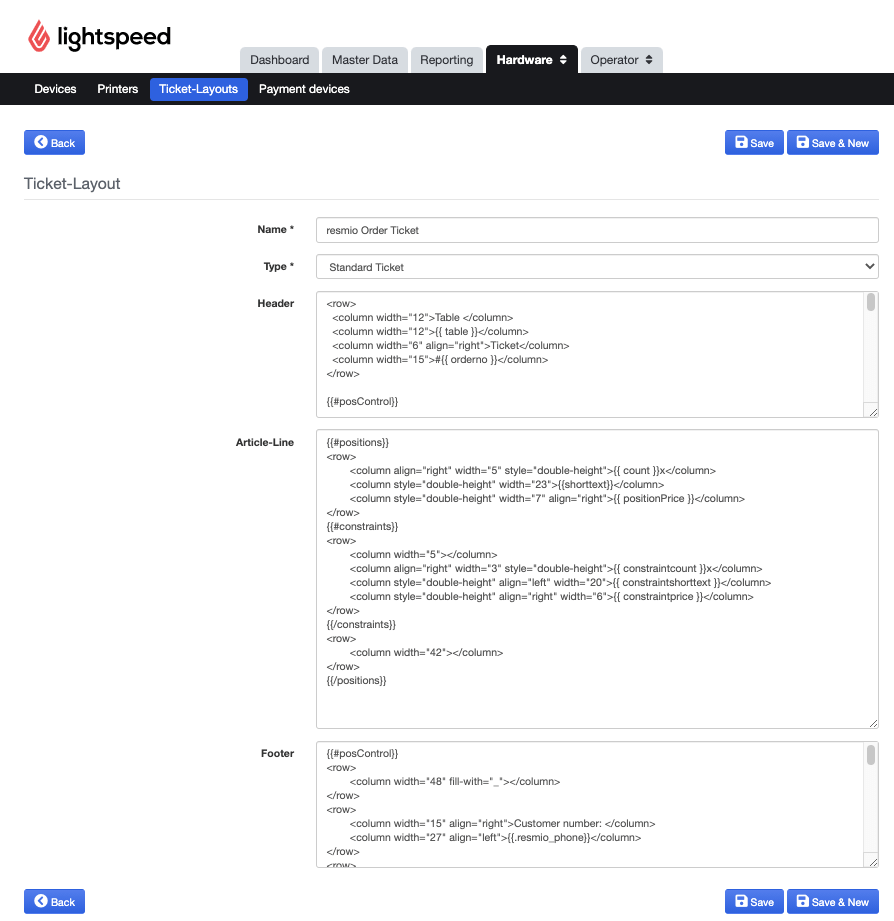
Lightspeed
- Go to “Setup”
- Click on “Hardware”
- Select “Ticket-Layouts”
- Click on “+Add new”
- Add the following information:
Name: resmio Order Ticket
Type: Standard Ticket
Header
<row>
<column width="12">Table </column>
<column width="12">{{ table }}</column>
<column width="6" align="right">Ticket</column>
<column width="15">#{{ orderno }}</column>
</row>

{{#posControl}}

<row>
<column width="14" style="double-height">Order Type: </column>
<column width="28" align="right" style="double-height">{{.resmio_delivery_type}}</column>
</row>

<row>
<column width="19">Order fulfilment: </column>
<column width="23" align="right">{{.resmio_fulfillment_time}}</column>
</row>
<row>
<column width="16">Payment: </column>
<column width="26" align="right">{{.resmio_payment_status}}</column>
</row>
<row>
<column width="11">Order for: </column>
<column width="31" align="right">{{.resmio_customer_name}}</column>
</row>

<row>
<column width="20">resmio Order Id: </column>
<column width="22" align="right">{{.resmio_order_id}}</column>
</row>

<row> <column fill-with="-"></column> </row>
<row>
<column width="48" align="left">Order notes: </column>
</row>

{{#posControl.resmio_customer_order_notes}}
<row>
<column width="48">{{.}} </column>
</row>
{{/posControl.resmio_customer_order_notes}}
<row> <column fill-with="-"></column> </row>

{{/posControl}}

<row>
<column width="12">{{ date }} /</column>
<column width="30">{{ time }}</column>
</row>
<row><column width="48">Server: {{ waitername }}</column></row>
<row>
<column width="48" fill-with="_"></column>
</row>
<row>
<column width="48" style="double-height">{{ coursegroup }}:</column>
</row>
<row><column width="48"></column></row>
Article-Line
{{#positions}}
<row>
<column align="right" width="5" style="double-height">{{ count }}x</column>
<column style="double-height" width="23">{{shorttext}}</column>
<column style="double-height" width="7" align="right">{{ positionPrice }}</column>
</row>
{{#constraints}}
<row>
<column width="5"></column>
<column align="right" width="3" style="double-height">{{ constraintcount }}x</column>
<column style="double-height" align="left" width="20">{{ constraintshorttext }}</column>
<column style="double-height" align="right" width="6">{{ constraintprice }}</column>
</row>
{{/constraints}}
<row>
<column width="42"></column>
</row>
{{/positions}}
Footer
{{#posControl}}
<row>
<column width="48" fill-with="_"></column>
</row>
<row>
<column width="15" align="right">Customer number: </column>
<column width="27" align="left">{{.resmio_phone}}</column>
</row>
<row>
<column width="48"></column>
</row>
<row>
<column width="48" align="center">Delivery Address:</column>
</row>
<row>
<column width="48" align="center">{{.resmio_customer_name}}</column>
</row>
<row>
<column width="48" align="center">{{.resmio_street}}</column>
</row>
<row>
<column width="22" align="right">{{.resmio_zip}}</column>
<column width="34" align="left">{{.resmio_city}}</column>
</row>
<row>
<column width="48">Address Comment: </column>
</row>
{{#posControl.resmio_address_comment}}
<row>
<column width="48" >{{.}}</column>
</row>
{{/posControl.resmio_address_comment}}
<row>
<column width="48" fill-with="_"></column>
</row>
{{/posControl}}
Example:
resmio – Enable „Push orders“
- Go back to the resmio settings. Click on “Integrations & Connections” & POS & Partnerintegrations
- Enable the checkbox “Push orders to Lightspeed”
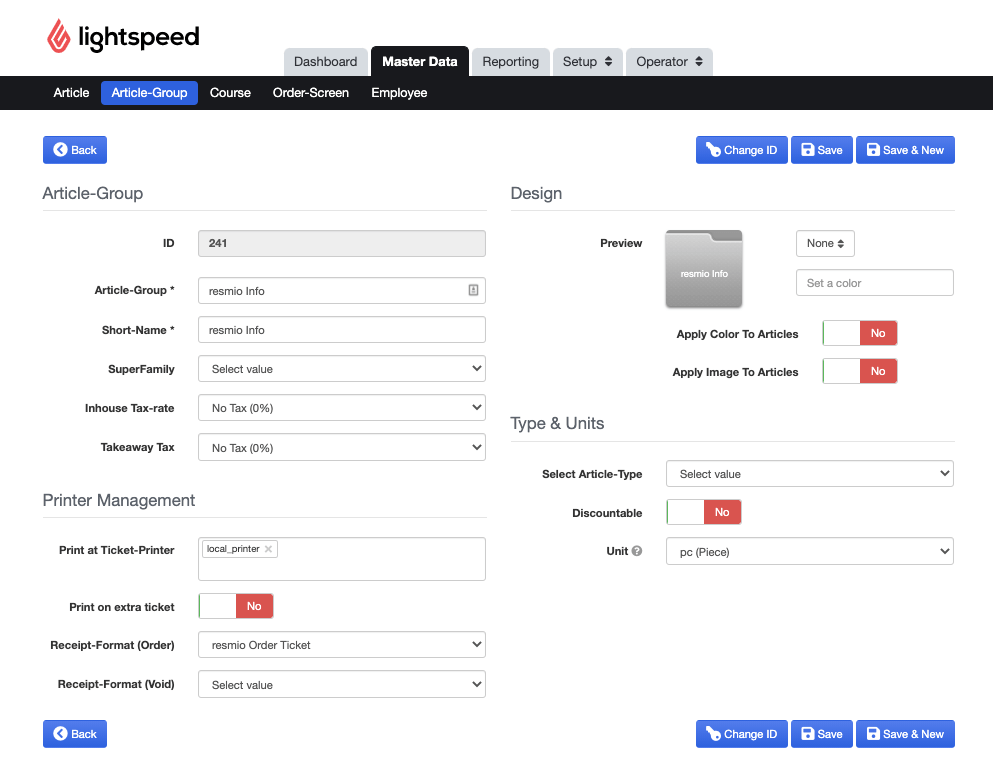
Lightspeed – Link ticket layout with artikel group
- Go to “Master Data”
- Click on “Article-Group”

- A article group “resmio” should exist already. Blick edit this one.
- Add the following data:
| Article-Group | resmio Info |
|---|---|
| Short-Name | resmio Info |
| Inhouse Tax-rate | No Tax (0%) |
| Takeaway Tax | No Tax (0%) |
| Receipt-Format (Order) | resmio Order Ticket |
Note: A new payment method “resmio” is displayed on the tablet in case a payment was made via resmio and Lightspeed declined it. You can close the order manually via the resmio entry then.
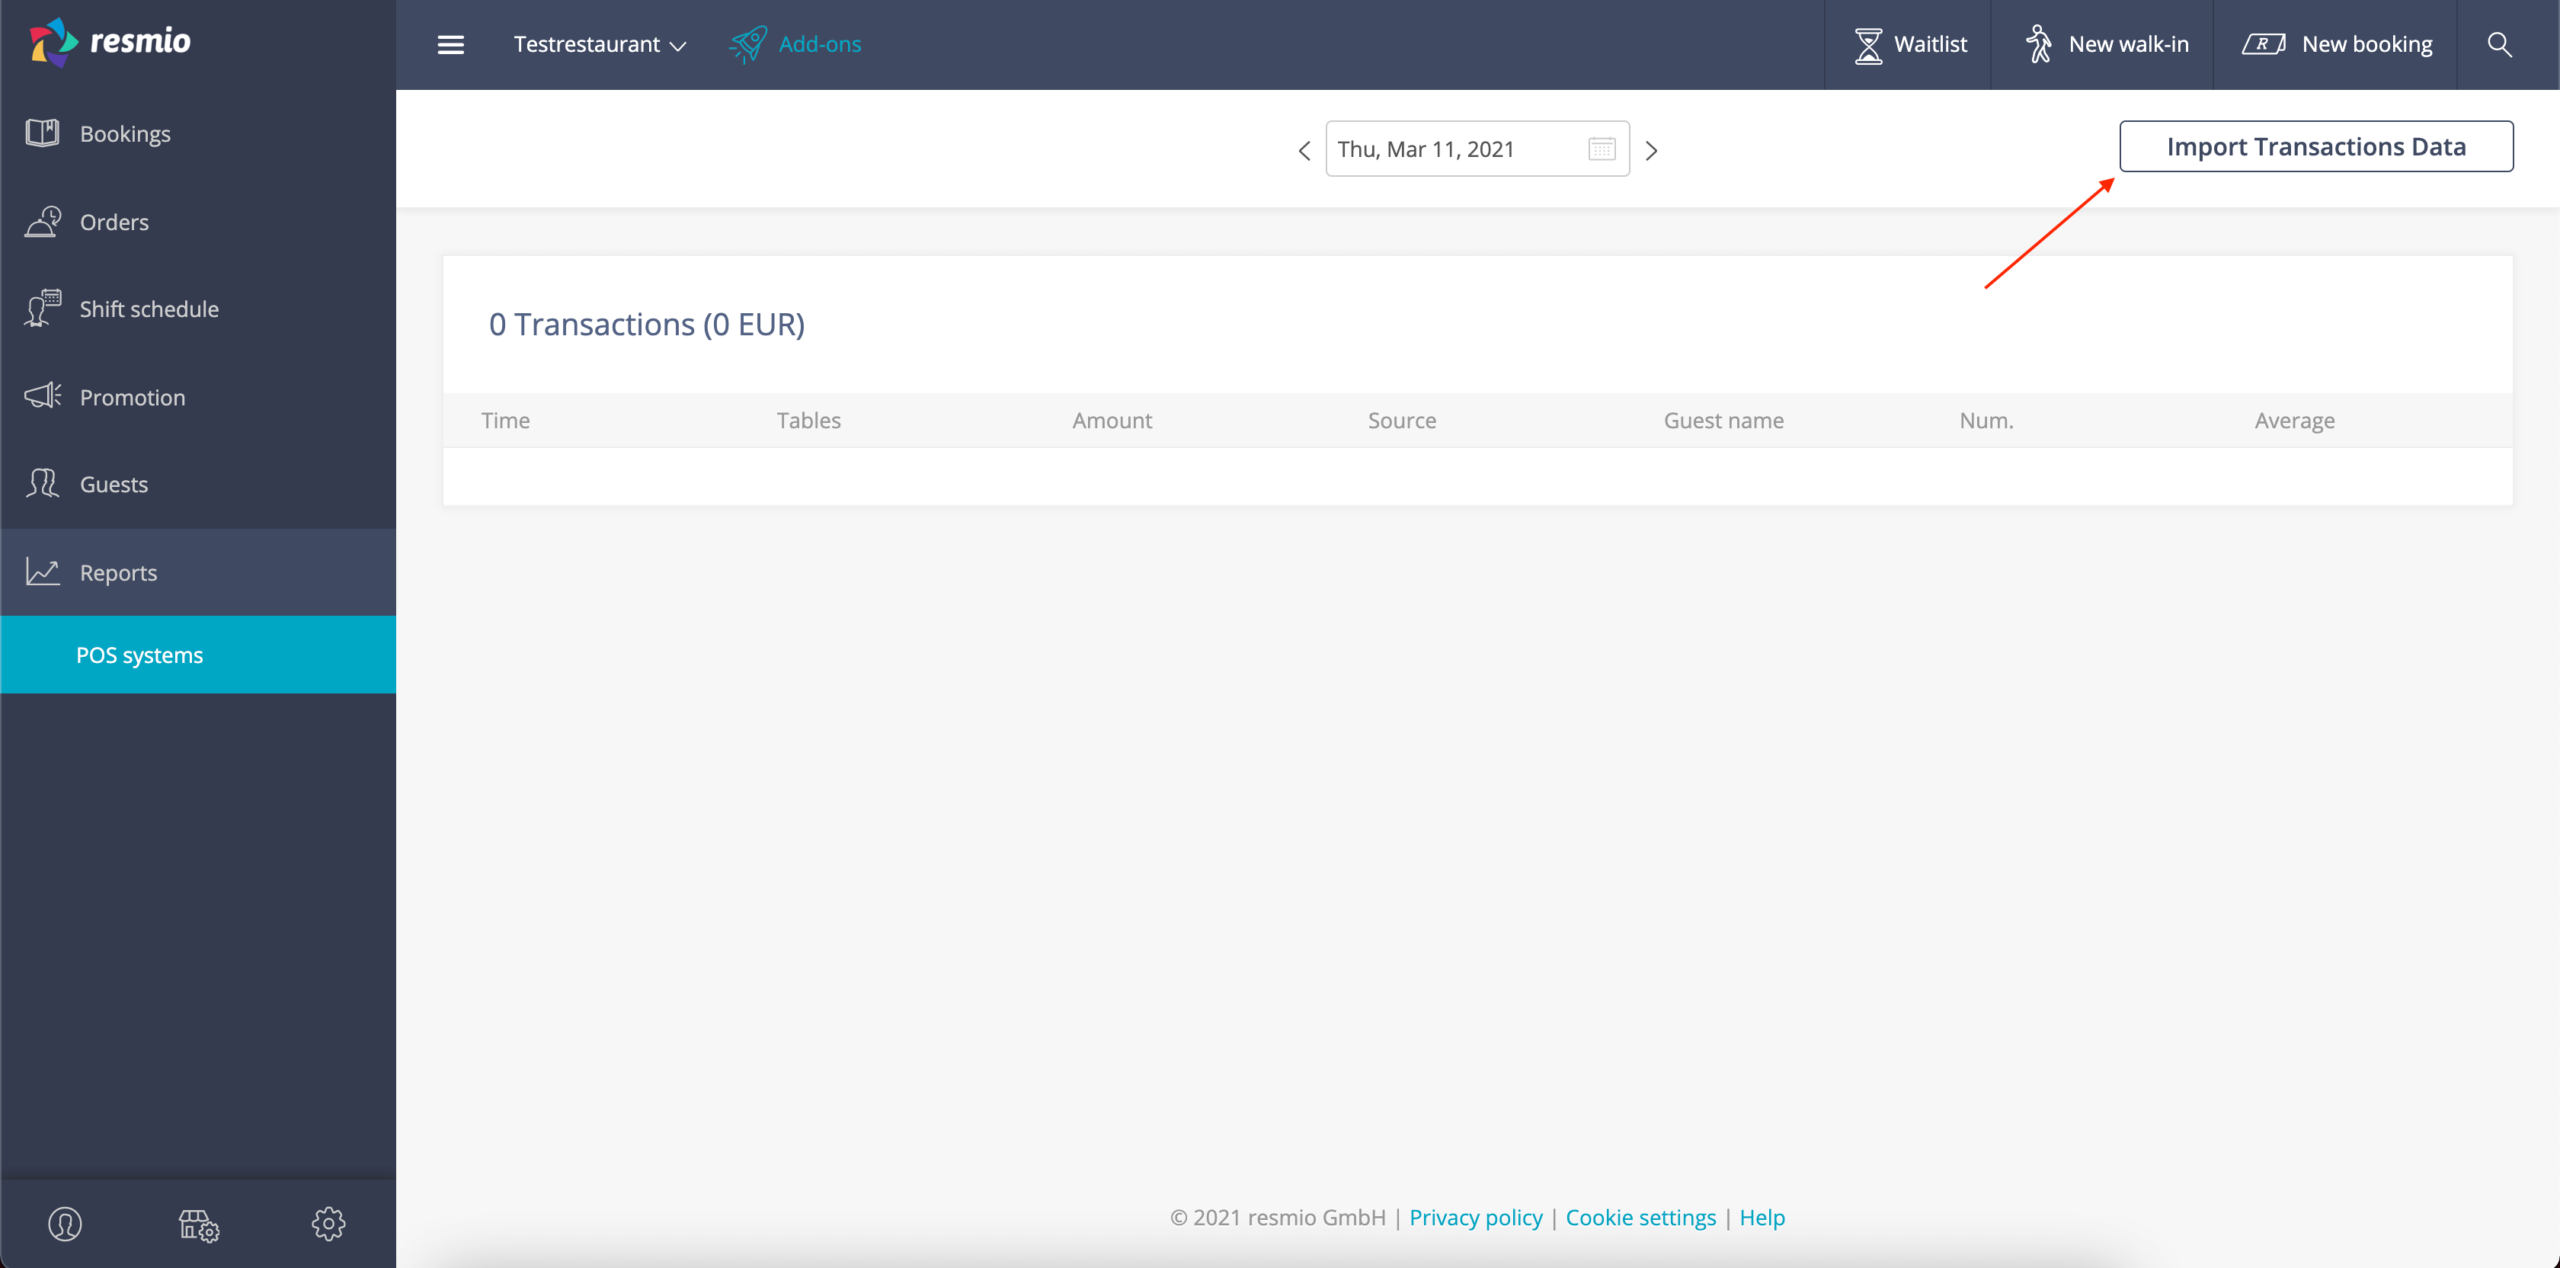
In order to import transaction data and assign it to your tables in resmio, a “table matching” has to be done. Therefore, the tables should have the same name in both systems. With the button “Import Transactions Data” you can import the transaction data from Lightspeed.
Yay, that’s it – your resmio orders will be pushed into the Lightspeed POS and directly be printed now!
Have fun!